How to Host a Static Website on AWS With S3, CloudFront, Route53 and Terraform
Deploy a website on AWS using S3, CloudFront and Route 53 as the main services and Terraform as the infrastructure as code deployment tool.
Hosting a website on AWS using Cloudfront, S3 and Route53 is a popular solution for Amazon web hosting. It typically costs $3 a month outside the generous free tier and $0.50 within the free tier. Terraform can automate the deployment of this finicky architecture, making it much easier to deploy, manage and automatically upload website content. We will use an open-source Terraform module to deploy a secure, scalable, and performant website on AWS based on Route 53, CloudFront, and S3.
Architecture
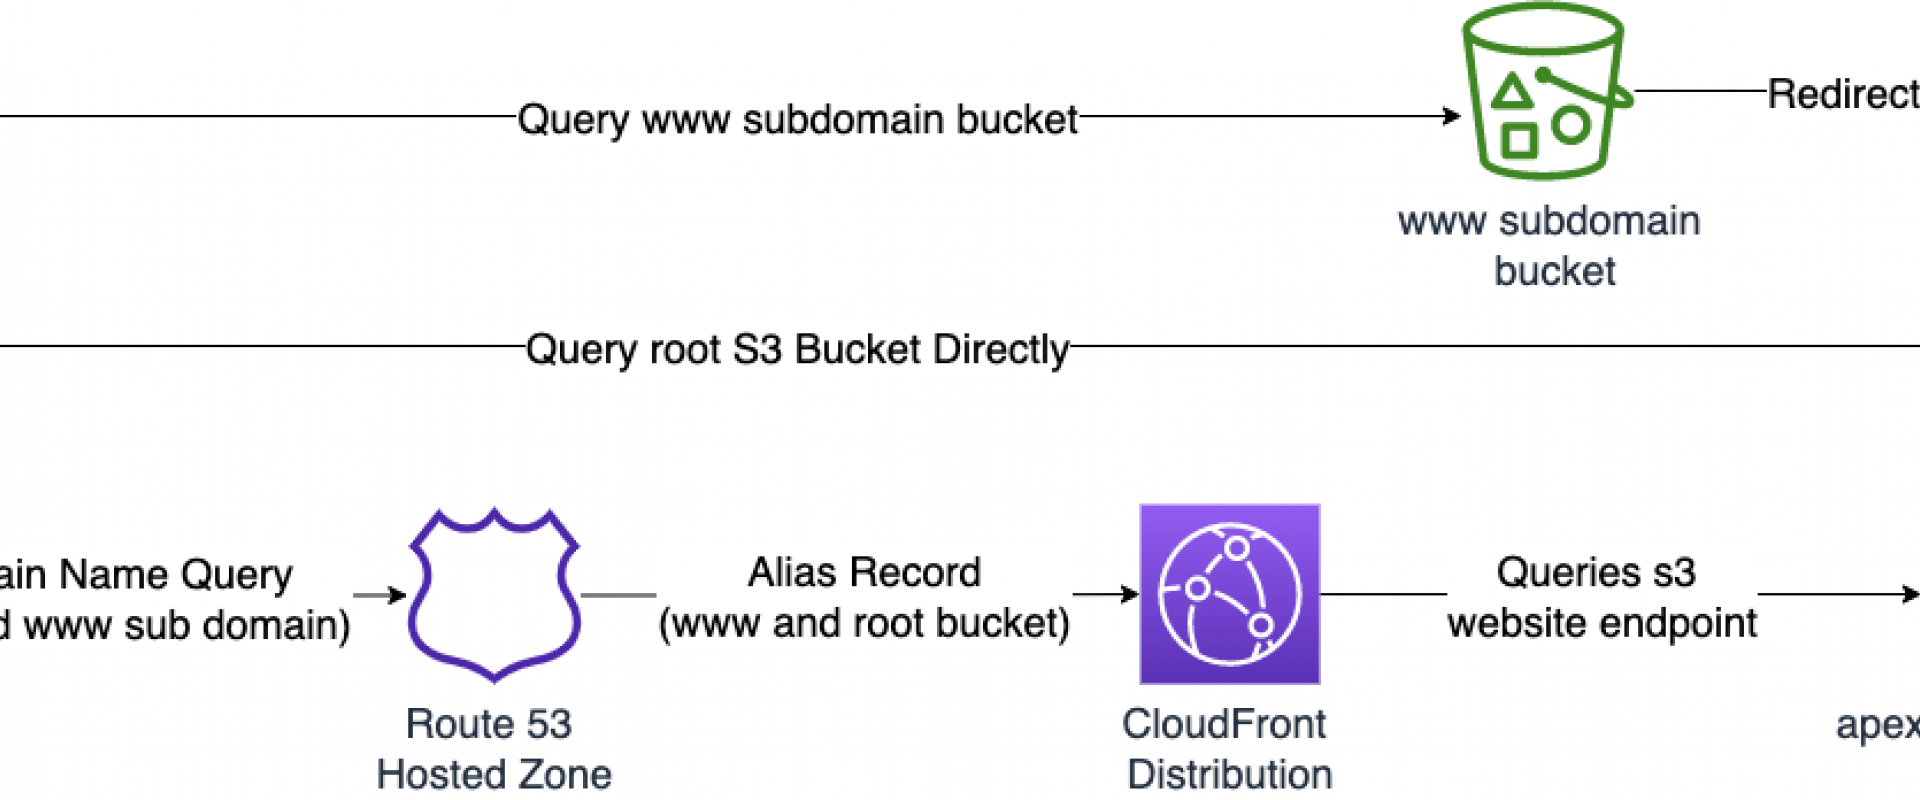
The vast majority of Terraform tutorials I see covering similar topics all focus on recreating an identical architecture from stack utilizing resources which is simply a waste of time and effort. Existing tutorials and modules generally follow the architecture shown below, which is based on the AWS tutorials. Configuring a static website on Amazon S3 and Speeding up your website with Amazon CloudFront. Since they are based on tutorials, the following flaws remain:
The architecture that most tutorials and guides follow
- Two buckets are created when only one is really required.
- The root bucket is publicly exposed. Public S3 buckets have been at the center of serve high-profile file data leaks. Due to this, it is increasingly becoming corporate policy to completely disallow public S3 buckets.
- The users still can access the bucket objects directly from the s3 website endpoint. This circumvents the CloudFront distribution and can nullify CloudFront features like geographic restrictions.
- A manual activity remains to upload the website content onto the S3 bucket.

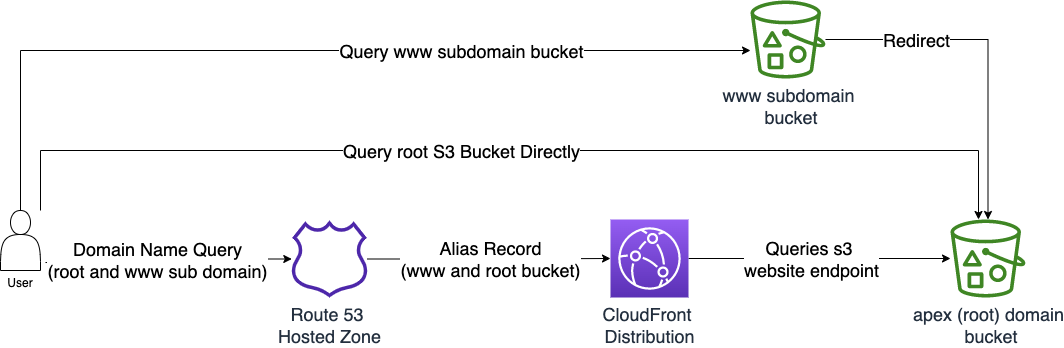
The improved architecture of what will be deployed in this guide
My module s3-cloudfront-static-website uses the architecture shown above, which represents a much simpler, secure, and straightforward architecture.
- This only uses one bucket for both the root and www. domains.
- The bucket is private and CloudFront accesses the website content utilizing an Origin Access Identity with IAM permissions to the S3 Bucket.
- Users can only access the website through CloudFront.
- Website content can be automatically uploaded during Terraform deployment (uses AWS CLI).
Pre-Requisites
- Domain name
- Route 53 Hosted Zone, which is the DNS Provider for the domain
- AWS CLI locally installed with a configured named profile
- Terraform CLI locally installed
If you require assistance with the pre-requisites, review the following subsections.
Domain Name
To use a domain name, you must purchase the domain from a registrar like Google, Go, Daddy, 123-Reg, names.co.uk, or AWS Route 53. Using AWS Route 53 is easiest since AWS will automatically create a hosted zone for the domain, assign four name servers to the hosted zone, and then update the domain registration to use those name servers. However, it is normally the most expensive option for a domain. I browse for the best price for my desired main domain and find names.co.uk is a great site for free domains for testing or development. Beware of the higher prices after the first year. I also turn off auto-renewal — especially for free domains.
Route 53 Hosted Zone as DNS Service for the Domain
If you bought your domain through AWS Route 53, you can skip this section. If you bought the domain from another website, you need to create a route 53 hosted zone and make Route 53 the DNS service for your domain. Put simply, the Domain Name Service (DNS) is the phonebook of the internet, when a user inputs your domain name, DNS will return the correct IP address to access your site. Name servers are underlying servers that contain and return the information of which IP addresses correspond to which services on your domain. To make Route 53 the hosted zone for your domain, you must change the name servers from your registrar’s to your Route 53 hosted zone.
How to Create a Route 53 Hosted Zone
1. Sign in to the AWS Management Console and open the Route 53
console.
2. If you’re new to Route 53, choose to Get started under DNS management.
If you’re already using Route 53, choose Hosted zones in the navigation pane.
3. Choose Create hosted
zone.
4. In the Create Hosted
Zone pane, enter the name of the domain that you want to
route traffic to. You can also optionally enter a comment. The domain name for
this website is interweave.cloud — you do not need to include ‘www.' or
‘HTTPS://'.
5. For Type,
accept the default value of Public
Hosted Zone.
6. Choose Create.
Update the Name Servers for the Domain
1. Open the Route 53 console at https://console.aws.amazon.com/route53/
2. In the navigation pane, choose Hosted
zones.
3. On the Hosted zones page,
choose the radio button (not the name) for the hosted zone, then choose View details.
4. On the details page for the hosted zone, choose Hosted zone details.
5. Make note of the four servers listed for Name servers.
6. Use the method provided by the registrar for the domain to change the name
servers for the domain to use the four Route 53 name servers you got from step
5. NOTE: it can take up to 3 days for the change to become effective.
AWS CLI
To upload your files to the s3 bucket automatically, the AWS CLI tool is used. Therefore, it is required for the AWS CLI to be installed on your local machine — instructions can be found here. You also need to configure a local named profile using the `aws configure — profile NAME` command. Using named profiles is generally better than static credentials within Terraform.
Terraform Code
The terraform module is available on the Terraform Registry, with the source code available on GitHub with examples shown. We would like to deploy a static website with the files automatically synced and a custom domain name.
Providers.tf
}
In providers.tf, you will have two providers:
- Default provider for the region where your main infrastructure will be deployed.
- ‘useast1’ provider for CloudFront and the SSL certificates. These sit in the us-east-1 region because they are global services.
main.tf
module “s3-cloudfront-static-website_example” {source = “InterweaveCloud/s3-cloudfront-static-website/aws”version = “0.0.1”resource_uid = “DevOpsNavy”domain_name = “XXX”hosted_zone_id = “XXX”profile = “XXX”sync_directories = [{local_source_directory = “./website_content”s3_target_directory = “”}]providers = {aws.useast1 = aws.useast1}}
Following the normal terraform init, terraform plan and terraform apply workflow will deploy the infrastructure, and your site will be up and running! If you update your website content, you can rerun Terraform apply, and a change will be detected and the content re-synced.
What Next?
Automated Deployment Through GitHub Actions
We are currently developing an associated GitHubActions pipeline which will automate the Terraform deployment and the build of the source code.
Monitoring and Budgeting Alarms
We are looking into creating a monitoring dashboard and budgeting alarms.
General Quality of Life Updates
We are making general QoL updates, such as making the domain name optional initially in case this is not readily available at the start.
We Provide consulting, implementation, and management services on DevOps, DevSecOps, Cloud, Automated Ops, Microservices, Infrastructure, and Security
Services offered by us: https://www.zippyops.com/services
Our Products: https://www.zippyops.com/products
Our Solutions: https://www.zippyops.com/solutions
For Demo, videos check out YouTube Playlist: https://www.youtube.com/watch?v=4FYvPooN_Tg&list=PLCJ3JpanNyCfXlHahZhYgJH9-rV6ouPro
If this seems interesting, please email us at [email protected] for a call.
Relevant blogs:
AWS, Azure, and GCP: Find the Right Platform
Introduction to AWS Config: Simplified Cloud Auditing
AWS, Azure, and GCP: The Ultimate IAM Comparison
Kubernetes Requests and Limits Demystified
Recent Comments
No comments
Leave a Comment
We will be happy to hear what you think about this post