As shown in the picture below, the physical architecture we want
to achieve is composed of a Consul and Nomad cluster
of five nodes: three of them are Control Plane nodes configured for High
Availability (HA), while the remaining two are Data Plane nodes.
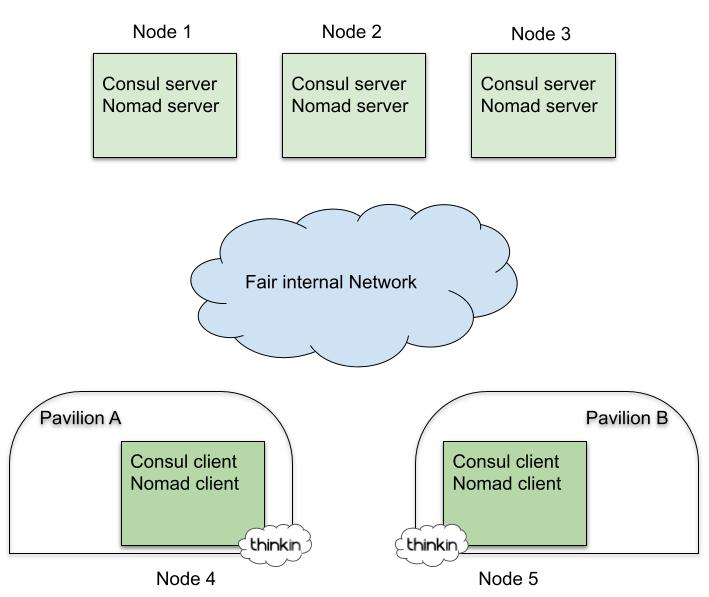
Given that we are in an edge environment, the final location of
cluster servers is key:
· Control plane nodes (servers) are distributed on the fair’s
pavilions or installed on a dedicated cabinet in the main building
· Data plane nodes (clients) are physically located on every
pavilion
By default, the server's role is to maintain the state of the
clusters while clients serve users which are physically located in the proximity of
them.
Basic Requirements and Nodes
Deployment
In the era of
Automation and Virtualization, the way to proceed is to create a "test and
destroy" virtualized environment in order to try our configurations before
going into production and deploy everything on the physical infrastructure.
The DevOps toolbox, composed of tools such as Ansible, Terraform, and Git, has been a strict
requirement in the process of evolving and refining the configuration and
procedure for setting up such a complicated environment. Ansible Vault is our choice to ensure that sensitive content related to specific
environments, such as passwords, keys, configuration variables, and
bootstrapping tokens or TLS certificates, are protected and encrypted rather
than visible in plain text from the Git repository where we store code for
building the infrastructure.
We start by creating five virtual machines. For our tests, we used the
following specs:
· OS: Ubuntu 22.04 LTS
· Disk: 20GB
· Memory: 2GB
· vCPU: 2
You can choose your preferred Public Cloud provider and deploy a
bunch of virtual machines with Terraform there, or alternatively, to speed up
the deployment process, you could create them on your laptop using VirtualBox
and Vagrant, but finally, you will end up with an Ansible inventory looking
similar to this one:
YAML
all:
children:
cluster_role_server:
hosts:
node-1:
node-2:
node-3:
cluster_role_client:
hosts:
node-4:
vars:
placement: "pavilion-1"
node-5:
vars:
placement: "pavilion-2"
Provision the Consul and
Nomad Cluster
In this bootstrapping phase, the Open Source Ansible
Community provides a library of extensively tested and secure public
playbooks. Thanks to the Ansible
Galaxy utility, we can pull the code of two roles for deploying,
respectively, Consul and Nomad.
We crafted the above roles into a proprietary playbook that, first of all,
configures and setup the server networking with a dummy network interface. That
interface is mapped to the reserved IP address 169.254.1.1 and
used to resolve *.consul domain
names in the cluster, let's call it the dummy0 interface.
We rely on Ansible to configure it on target nodes, and at the end, we will have the following file: /etc/systemd/network/dummy0.network on
every server:
Shell
[Match]
Name=dummy0
[Network]
Address=169.254.1.1/32
# We want these domains
Domains=~consul.
# To go to the consul DNS server we'll bind to this address
DNS=169.254.1.1
In addition, the playbook configures a few basic customizations
on servers like updating the OS, setting up node's users importing the related
SSH authorized_keys, installing the container runtime, and some debugging CLI
tools.
Finally, you should take care in configuring Consul and Nomad roles by setting
proper Ansible variables. Most of their names are self-explanatory, but for
sure you have to specify the consul_version and nomad_version (in
our case, respectively 1.12.2 and 1.2.8). The three
client nodes should use consul_node_role and nomad_node_role variables,
while the others should use the server. Another useful variable to set is nomad_cni_enable:
true because, otherwise, you will have to manually install CNI
on any Nomad node. More information about how to configure the roles for your
specific case is available on the related GitHub pages.
In this way, we are also able to support, with minimal effort,
the rapid provisioning and deployment of different environment inventories
varying from production bare-metal servers or cloudlets at the edge to
development and testing virtual machines in the cloud.
Provision the Vault Cluster
At this point, you have a Consul + Nomad cluster ready, and you
should be able to access the respective UI and launch some testing workload. If
everything is working fine, it comes time to provision the Vault cluster, which for simplicity
and exclusively for this testing phase, will be installed in HA on the very
same server nodes where Nomad and Consul control planes run.
If you are a Vault beginner, start here and here playing
a little bit with it, then you can move to the Ansible
Vault role to install this component, but before jumping into
the playbook magic, a few manual steps are needed in order to bootstrap the PKI
for our Vault cluster.
You can rely on an existing PKI configuration if your company provides it.
However, we will start from scratch, creating our Root Certification (CA)
Authority and Certificates.
First, create the root key (this is the CA private key and can
be used to sign certificate requests), then use the root key to create the root
certificate that needs to be distributed to all the clients that have to trust
us. You can tune the value for the -days flag
depending on your needs.
Shell
openssl genrsa -aes256 -out rootCA.key 4096
openssl req -x509 -new -key rootCA.key -sha256 -days 1024 -out rootCA.crt
You will have to customize the fields on prompts, for instance,
with something like: C=IT, O=CompanyName,
CN=company.com/[email protected] and
optionally check the root CA certificate with:
Shell
openssl x509 -in rootCA.crt -text
At this point, we need to create a certificate for every server,
appliance, or application that needs to expose a TLS-encrypted service via a
certificate that is trusted by our CA. In our case, we will assign this
certificate to the Vault cluster, and therefore we will use the same on every
Vault node.
Shell
openssl genrsa -out vault.key 4096
# create the Certificate Signing Request (csr)
openssl req -new -sha256 \
-key vault.key \
-subj "/C=IT/ST=TN/O=Tofane/CN=vault.service.consul" \
-out vault.csr
# finally verify the CSR's content
openssl req -in vault.csr -noout -text
To complete the procedure, create an extfile with all the
alternative names (can be URL or IP); in the example, the IP of every Vault
node is used, and then generate the certificate using the CSR and key along
with the CA root key.
Shell
echo "subjectAltName=DNS:*.vault.service.consul,IP:10.231.0.72,IP:10.231.0.71,IP:10.231.0.73" >> extfile.cnf
# optionally, if you want to use the csr also for authentication
echo extendedKeyUsage = serverAuth >> extfile.cnf
openssl x509 -req -in vault.csr -CA rootCA.crt -CAkey rootCA.key -CAcreateserial -out vault.crt -extfile extfile.cnf -days 365 -sha256
# verify the certificate content
openssl x509 -in vault.crt -text -noout
In addition to other minor files, you should now ensure to have
the following generated files in the current working folder:
rootCA.crt
vault.crt
vault.key
PKI files must be passed, through dedicated variables, to the
Ansible role together with some additional configurations suggested below, then
start the Vault provisioning by assigning the vault role
to your server nodes.
YAML
vault_backend: consul
vault_consul: 169.254.1.1:8500
vault_iface: "{{ ansible_default_ipv4.interface }}"
vault_listener_localhost_enable: true
vault_tls_disable: 0
vault_tls_src_files: "ANSIBLE_RELATIVE_PATH_TO_YOUR_CERT_FILES"
vault_tls_cert_file: "vault.crt"
vault_tls_key_file: "vault.key"
vault_tls_ca_file: "rootCA.crt"
One more step is needed if you used a self-signed CA: it must be copied and installed into every node, and you can easily accomplish this task with the following:
Shell
sudo cp rootCA.crt /usr/local/share/ca-certificates/
sudo update-ca-certificates
Finally, initialize your Vault cluster, unseal it, login with the token returned from the initialization phase, and check its status; if everything is working well, then move to the next pitfall: enabling and configuring TLS on your fresh new cluster.
Shell
vault operator init
vault operator unseal
vault login
vault status
Configure TLS
In this section, we will walk through the procedure to enable
secure cluster communications for both infrastructure components (eg: Consul
and Nomad agents) and application containers running in our cluster. So we will
secure Consul Agent communication with TLS encryption and services
authentication on top of mTLS verification. This can be done using certificates
generated from a Vault cluster; moreover, in our case, certificates will be
distributed via consul-template on servers and via auto
encryption method on clients.
Requirements
All the magic related to certificates renewal and rotation
between Consul and Nomad agents and Vault is in the hands of a required
component which is Consul
Template. Let us share the reference to the GitHub page and
shortly give you some pointers on how to install and configure it because, as
of today, we cannot find a complete guide on the web:
Download and unpack the binary in the home of every cluster node
Shell
ansible all -m shell -a 'sudo apt-get install unzip; CT_V=0.29.0; \
curl -O https://releases.hashicorp.com/consul-template/${CT_V}/consul-template_${CT_V}_linux_amd64.zip; \
unzip consul-template_${CT_V}_linux_amd64.zip; \
sudo mv consul-template /usr/local/bin/'
Create the unit file on every node for systemd
Shell
ansible all -m shell -a "sudo bash -c 'cat < /etc/systemd/system/consul-template.service
[Unit]
Description=consul-template
Documentation=https://github.com/hashicorp/consul-template
Wants=network-online.target
After=network-online.target
[Service]
EnvironmentFile=/etc/environment
ExecStart=/usr/local/bin/consul-template -config /etc/consul-template.d
ExecReload=/bin/kill -HUP $MAINPID
KillMode=process
KillSignal=SIGINT
Restart=on-failure
RestartSec=42s
[Install]
WantedBy=multi-user.target
EOF'"
Finally, promote it as a system service under systemd and create a folder for consul-template configuration file
Shell
ansible all -m shell -a "sudo systemctl daemon-reload"
ansible all -m shell -a \
'sudo mkdir -p /etc/consul-template.d; \
sudo chgrp consul /etc/consul-template.d'"
The main scaffold for Consul Template is now ready; all you need to do in the next steps is to create its configuration file and template files for every service requesting certificate rotation.
Configure Consul TLS and
Consul Connect
You can easily follow the below step-by-step tutorials, which
are very detailed and need just minor and quite obvious adjustments for your
specific case:
1.
Configure
Vault's PKI secrets engine
2.
Configure
Vault as Consul's CA, Install the Consul intermediate CA into every node
3.
Generate
a server certificate
Now, before continuing with the Consul configuration, we need to
enable and configure the Consul Connect feature, and for this, we need first to
enable Vault as a Consul Connect Certification Authority provider: certificates
used in the service mesh networks created by Consul Connect will be generated
and managed by Vault. Jump to the following tutorial and make sure to choose
the instructions under the "Self Managed" tab: Vault as
Consul Service Mesh Certification Authority provider.
At this point, you need to configure Consul by first
distributing bootstrap certificates on both clients and servers under the /opt/consul/agent-certs/ and
then by installing the Consul intermediate CA into every node using update-ca-certificates utility
in a similar way to how we did for Vault CA in the previous section. For these
steps, you can easily follow the Configure
Consul tutorial.
Now that you have distributed the bootstrap certificates on your nodes, you can
enable TLS first on servers and then on clients by placing the Consul
configuration respectively on servers and clients in the /etc/consul.d/ folder
and restart the Consul agent.
These are the configurations used in our cluster:
enable-tls-server.hcl
YAML
verify_incoming = true
verify_outgoing = true
verify_server_hostname = true
ca_file = "/opt/consul/agent-certs/ca.crt"
cert_file = "/opt/consul/agent-certs/agent.crt"
key_file = "/opt/consul/agent-certs/agent.key"
auto_encrypt {
allow_tls = true
}
enable-tls-client.hcl
YAML
verify_incoming = false
verify_outgoing = true
verify_server_hostname = true
ca_file = "/opt/consul/agent-certs/ca.crt"
auto_encrypt {
tls = true
ip_san = ["169.254.1.1"]
}
Restart the Consul agent on every node, and the API over TLS should be available at https://169.254.1.1:8501, but still, we need to configure certificate renewal by means of the Consul Template and also set up the mTLS authentication.
The Configure consul-template page will guide you in setting up the template files, and here you should take care of a small detail: given that in our cluster, Consul agents are listening on the special dummy0 interface, we need to create proper certificates, via the template, mechanism, by adding a custom ip_sans in every template files. For your convenience, here is a template example for the server agent certificate:
Plain Text
{{ with secret "pki_consul_int/issue/consul-tofane" "common_name=server.tofane.consul" "ttl=24h" "alt_names=localhost" "ip_sans=169.254.1.1"}}
{{ .Data.certificate }}
{{ end }}
Finally, you just need to create a consul-template configuration file, and here the only advice is to use address = "http://localhost:8200" for server nodes and address = "https://active.vault.service.consul:8200" for client nodes. In this way servers will have a more stable configuration because the communication with Vault will work also in the case Consul is not working, and the DNS resolution is not available.
To perform final checks that TLS certificate rotation is working as expected, you should wait for 24 hours for the TTL that you chose when creating the certificates in Vault. Testing the certificates have been overwritten on every node can be done with this quite simple Ansible command
Shell
ansible all -m shell -a 'sudo ls -la /opt/consul/agent-certs/'
In addition, you can use OpenSSL and check the certificates used on the RPC or API ports.
Shell
openssl s_client -connect $CONSUL_NODE_LAN_IP:8300 2>/dev/null | less
openssl s_client -connect 169.254.1.1:8501 2>/dev/null | less
And finally, try to connect on API using the proper certificates from a server node.
Shell
consul members -http-addr="https://169.254.1.1:8501" \
-ca-file="/opt/consul/agent-certs/ca.crt" \
-client-cert="/opt/consul/agent-certs/agent.crt" \
-client-key="/opt/consul/agent-certs/agent.key"
Configure Nomad TLS
The procedure to configure Nomad to use TLS is very straightforward because we need to proceed with the very same steps done for the Consul configuration. The official tutorial for your reference is Generate mTLS Certificates for Nomad using Vault, and we will describe below only a few tweaks that will save you some headaches.
First of all, as we did for Consul, in the consul templates, we need to add ip_sans, but in this case, we need also to add 127.0.0.1 because Nomad will be contacted also on that interface from services (eg: the Nomad Autoscaler). Below you have our example:
Plain Text
{{ with secret "pki_nomad_int/issue/nomad-cluster" "common_name=server.global.nomad" "ttl=24h" "alt_names=localhost" "ip_sans=127.0.0.1,169.254.1.1"}}
{{ .Data.certificate }}
{{ end }}
It is worth noticing that the consul template configuration for Nomad can just be appended to the existing configuration file because we are already using it for Consul.
Given that Consul Template will be used to retrieve both Consul and Nomad certificates from different Vault paths, it is better to create a new policy and also create a new token that will have both permissions.
Shell
vault token create -policy=nomad -policy=connect-ca
Of course, this token must be replaced in the Consul Template configuration file on every node.
As we did for Consul, for your convenience, we share the files that should be placed in /etc/nomad.d/ in order to enable Nomad TLS on server nodes. For client nodes, just remove the last line.
enable-tls-server.hcl
YAML
tls {
http = true
rpc = true
ca_file = "/opt/nomad/agent-certs/ca.crt"
cert_file = "/opt/nomad/agent-certs/agent.crt"
key_file = "/opt/nomad/agent-certs/agent.key"
verify_server_hostname = true
verify_https_client = true
rpc_upgrade_mode = true
}
As soon as you first reload the Nomad agents, remember to change the rpc_upgrade_mode option to false on server nodes so that your Nomad servers will only accept TLS connections, then restart the service again.
Shell
ansible core_cluster_role_server -m shell -a \ 'sudo sed -i "s/rpc_upgrade_mode = true/rpc_upgrade_mode = false/g" /etc/nomad.d/enable-tls-server.hcl'
ansible core_cluster_role_server -m shell -a \ 'sudo systemctl restart nomad'
Only a few more steps are needed to fully conclude Nomad configuration: i) Allow access to web UI, ii) Enable sidecars to use the TLS, and iii) Test if everything is working as expected.
In order to access Web-UI when TLS is enabled, set verify_https_client to false on servers and restart the nomad service. For more information, we found this post very useful.
Shell
ansible core_cluster_role_server -m shell -a \
'sudo sed -i "s/verify_https_client = true/verify_https_client = false/g" /etc/nomad.d/enable-tls-server.hcl; \
sudo systemctl restart nomad'
Now you should be able to connect to https://localhost:4646/ui, but remember that for production environments, you should configure your browser using the Vault root CA in order to provide a supported peer authentication.
The second step is about enabling sidecars to use the TLS-protected mesh provided by Consul connect: in order to initialize the channels in the TLS-protected mesh, Nomad needs to communicate with Consul and inject in the sidecar the right certificates in order to establish a protected connection.
To do that, update the Nomad configuration in /etc/nomad.d/base.hcl and allow Nomad to communicate via TLS with the Consul API, adding the lines below:
Shell
address = "169.254.1.1:8501"
ssl = true ca_file = "/opt/consul/agent-certs/ca.crt"
cert_file = ""
key_file = ""
Hopefully, you are at the final testing phase; indeed if you input the nomad status command, you will receive an error message because you need to properly configure the CLI.
Export the endpoint and certificates variables:
Shell
export NOMAD_ADDR=https://localhost:4646
export NOMAD_CACERT="/opt/nomad/agent-certs/ca.crt"
export NOMAD_CLIENT_CERT="/opt/nomad/cli-certs/cli.crt"
export NOMAD_CLIENT_KEY="/opt/nomad/cli-certs/cli.key"
And finally, check the status again via TLS, the nomad status command now should work seamlessly.
Configure Consul ACL
The following last step will enable the Consul Access Control List System on our cluster. The main reference for this task is the HashiCorp tutorial about Bootstrapping the ACL system but again we will give you some suggestions.
Enable the ACL
In the process of enabling the ACL system, we encountered just a small issue preventing us to bootstrap it if multiple nodes were active simultaneously. Small issues can be solved with easy solutions: why not temporarily shrink the cluster to one node before enabling the ACL? We are "lazy developers," so a rough but working bash loop and SSH helped us in this:
Shell
# server nodes
S_L="node-1 node-2 node-3"
# client nodes
C_L="node-4 node-5"
for i in ${S_L#* } $C_L;
do echo "R $i"
ssh -t $i consul leave
done
Now copy the following Consul HCL configuration file and then bootstrap the ACL into the single node Consul cluster
enable-acl.hcl
YAML
acl = {
enabled = true
#default_policy = "deny"
default_policy = "allow"
enable_token_persistence = true
}
Shell
FIRST=node-1
echo "R $FIRST"
scp enable-acl.hcl $FIRST:/var/tmp/enable-acl.hcl
ssh $FIRST sudo install --owner consul --group consul /var/tmp/enable-acl.hcl /etc/consul.d/enable-acl.hcl
ssh -t $FIRST sudo systemctl restart consul.service
Consul will reply with a successful message and will allow us to proceed with saving the Consul bootstrap token and re-joining other nodes to the original cluster by simply restarting its Consul agents.
Shell
# save consul bootstrap token
sudo consul acl bootstrap -format json 2>&1 | tee consul-acl-bootstrap.token CONSUL_HTTP_TOKEN=$(cat consul-acl-bootstrap.token | jq -r '.SecretID') export CONSUL_HTTP_TOKEN
# restore cluster nodes
for i in ${S_L#* } $C_L; do
echo "R $i"
scp enable-acl.hcl $i:/var/tmp/enable-acl.hcl
ssh $i sudo install --owner consul --group consul /var/tmp/enable-acl.hcl /etc/consul.d/enable-acl.hcl
ssh -t $i sudo systemctl restart consul.service
done
At this point, if only server nodes are available in the cluster (check using: consul members) and you see that Vault, Consul, and Nomad agents do not work anymore; that's quite normal, given that they do not have the proper ACL policies and relative tokens. Following the next steps, you will fix it.
Integrate ACL With Vault
The integration with Vault is quite easy; you just need to generate a token from a proper Consul policy and run again the Ansible Vault role to update all your nodes in one shot after settings an additional Ansible extra variable:
YAML
vault_consul_token: "YOUR_TOKEN_HERE"
Integrate ACL With Consul and Nomad Agents
Integration with other components is absolutely straightforward, and you can easily follow the official tutorials in this order:
1. Create rules, policy, and tokens for Consul nodes and agents
2. Create rules, policy, and tokens for UI
3. Create rules, policy, and tokens for DNS; here for simplicity, we just merged this policy with the one at point 1) and generated for every node starting from the template below:
JSON
node "NODE-NAME" {
policy = "write"
}
service_prefix "" {
policy = "read"
}
node_prefix "" {
policy = "read"
}
service_prefix "" {
policy = "read"
}
query_prefix "" {
policy = "read"
}
agent "NODE-NAME" {
policy = "write"
}
4. Create rules, policy, and token for Nomad
Fully Enable ACL Policy
Now force ACL to deny by default communications and finally restart consul on every nodes.
Shell
ansible all -m shell -a "\ sudo sed -i \
's/default_policy = \"allow\"/#default_policy = \"allow\"/g' /etc/consul.d/enable-acl.hcl"
ansible all -m shell -a "\ sudo sed -i \
's/#default_policy = \"deny\"/default_policy = \"deny\"/g' /etc/consul.d/enable-acl.hcl"
ansible all -m shell -a "sudo systemctl restart consul"
Conclusions
Well done! At this point, your "Secure Edge
Infrastructure" based on the HashiCorp products should be up and running,
and you can start installing your preferred workload. In our case, we installed
a layer of middleware on top of this deployment, enabling features like Load
Balancing, Monitoring, and Autoscaling. To achieve this last goal, we
respectively used Traefik, Prometheus, and Nomad autoscaler and, as you may
imagine, additional configurations are required in order to have these tools
working properly on top of a full TLS infrastructure but this will be the topic
of another article.
In conclusion, we want to share with you a possible evolution of
this work, which we think is quite natural: given that the infrastructure is
considered reasonably secure in terms of communication and authentication
across components, why not use it as a pillar to build a hybrid infrastructure
in which the control plane nodes live in the Cloud of your choice while the
data plane servers stay at the edge?
With such architecture, you would have the unquestioned advantage of being able
to control multiple edge sites with a single control plane sweeping away the
overhead and targeting economy of scale in your company. Of course the system
should be properly partitioned to support multi-tenancy but this will be for
sure our next exciting project.
We
Provide consulting, implementation, and management services on DevOps,
DevSecOps, Cloud, Automated Ops, Microservices, Infrastructure, and Security
Services
offered by us: https://www.zippyops.com/services
Our
Products: https://www.zippyops.com/products
Our
Solutions: https://www.zippyops.com/solutions
For
Demo, videos check out YouTube Playlist: https://www.youtube.com/watch?v=4FYvPooN_Tg&list=PLCJ3JpanNyCfXlHahZhYgJH9-rV6ouPro
If
this seems interesting, please email us at [email protected] for a call.
Relevant Blogs:
Recent Comments
No comments
Leave a Comment
We will be happy to hear what you think about this post