Journey of Deployment Creation in Kubernetes
We will take a Kubernetes feature and break its implementation to understand how it interacts with Kubernetes system components.
This article is my take on what I have understood about the Kubernetes architecture.
Instead of explaining the different components of the architecture comprises what each component does functionally.
We will take a Kubernetes feature and break its implementation to understand how it interacts with Kubernetes system components.
So yeah, some working knowledge of K8s basics, such as creating deployments and services, is a plus.
Before starting, I want to let you know that this article is written to the best of my knowledge, and I’ll update it as I gain more insights into it.
The Initial Interaction With Kubernetes
I started learning about the What, Why, and How of Kubernetes.
I still remember my first hands-on Kubernetes experience was to
create a K8s cluster using minikube, in which I created an nginx deployment and
exposed it using NodePort service. At the end of this exercise, I was able to
view the ngnix default web page
running on [localhost:8080](<http://localhost:8080>).
But still, Kubernetes was a black box for me. I didn’t know what a deployment is, what a node port service is, or why Kubernetes is taking 8GB of RAM to run an nginx container, and I bet it is a black box for many people out there.
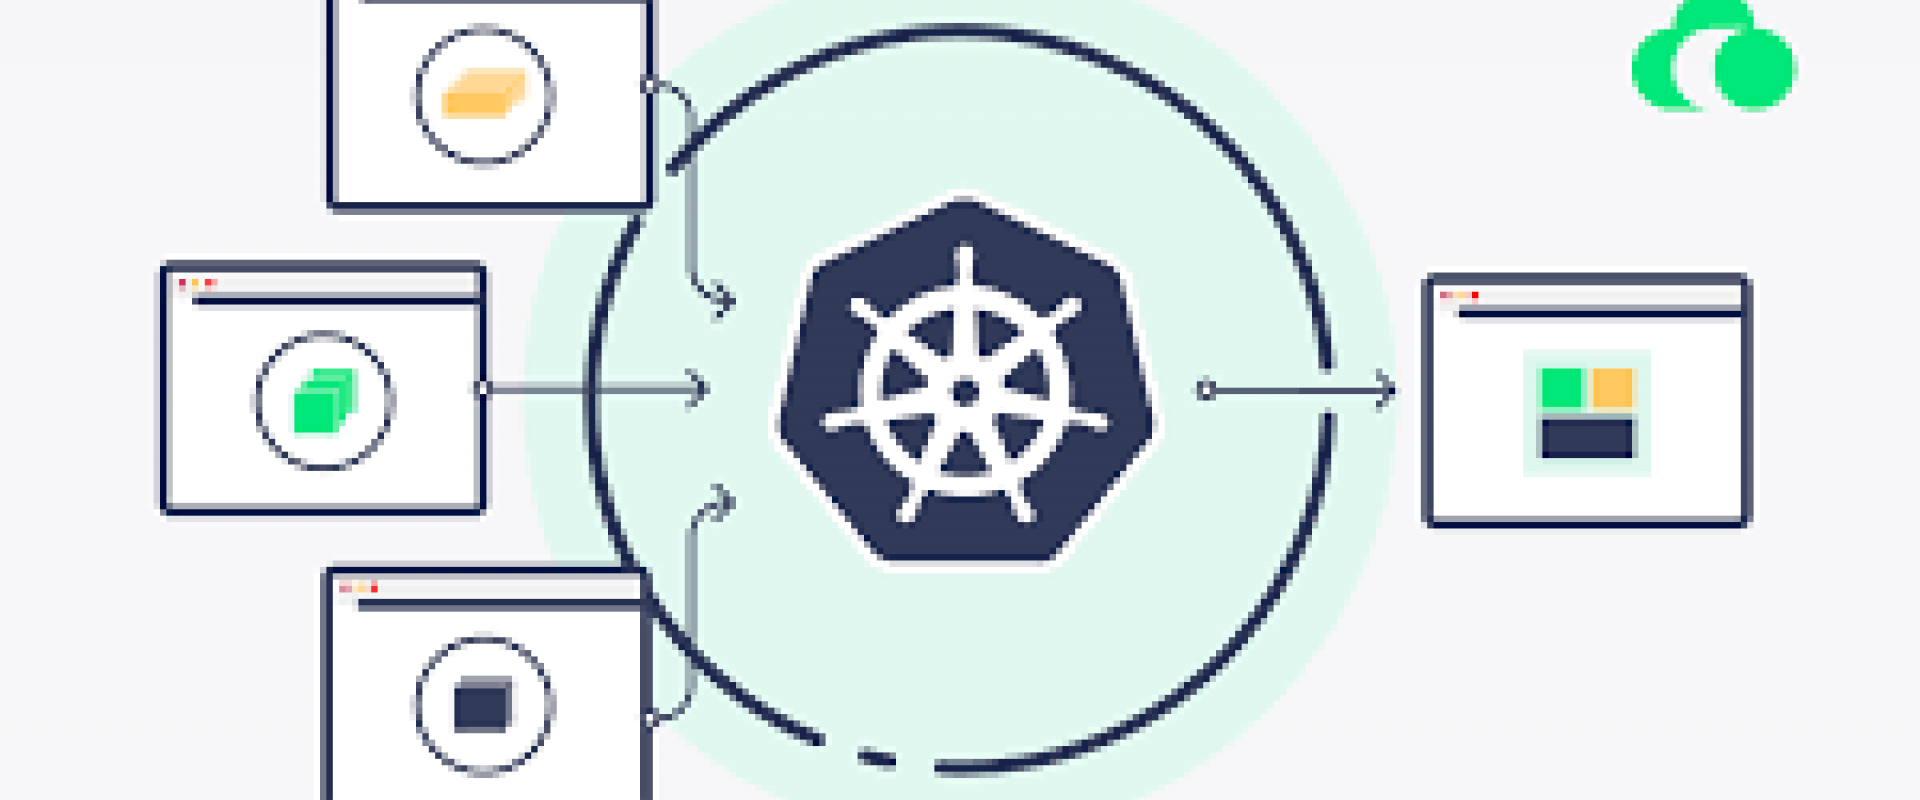
So we will demystify this black box with a feature that everyone new to Kubernetes has seen in action or at least heard about.
I am talking about deploying an application.
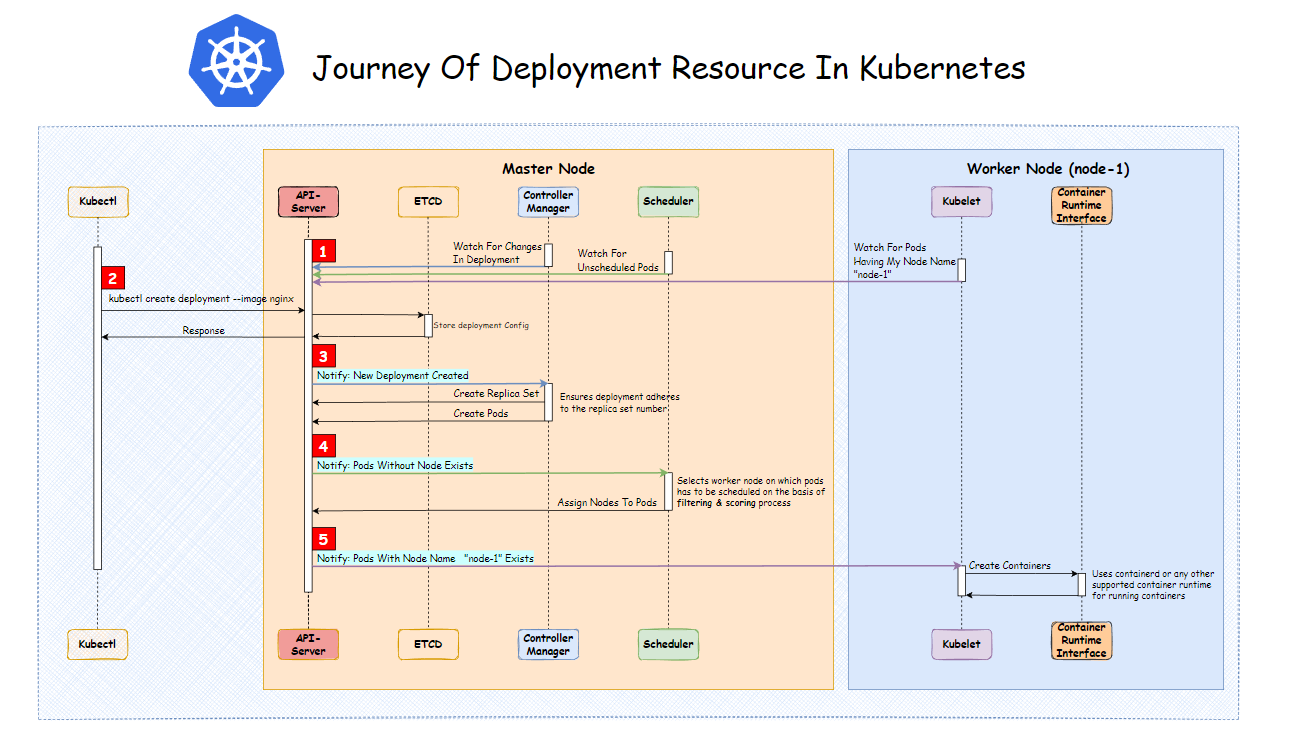
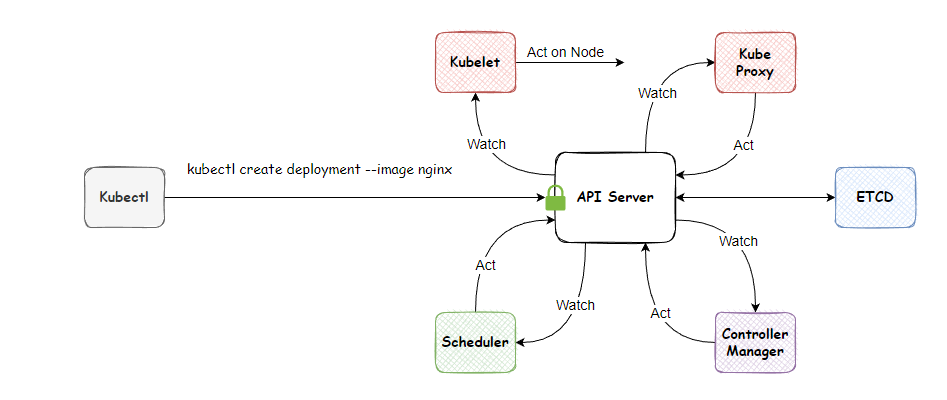
Here is a quick overview of the deployment journey represented via an image (for reading the image, follow the numeric indicators highlighted in red color). This is what we will be learning in depth in this article. Please keep this image in mind; we will be referring to it a lot in this article.
When you run kubectl create
deployment --image nginx command on the terminal. Under the hood,
kubectl fires an HTTP request to the server. And the server that responds to
this request is called the api-server—our first
Kubernetes system component.
API Server
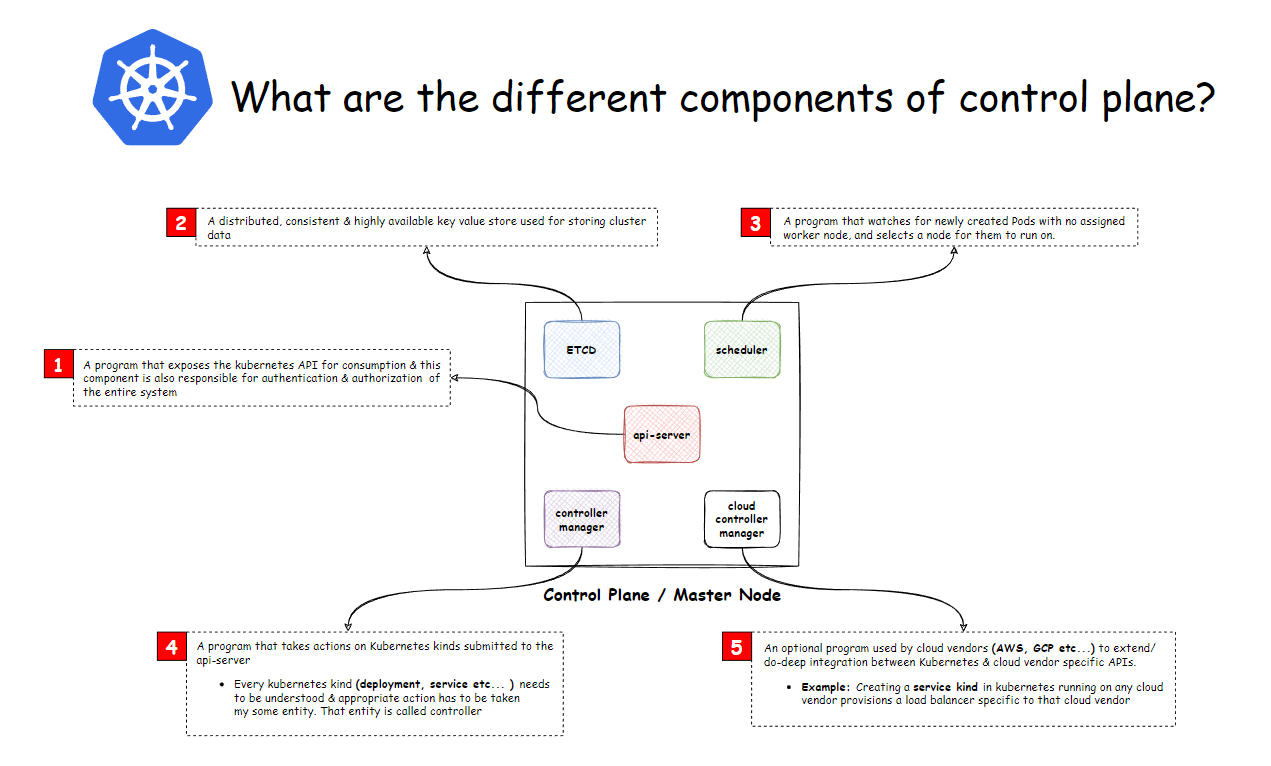
A program that exposes the Kubernetes REST API for consumption and this component is also responsible for authentication and authorization of the entire system.
Following are the actions taken for every request, be it external or internal:
-
Authenticates and authorizes the requests as
per the configuration done in the
api-server. - Depending upon the request, it performs CRUD operation on the persistent data store.
- Sends the response back to the client.
Apart from handling API requests, it also handles operational activities of the Kubernetes cluster, such as
- Registration of worker nodes.
In our case, we have requested to create the nginx deployment resource. After successful authentication, the API server will store the deployment resource object in the data store and sends back an appropriate HTTP status code to the client.
Suppose you observed carefully that the API-server talks to a
persistent data store. It is our second component in the architecture of ETCD.
ETCD Store
A distributed, consistent, and highly available key-value store is used for storing cluster data.
Nothing fancy here; Kubernetes is using ETCD as a database for storing the resource objects.
Apart from the basic CRUD operations that ETCD offers. A unique proposition of ETCD is providing events on changes happening to its keys. This feature is exposed by Kubernetes over the watch API. In the upcoming sections, you will see how different Kubernetes components leverages the watch API.
We haven’t taken any action with our nginx deployment object
resting in the ETCD store. It’s time to do that with our next component,
the controller manager.
Controller Manager
A program that takes actions on Kubernetes kinds submitted to the API server
Every Kubernetes kind/resource (deployment, service, etc.) needs
to be understood, and appropriate action has to be taken by some entity. That
entity is called the controller.
Technically, the controller just
watches for changes in a specific Kubernetes resource (deployment, service,
etc.) using the watch API exposed by the api-server in a
never-ending for loop called the control loop. Whenever the controller is
notified about resource change, It takes appropriate action to ensure that the
current state of the resource matches the desired state.
How does a single controller-manager be
able to handle multiple Kubernetes resources?
The controller-manager binary
comprises many such resource controllers to
take action on K8s resources. For example:
- Node controllers
- Deployment controller
- Service controller
- Namespace controller etc.
So in our case, we created a new nginx deployment object. The deployment controller in the controller manager is notified about the new deployment object; the controller takes action by comparing the desired state (we specified it by our CLI command) and the current state (what is currently running?). As there is no existing deployment, It decides to create a new deployment.
Technically, a deployment in Kubernetes is made of resources:
- Pods: Which is a logical grouping for running multiple containers.
- Replica-Set: Ensures that the replica (duplicates of pods) specified in the spec are running at any given time.
So the deployment controller tells the api-server to
create a replica-set and pod resource. Great!
As I said, that pod resource runs containers inside Kubernetes. But who decides on which node the container should run? As Kubernetes is a multi-node system, someone has to decide where the container will run.
This is where the scheduler component
comes into the picture.
Scheduler
A program that watches for newly created pods with no assigned worker node selects a worker node for them to run on
But what goes into the selection of worker nodes?
There are many stages involved in the selection process, but the important ones are:
1. Filtering
The goal of this state is to filter out the worker nodes that cannot host the pod for some reason; at the end of this stage, we have nodes on which pods can be scheduled.
Reasons for not hosting:
- Taints and Tolerance
- CPU and Memory requests
- Node selector
· At the end of this stage, based on the length of the schedulable node list following scenarios can occur:
- Length equal to 0: Then, the pod will remain pending till this condition is remedied.
- Length equal to 1: The scheduling can occur without any actions.
- Length greater than 1: It moves to the next stages of scheduling.
2. Scoring
This stage aims to assign scores to schedulable nodes based on server rules. At the end of this stage, the node with the highest score is selected for the scheduling of Pod.
Example of rules used for evaluation:
- Node affinity and anti-affinity
- Does the node have a container image already?
- Lower workload utilization will give you a higher result.
·
This is what a scheduler does
at a high level.
Until now, We have only decided what to do and how to do it
regarding our nginx deployment. But I
haven’t taken any action actually to run the container.
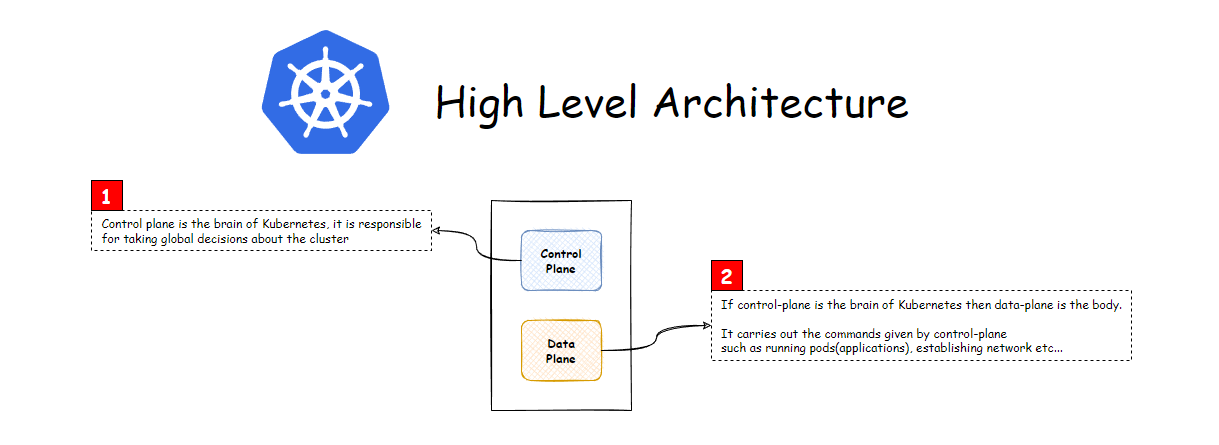
So observation can be made that whatever components that we have seen the action as the brain of the cluster which has the decision-making capability of the entire cluster.
In the Kubernetes architecture, a separation is made between the decision-making components called Master Node and components that execute the decisions called Worker Node.
As you have seen, our nginx deployment
has interacted with the master node in its journey. It’s time to go to the
final destination.
Ahh, finally, we have some progress in running containers. So who runs our containers in the worker node? The answer is Kubelet.
Kubelet
A program that watches for pods assigned to the worker node (itself) and ensures the containers specified in the pod spec are running on the node
Internally, kubelet uses many low-level technologies for running containers, for example:
- Container Runtime Interface
- Container Runtime (containers, Docker, Podman, etc.)
- Runs
All these low-level technologies will require a separate article; comment below if you want a separate article on them. But here is a quick image for an overview.
We haven’t discussed 2 main Kubernetes components:
- Cloud Control Manager
- Kube Proxy
We Provide consulting, implementation, and management services on DevOps, DevSecOps, DataOps, Cloud, Automated Ops, Microservices, Infrastructure, and Security
Services offered by us: https://www.zippyops.com/services
Our Products: https://www.zippyops.com/products
Our Solutions: https://www.zippyops.com/solutions
For Demo, videos check out YouTube Playlist: https://www.youtube.com/watch?v=4FYvPooN_Tg&list=PLCJ3JpanNyCfXlHahZhYgJH9-rV6ouPro
If this seems interesting, please email us at [email protected] for a call.
Recent Comments
No comments
Leave a Comment
We will be happy to hear what you think about this post