Kubernetes integration using AWS cloud provider
Project Description
Project-based on Setting up the Kubernetes AWS Cloud Provider. The AWS cloud provider for Kubernetes enables a couple of key integration points for Kubernetes running on AWS; namely, dynamic provisioning of Elastic Block Store (EBS) volumes, and dynamic provisioning/configuration of Elastic Load Balancers (ELBs) for exposing Kubernetes Service objects.
Kubernetes:
Kubernetes is a cluster and orchestration engine for docker containers. Kubernetes (K8s) is an open-source system for automating deployment, scaling, and management of containerized applications.
In the Kubernetes setup, we have one master node and multiple nodes. Cluster nodes are known as worker nodes or Minion. From the master node, we manage the cluster and its nodes using the ‘kubeadm‘ and ‘kubectl‘ commands.
installation of Kubernetes:
I installed centos 7 Instance in aws from the community. Before provisioning Instance, it was, we have to create roles for integration purposes and I created one vpc setup with a tag name. We can use the default one also.
Step 1: Creating VPC Setup
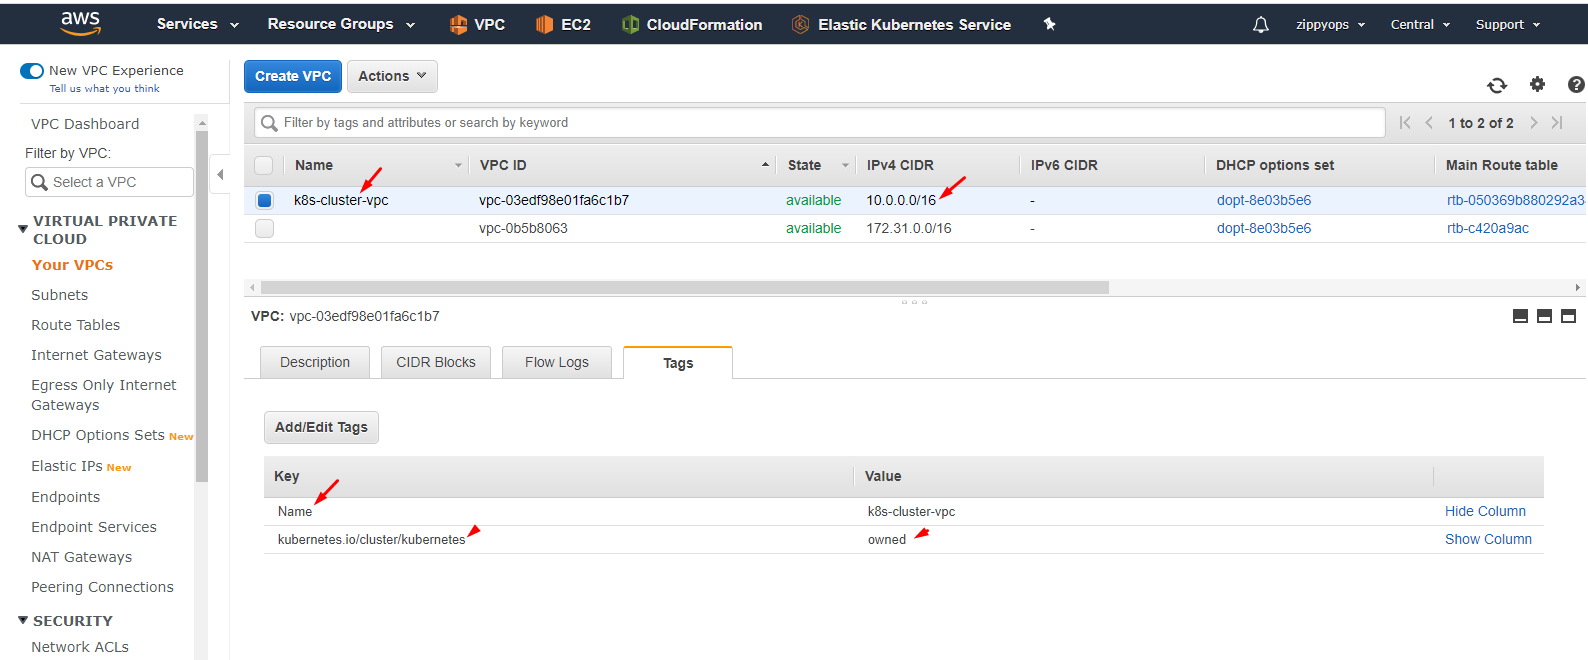
Here I created vpc with cidr 10. series and I tagged my vpc and also I gave the name for my vpc.
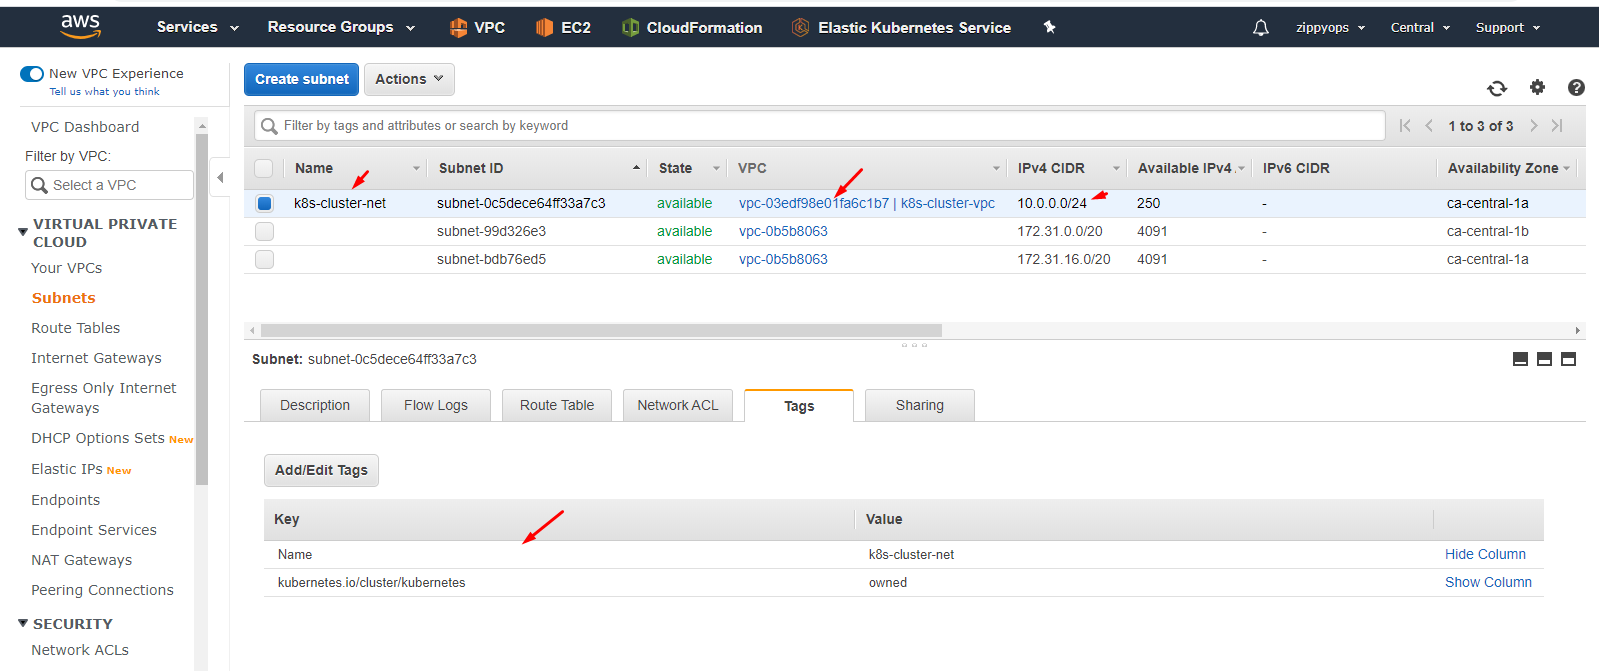
Then I created a public subnet with tag & name. After attached created vpc “k8s-cluster-vpc” to the subnet.
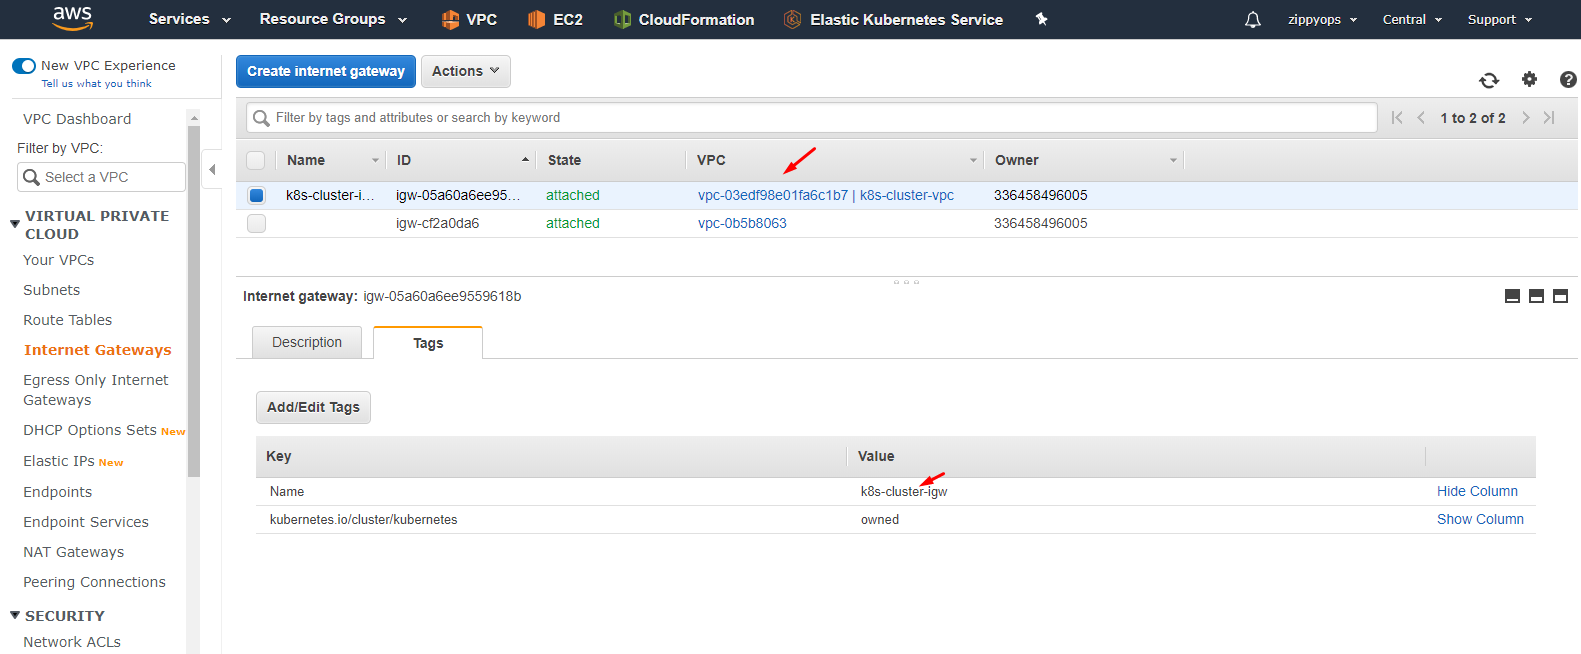
Then I created an internet gateway with a tag and name. And then I attached it to my vpc k8s-cluster-vpc.
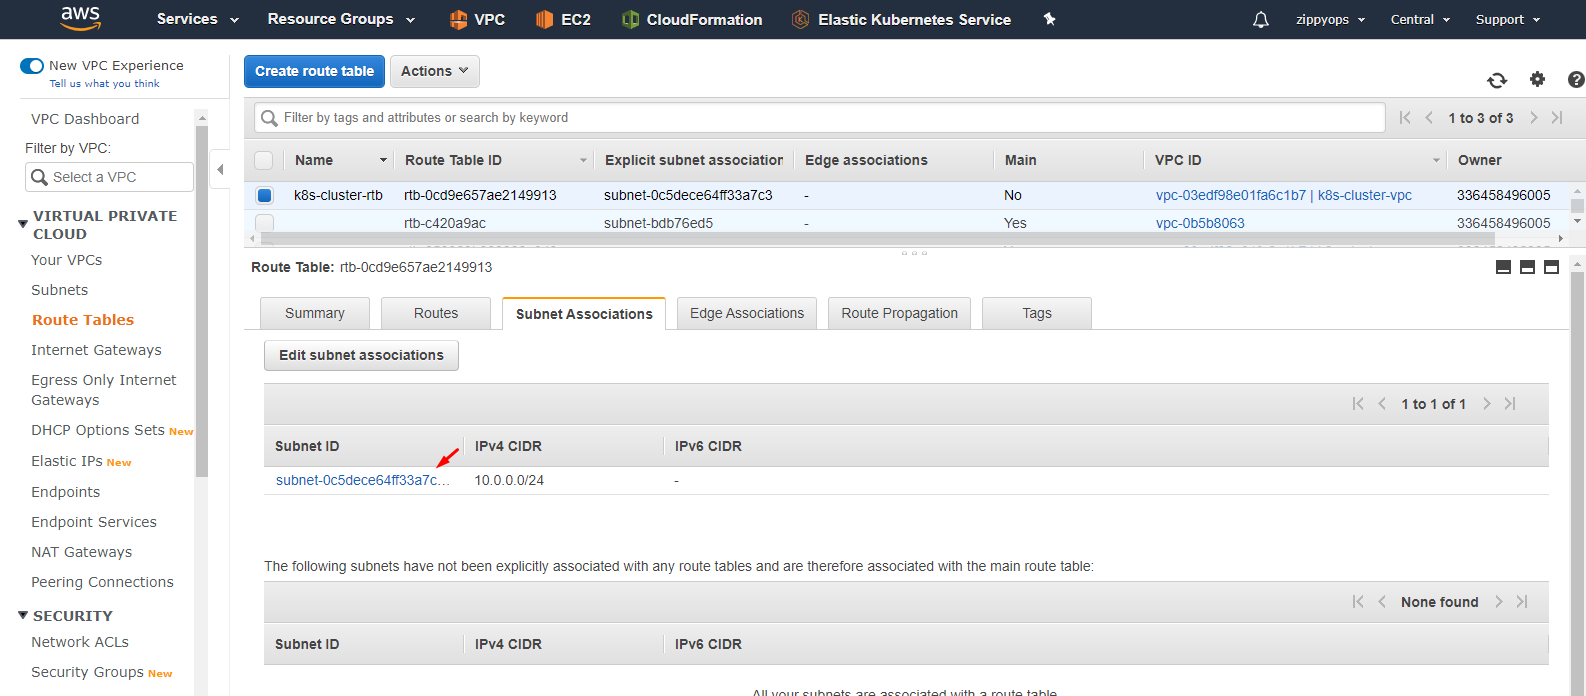
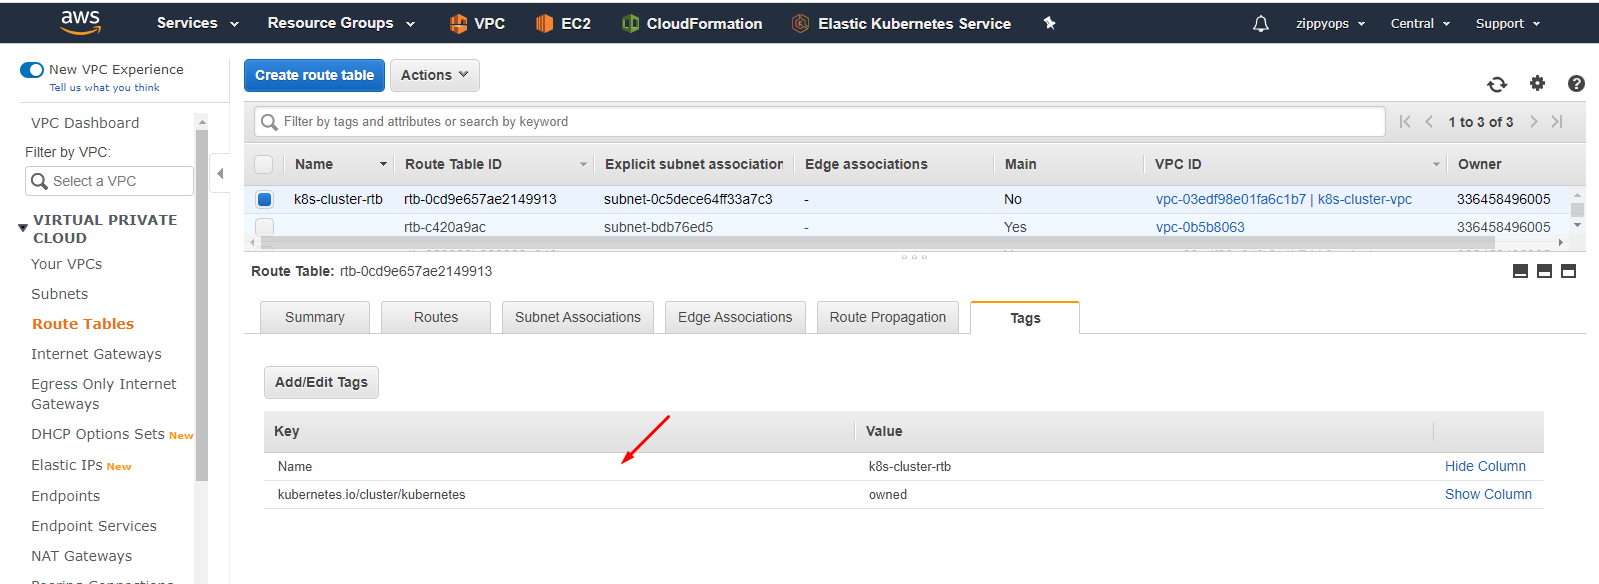
Now I am going to create a route table. The default public route table will create once we create vpc so I just give the name and tag. Then I attached routes and then associated subnets.
Now going to create a Security group below,
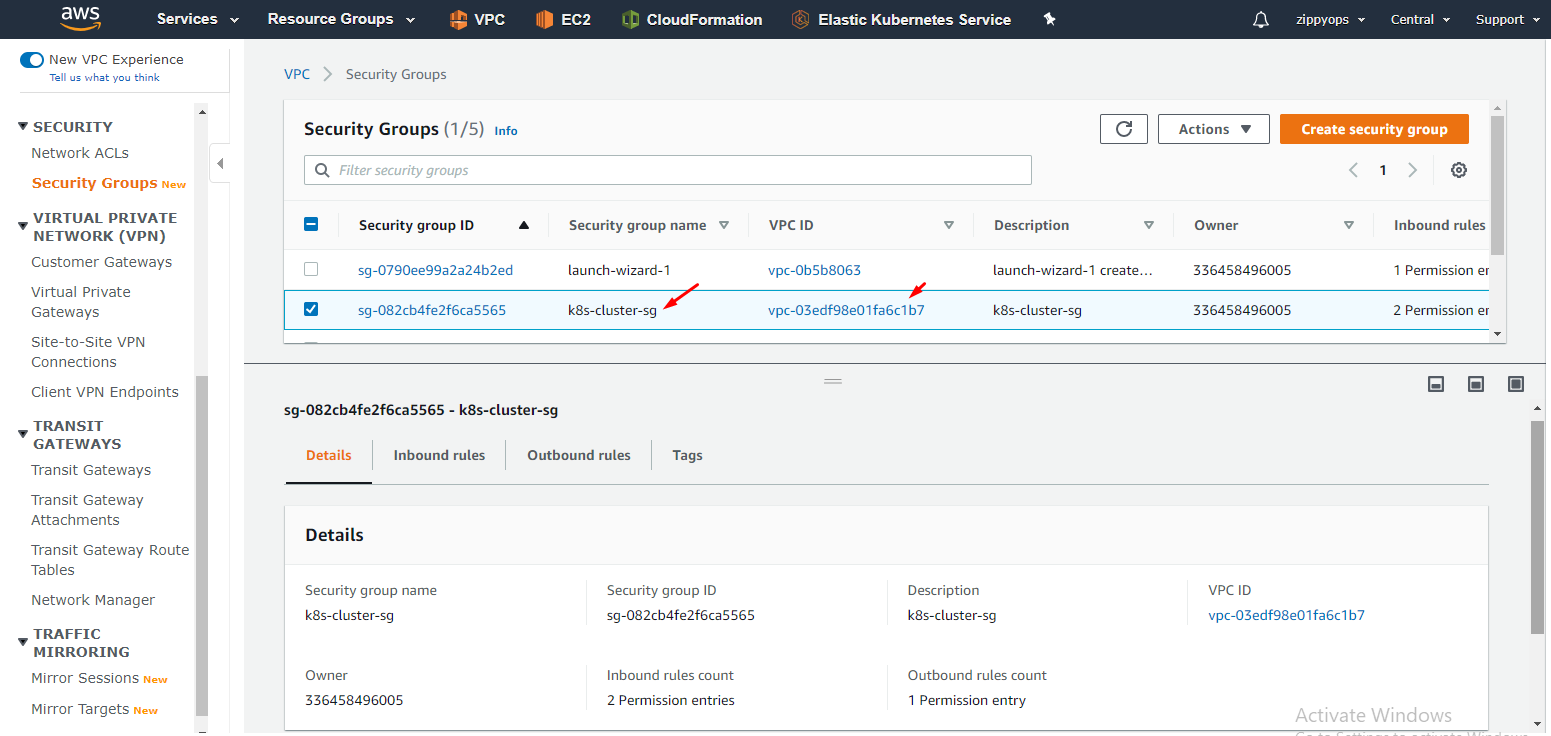
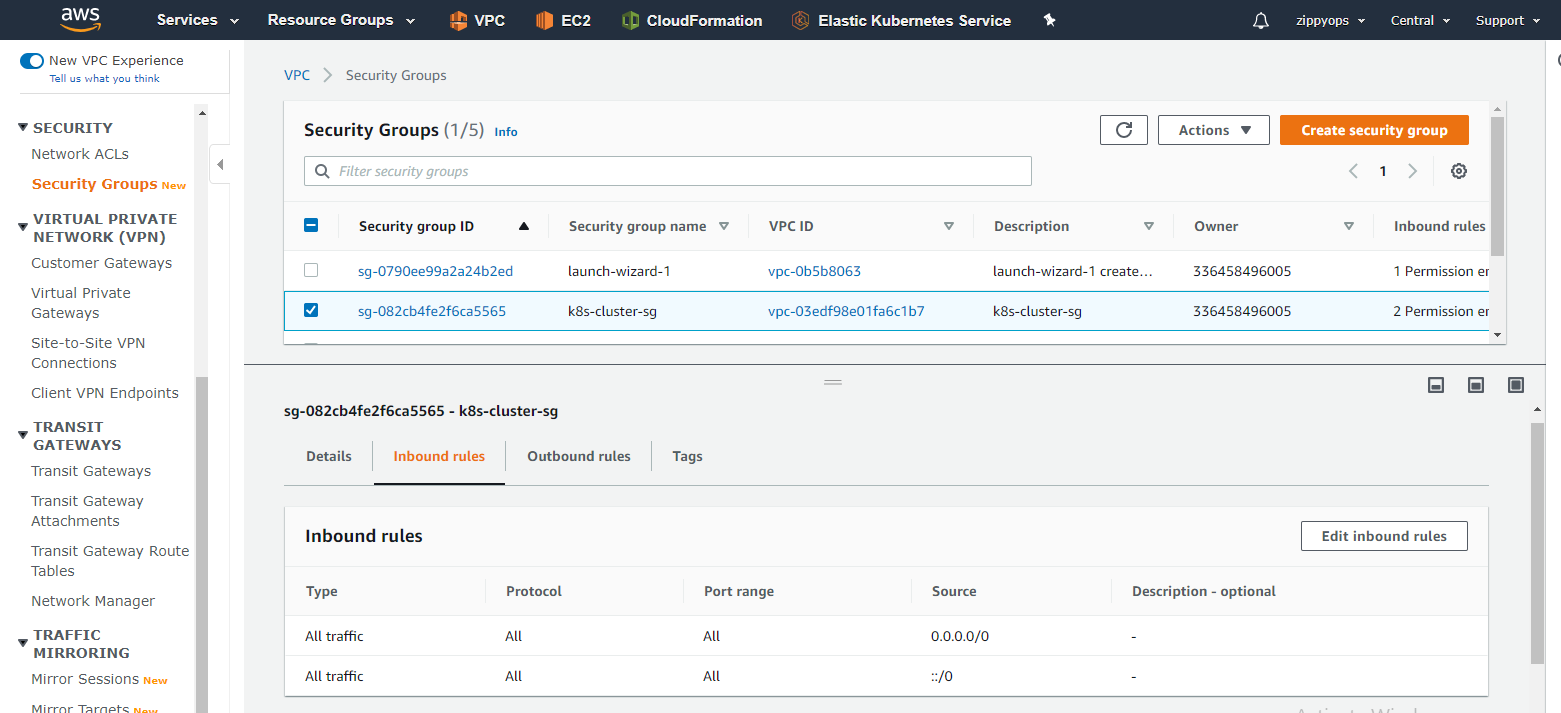
I just allow all traffic to my instance. Tag your security group as the same as we did before for all. I left outbound as it is.
Step 2: Create an IAM role for the master and worker node
Because the AWS cloud provider performs some tasks on behalf of the operator — like creating an ELB or an EBS volume — the instances need IAM permissions to perform these tasks. Thus, you need to have an IAM instance profile assigned to the instances that give them permissions.
Separate permissions are needed for the control plane nodes versus the worker nodes; the control plane nodes need more permissions than the worker nodes. This means you’ll end up with two IAM instance profiles: one for the control plane nodes with a broader set of permissions, and one for the worker nodes with a more restrictive set of permissions.
IAM Master role:
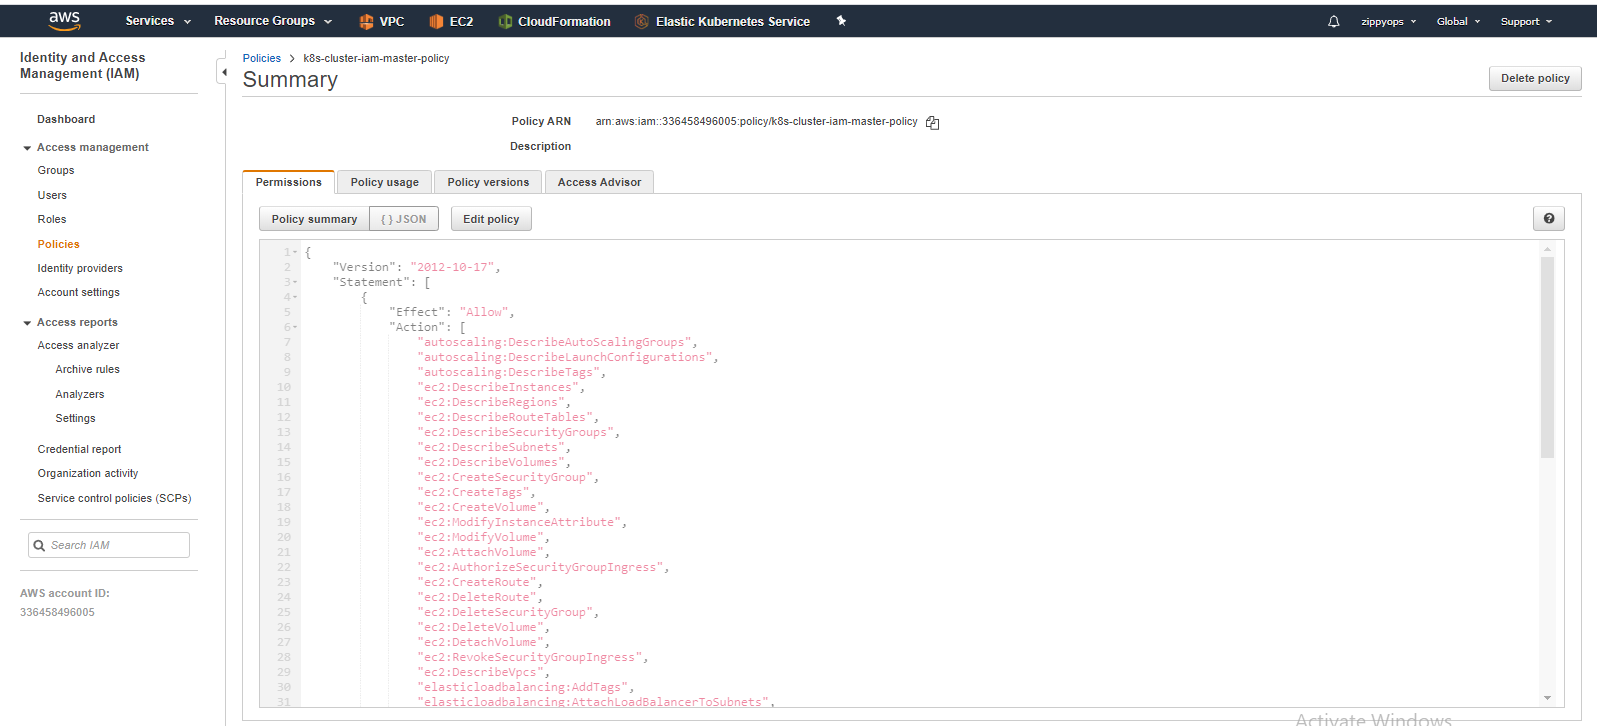
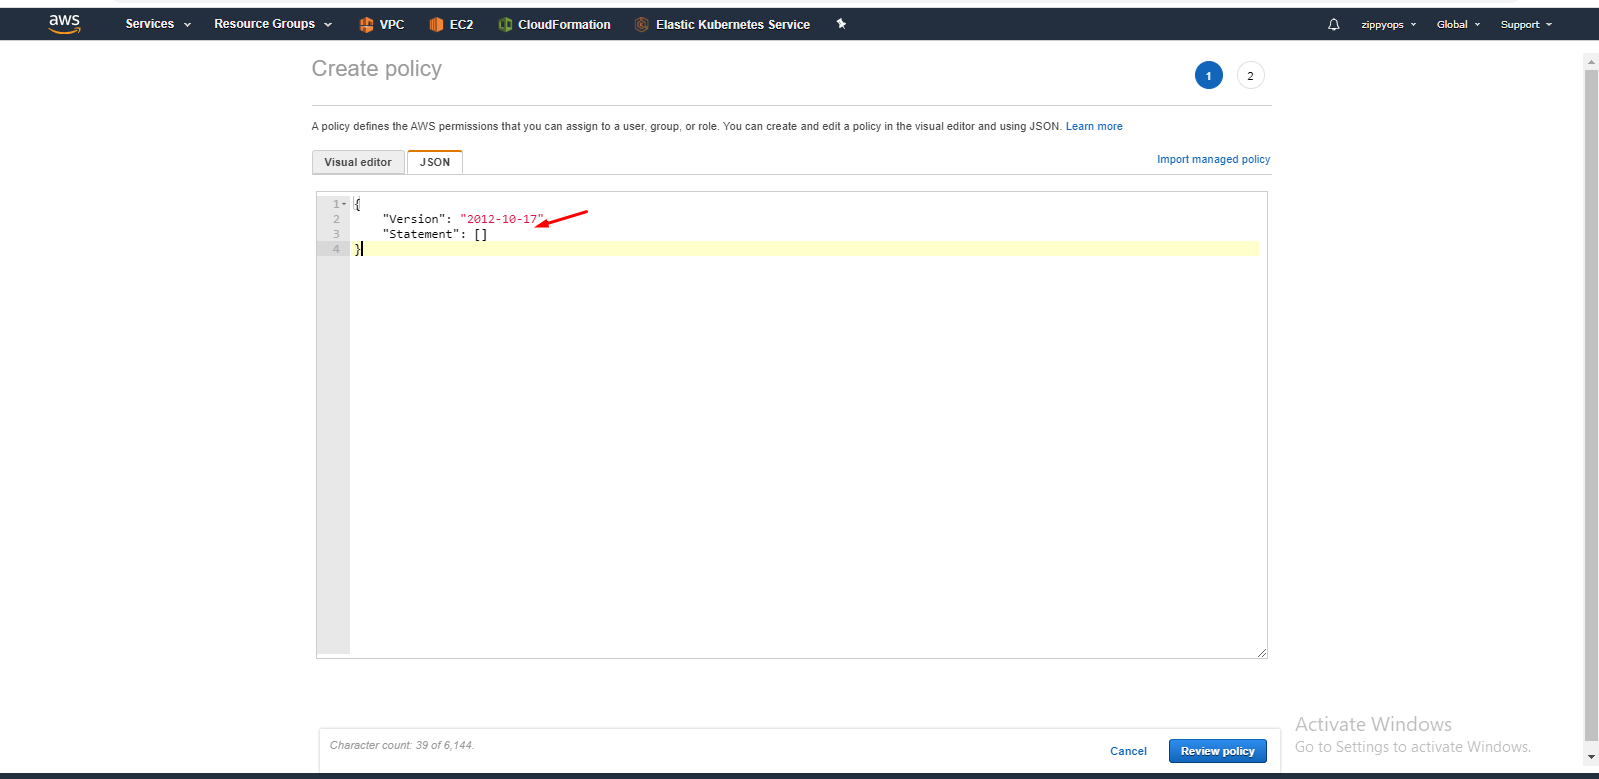
Go to the IAM > Policies, click Create policy, into the JSON add a new policy description (see cloud-provider-aws):
{
"Version": "2012-10-17",
"Statement": [
{
"Effect": "Allow",
"Action": [
"autoscaling:DescribeAutoScalingGroups",
"autoscaling:DescribeLaunchConfigurations",
"autoscaling:DescribeTags",
"ec2:DescribeInstances",
"ec2:DescribeRegions",
"ec2:DescribeRouteTables",
"ec2:DescribeSecurityGroups",
"ec2:DescribeSubnets",
"ec2:DescribeVolumes",
"ec2:CreateSecurityGroup",
"ec2:CreateTags",
"ec2:CreateVolume",
"ec2:ModifyInstanceAttribute",
"ec2:ModifyVolume",
"ec2:AttachVolume",
"ec2:AuthorizeSecurityGroupIngress",
"ec2:CreateRoute",
"ec2:DeleteRoute",
"ec2:DeleteSecurityGroup",
"ec2:DeleteVolume",
"ec2:DetachVolume",
"ec2:RevokeSecurityGroupIngress",
"ec2:DescribeVpcs",
"elasticloadbalancing:AddTags",
"elasticloadbalancing:AttachLoadBalancerToSubnets",
"elasticloadbalancing:ApplySecurityGroupsToLoadBalancer",
"elasticloadbalancing:CreateLoadBalancer",
"elasticloadbalancing:CreateLoadBalancerPolicy",
"elasticloadbalancing:CreateLoadBalancerListeners",
"elasticloadbalancing:ConfigureHealthCheck",
"elasticloadbalancing:DeleteLoadBalancer",
"elasticloadbalancing:DeleteLoadBalancerListeners",
"elasticloadbalancing:DescribeLoadBalancers",
"elasticloadbalancing:DescribeLoadBalancerAttributes",
"elasticloadbalancing:DetachLoadBalancerFromSubnets",
"elasticloadbalancing:DeregisterInstancesFromLoadBalancer",
"elasticloadbalancing:ModifyLoadBalancerAttributes",
"elasticloadbalancing:RegisterInstancesWithLoadBalancer",
"elasticloadbalancing:SetLoadBalancerPoliciesForBackendServer",
"elasticloadbalancing:AddTags",
"elasticloadbalancing:CreateListener",
"elasticloadbalancing:CreateTargetGroup",
"elasticloadbalancing:DeleteListener",
"elasticloadbalancing:DeleteTargetGroup",
"elasticloadbalancing:DescribeListeners",
"elasticloadbalancing:DescribeLoadBalancerPolicies",
"elasticloadbalancing:DescribeTargetGroups",
"elasticloadbalancing:DescribeTargetHealth",
"elasticloadbalancing:ModifyListener",
"elasticloadbalancing:ModifyTargetGroup",
"elasticloadbalancing:RegisterTargets",
"elasticloadbalancing:SetLoadBalancerPoliciesOfListener",
"iam:CreateServiceLinkedRole",
"kms:DescribeKey"
],
"Resource": [
"*"
]
}
]
}

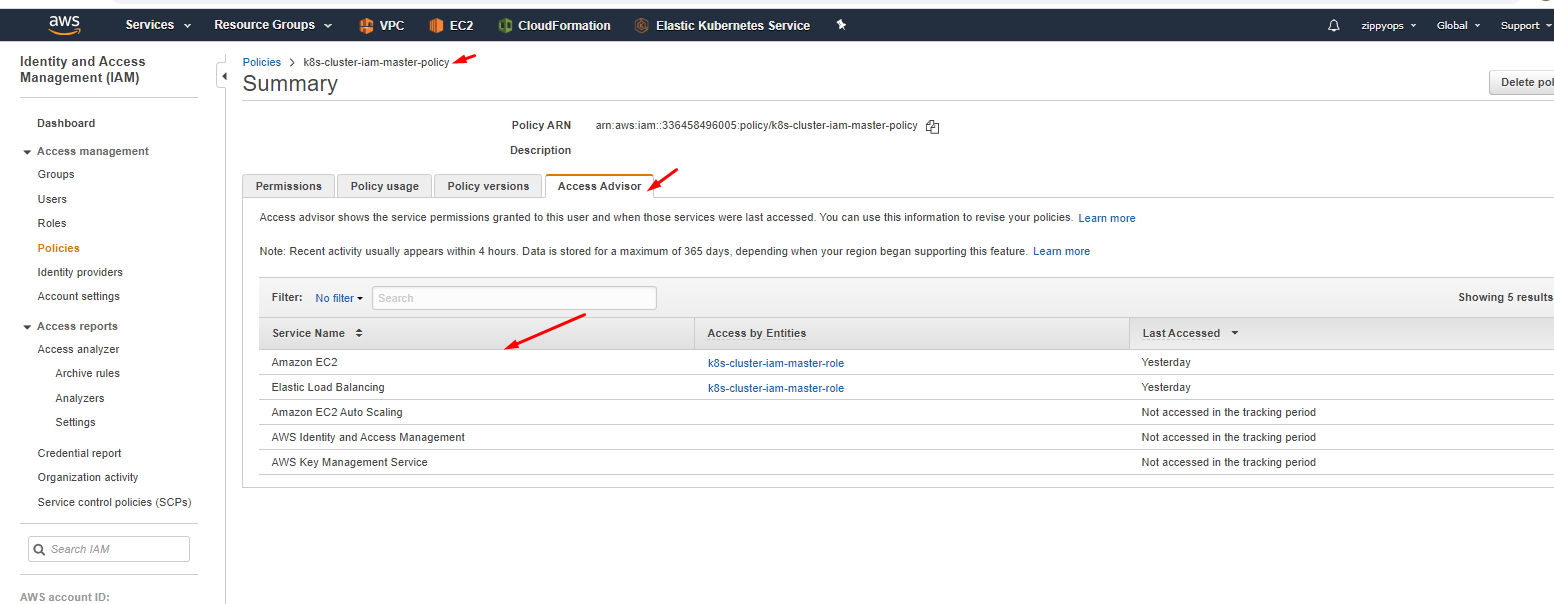
Here I already created a policy so you have to create a new policy like below and in json, remove the default sample, and put your master’s json policy. You can see what are all the services we enabled for the master in the access advisor tab above.
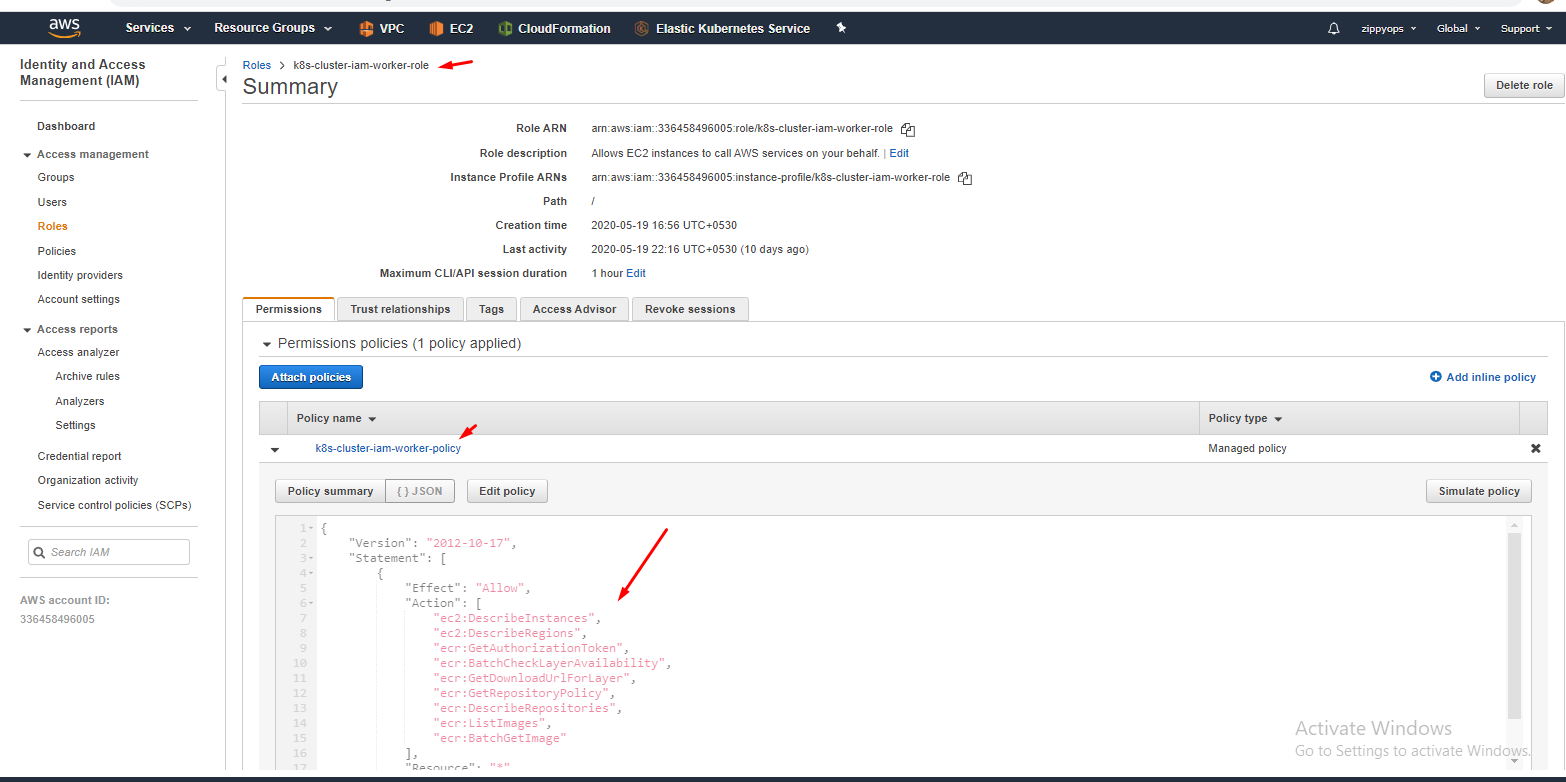
Same like master we have to create for worker node also.
{
"Version": "2012-10-17",
"Statement": [
{
"Effect": "Allow",
"Action": [
"ec2:DescribeInstances",
"ec2:DescribeRegions",
"ecr:GetAuthorizationToken",
"ecr:BatchCheckLayerAvailability",
"ecr:GetDownloadUrlForLayer",
"ecr:GetRepositoryPolicy",
"ecr:DescribeRepositories",
"ecr:ListImages",
"ecr:BatchGetImage"
],
"Resource": "*"
}
]
}
Now create a role and attach policies to the role.

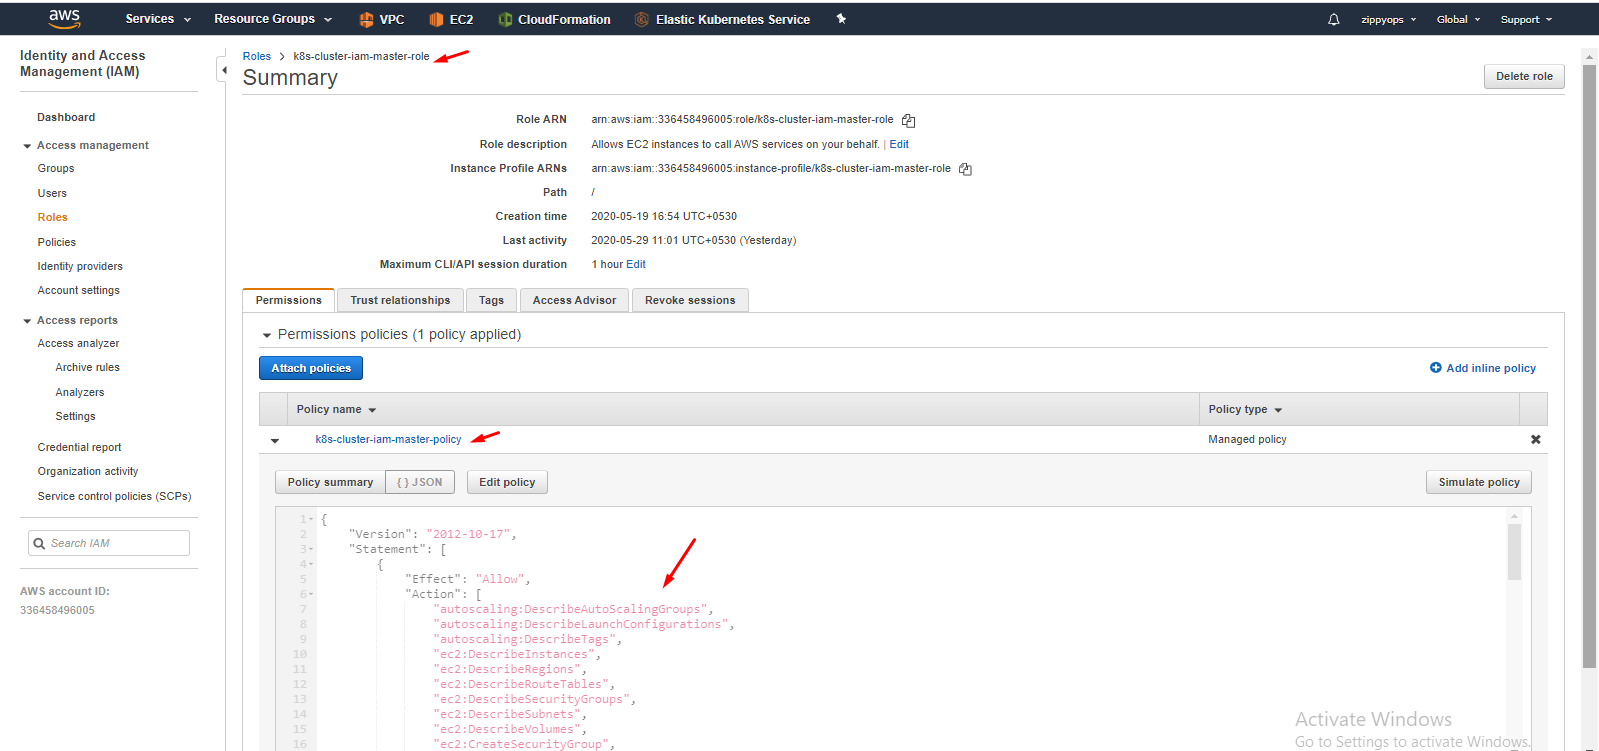
Here I created a role already. below I showed how to create a role and attach a policy.
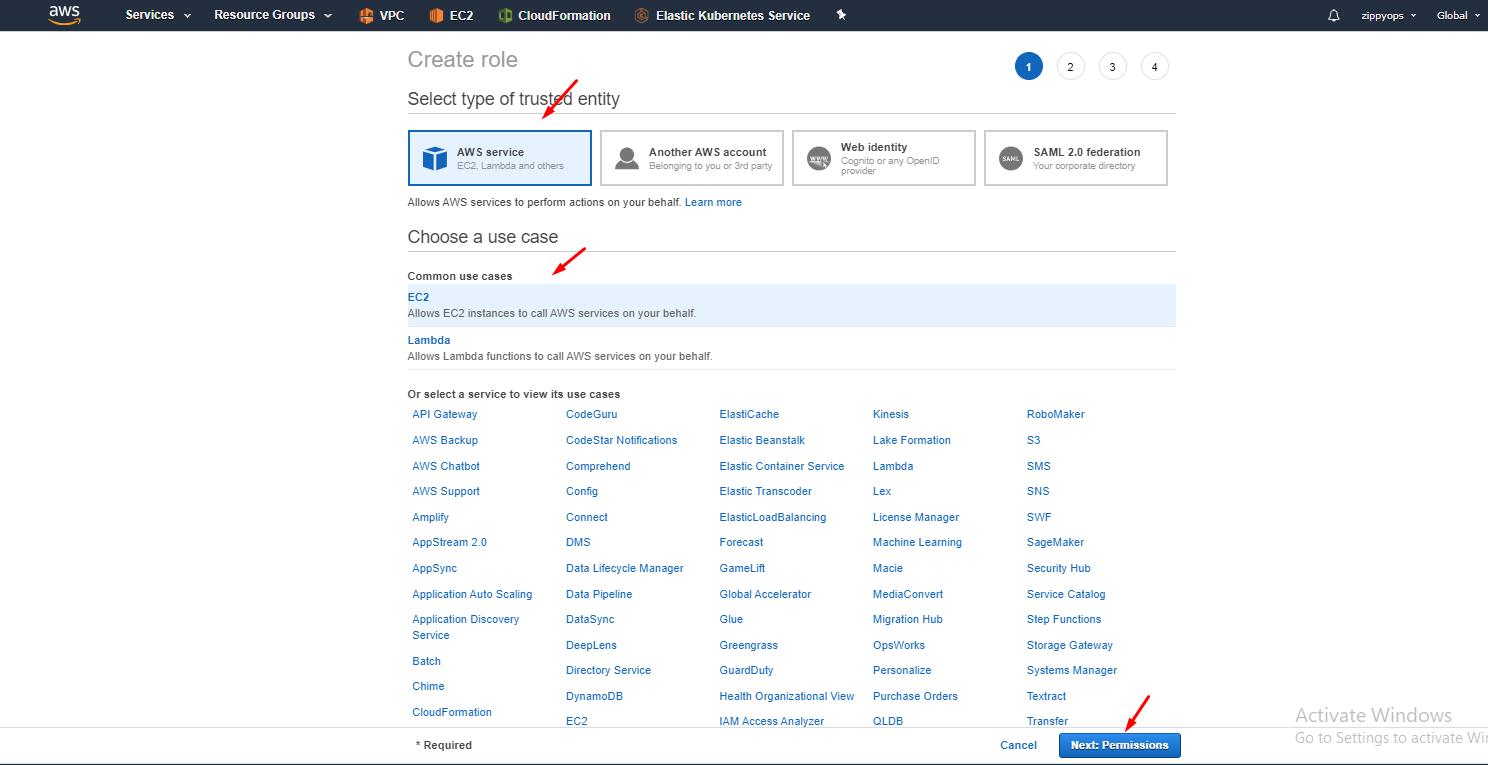
Go to -> create role, select aws service then select EC2 use cases then give next. Then in policy select your master policy because now we are creating for master. We can create policy here itself.
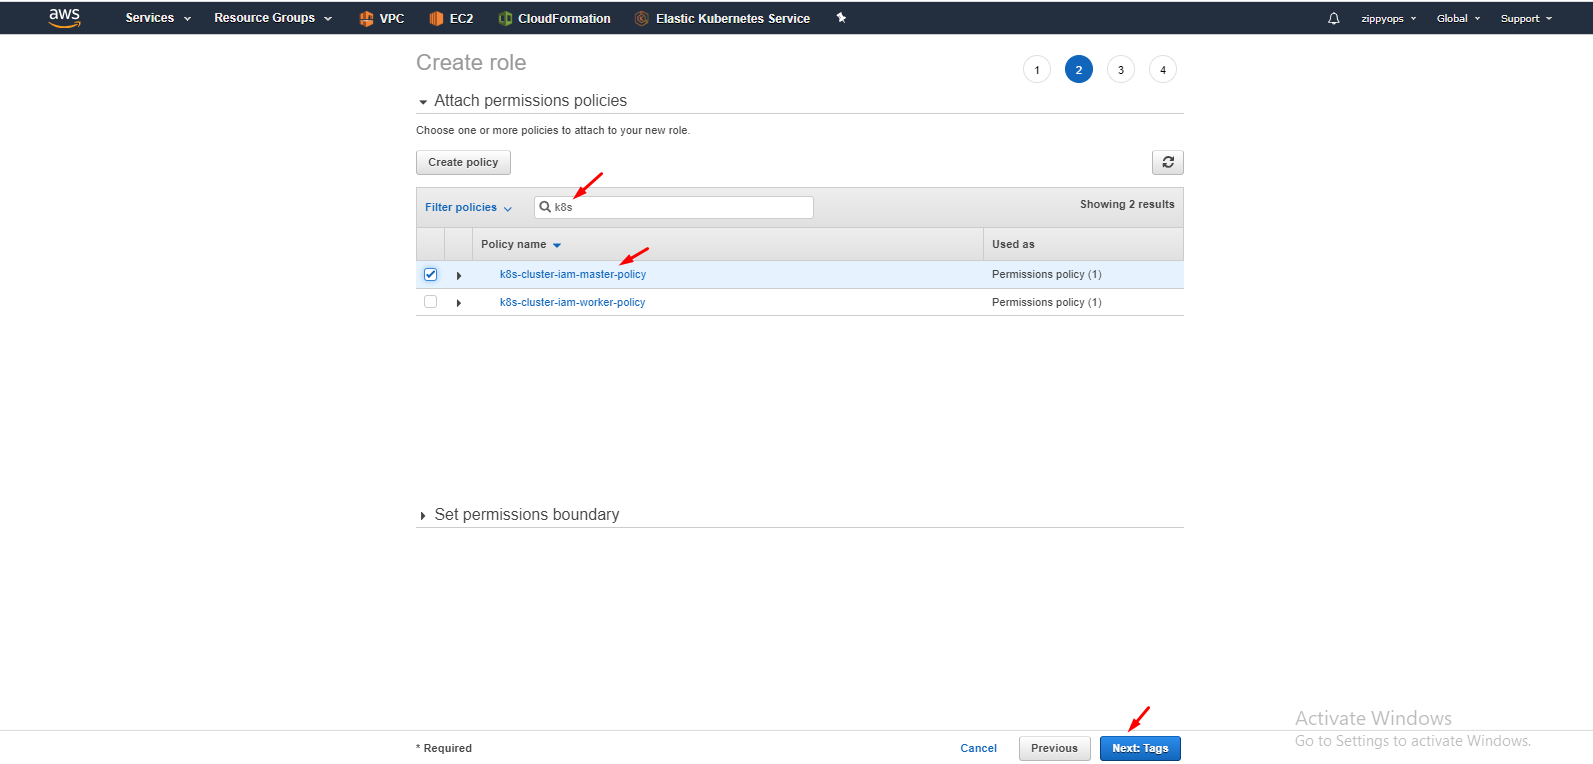
Then give a name for your role and create your role. The same process going to proceed for the worker node also.
IAM role for Worker Node:
Follow the same procedure for worker node also but instead of selecting master policy select your node policy.
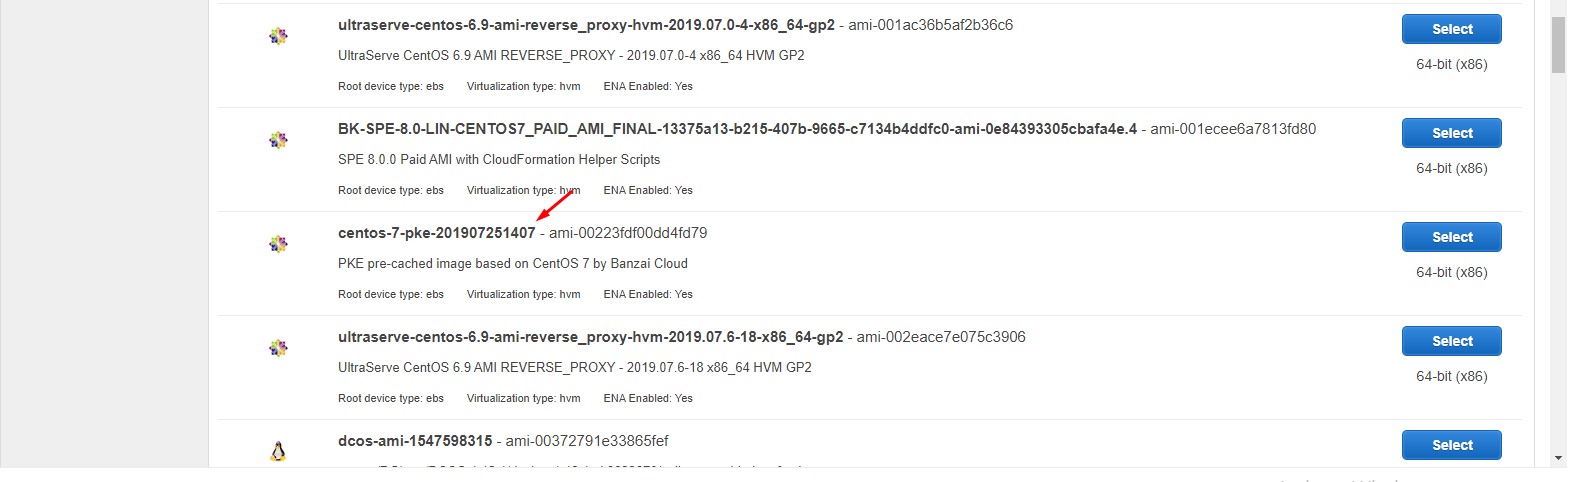
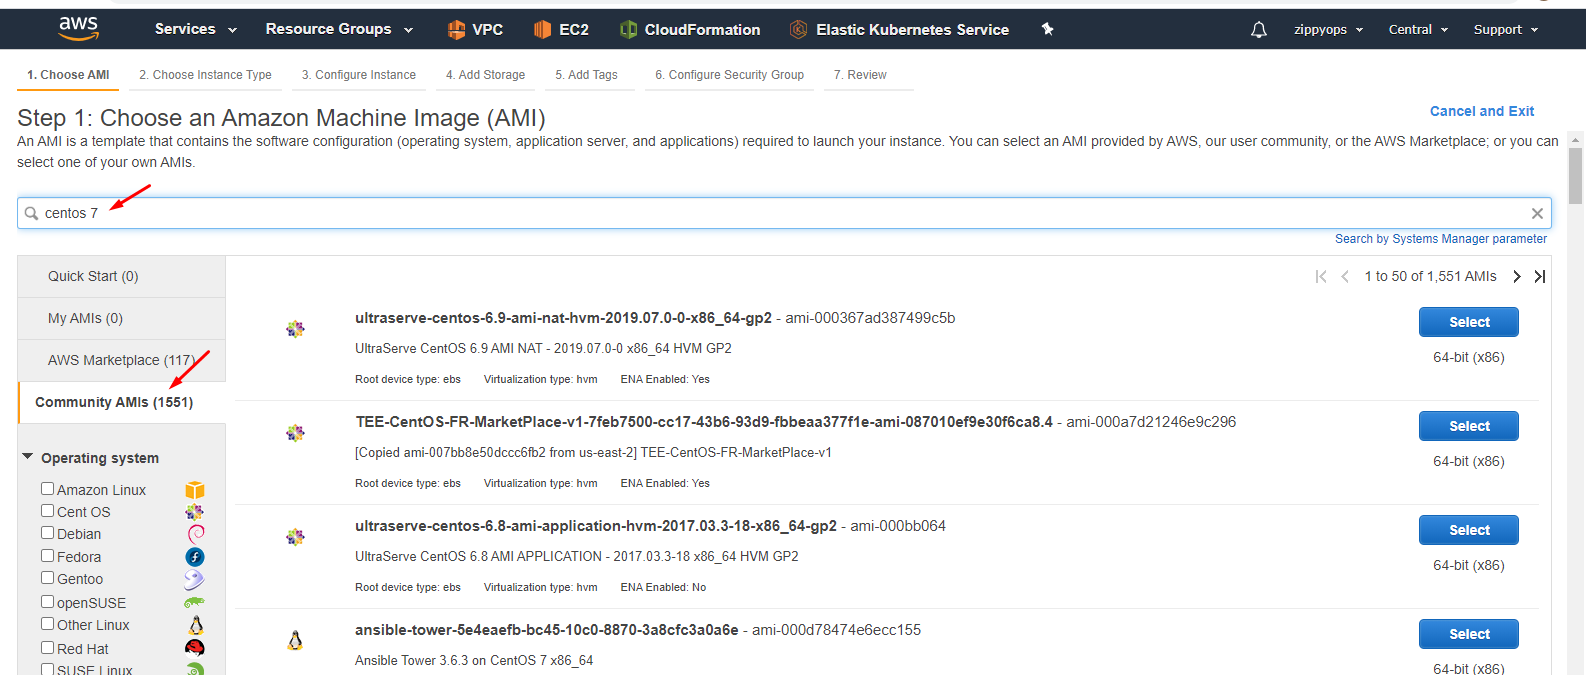
Step 3: Now create an instance. I creating centos 7 instances so I went to the community and took centos 7.

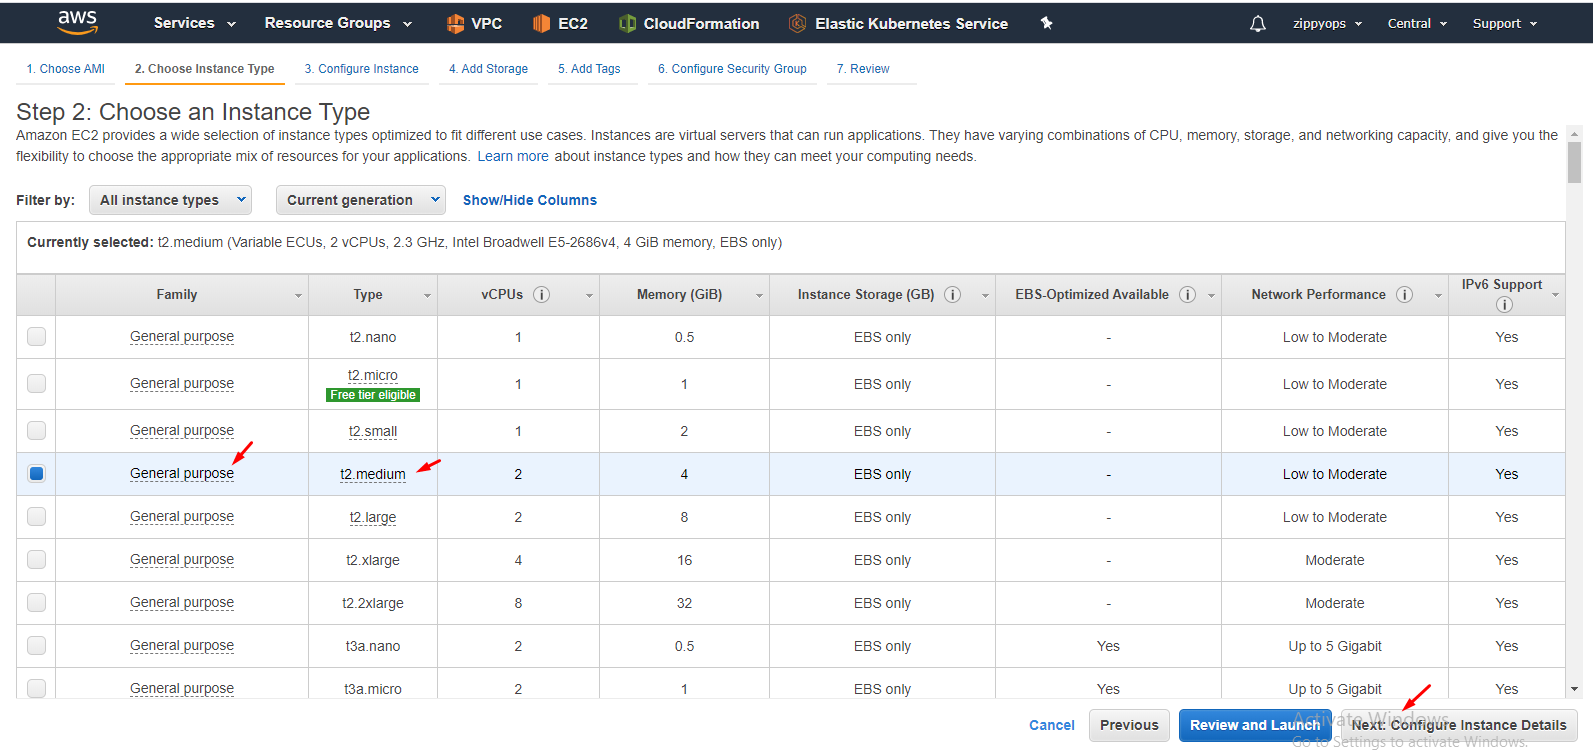
Dropdown you can see the image. Select the image and select type General purpose - t2.medium size.
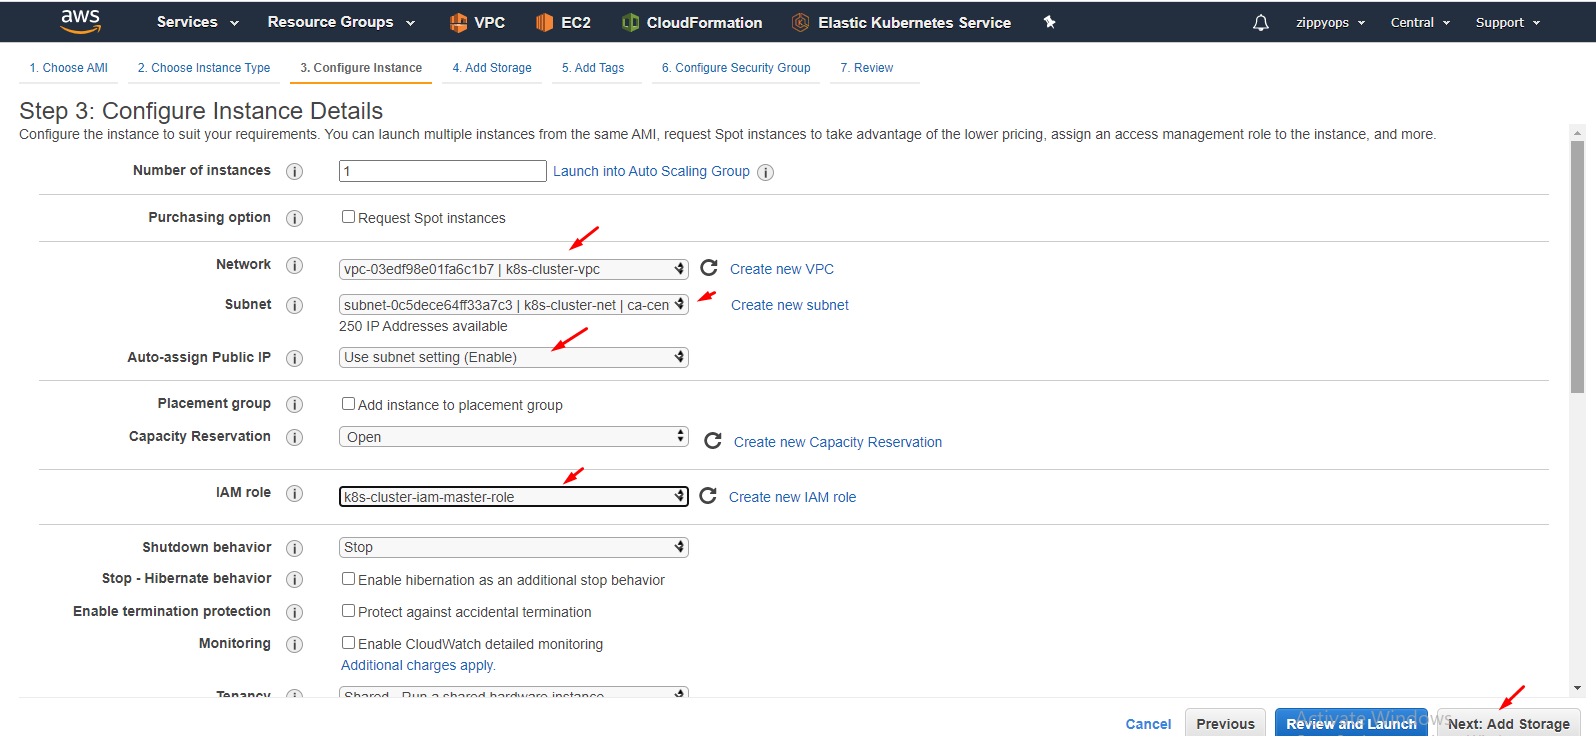
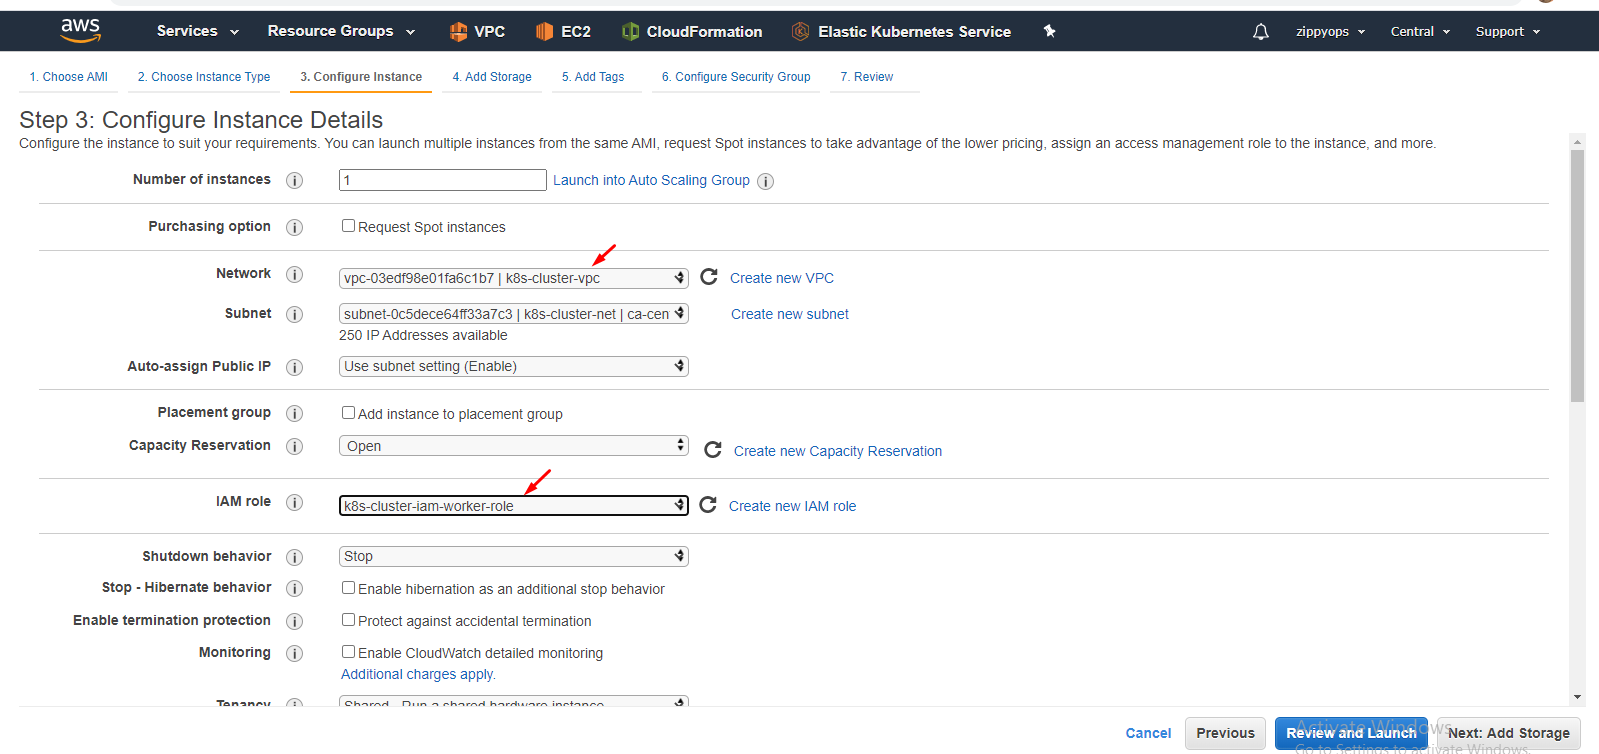
Select your vpc and subnet and then select your master IAM role. Leave other stuff as it is

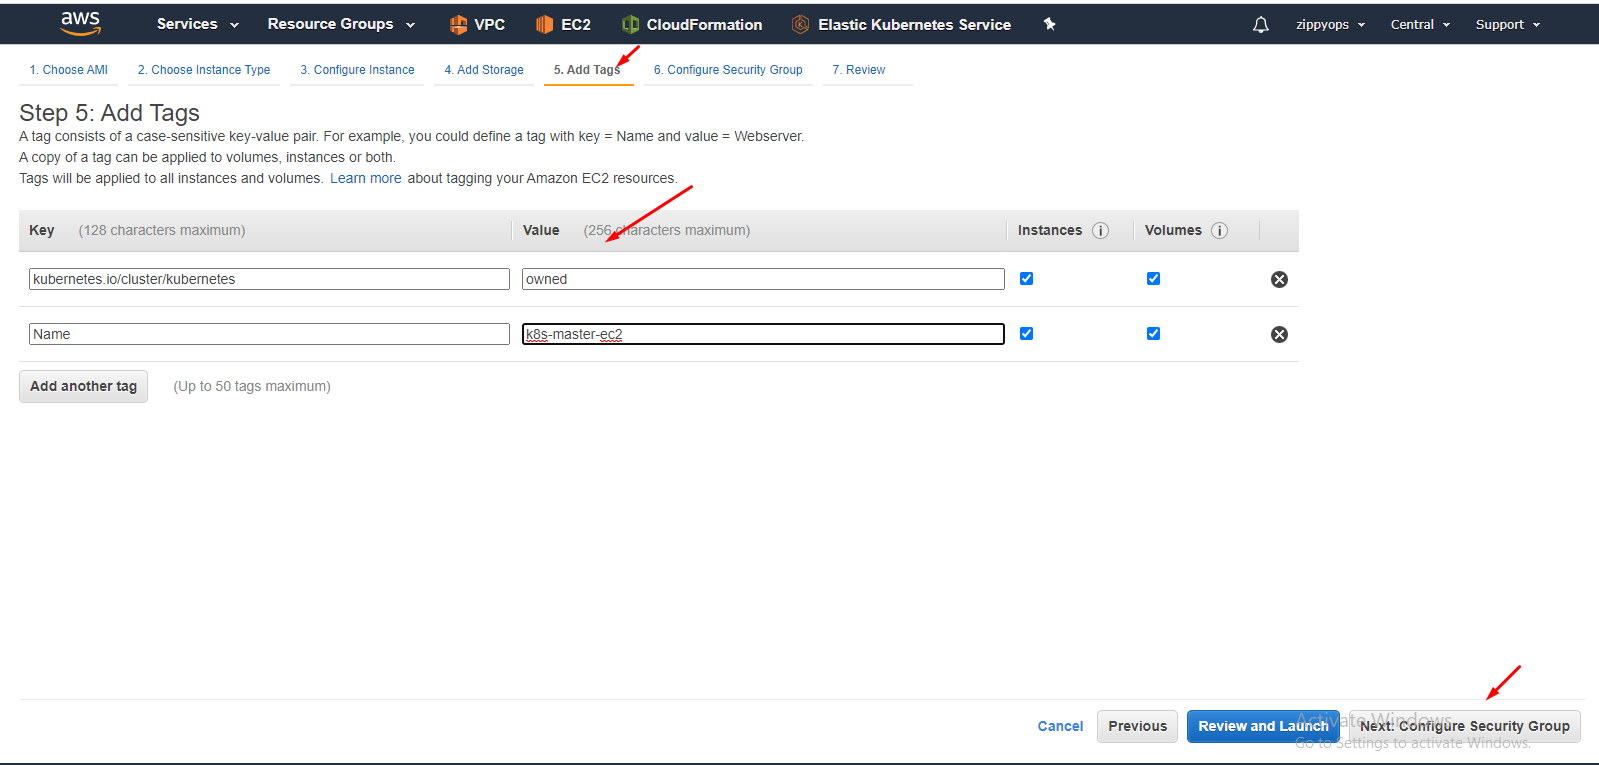
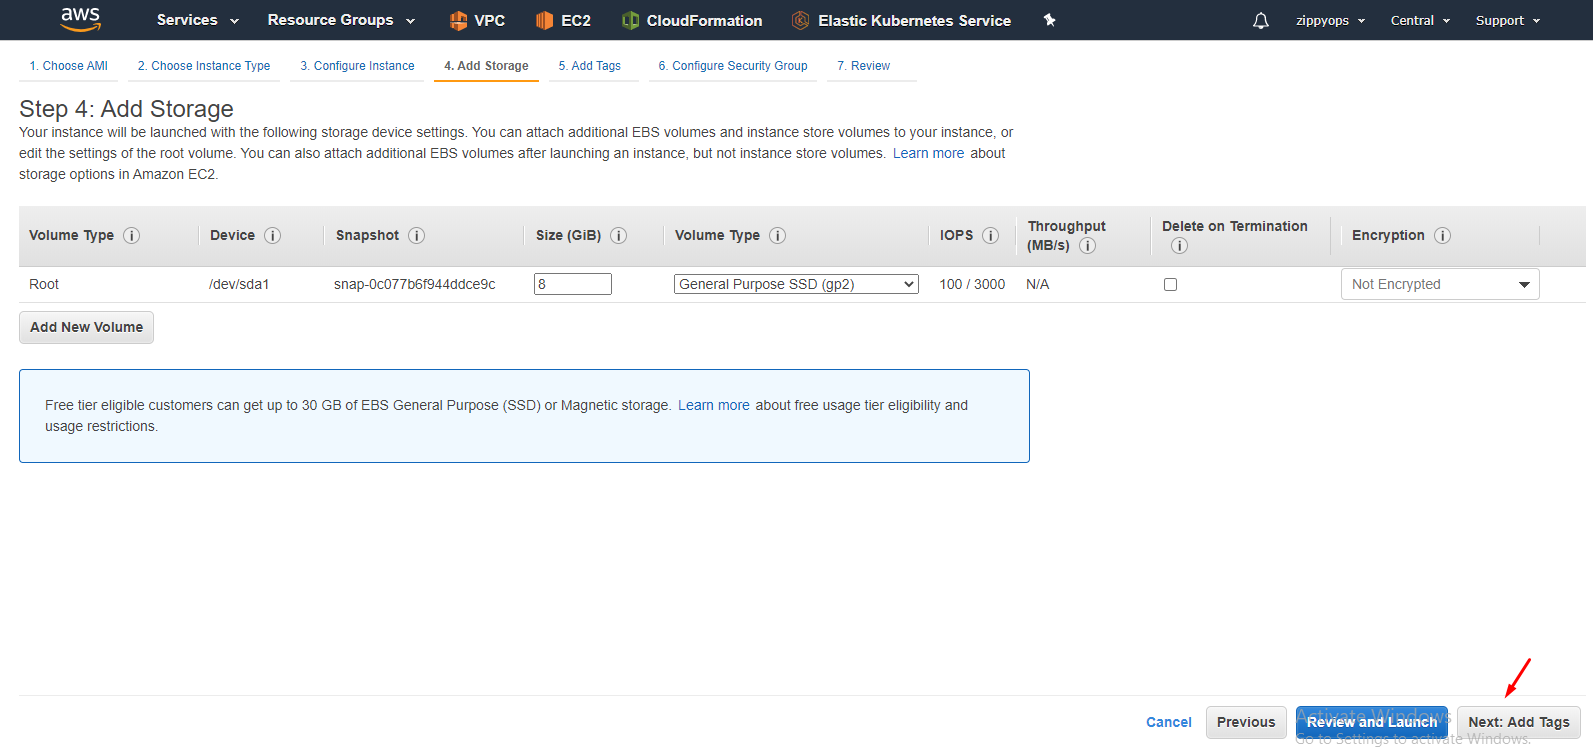
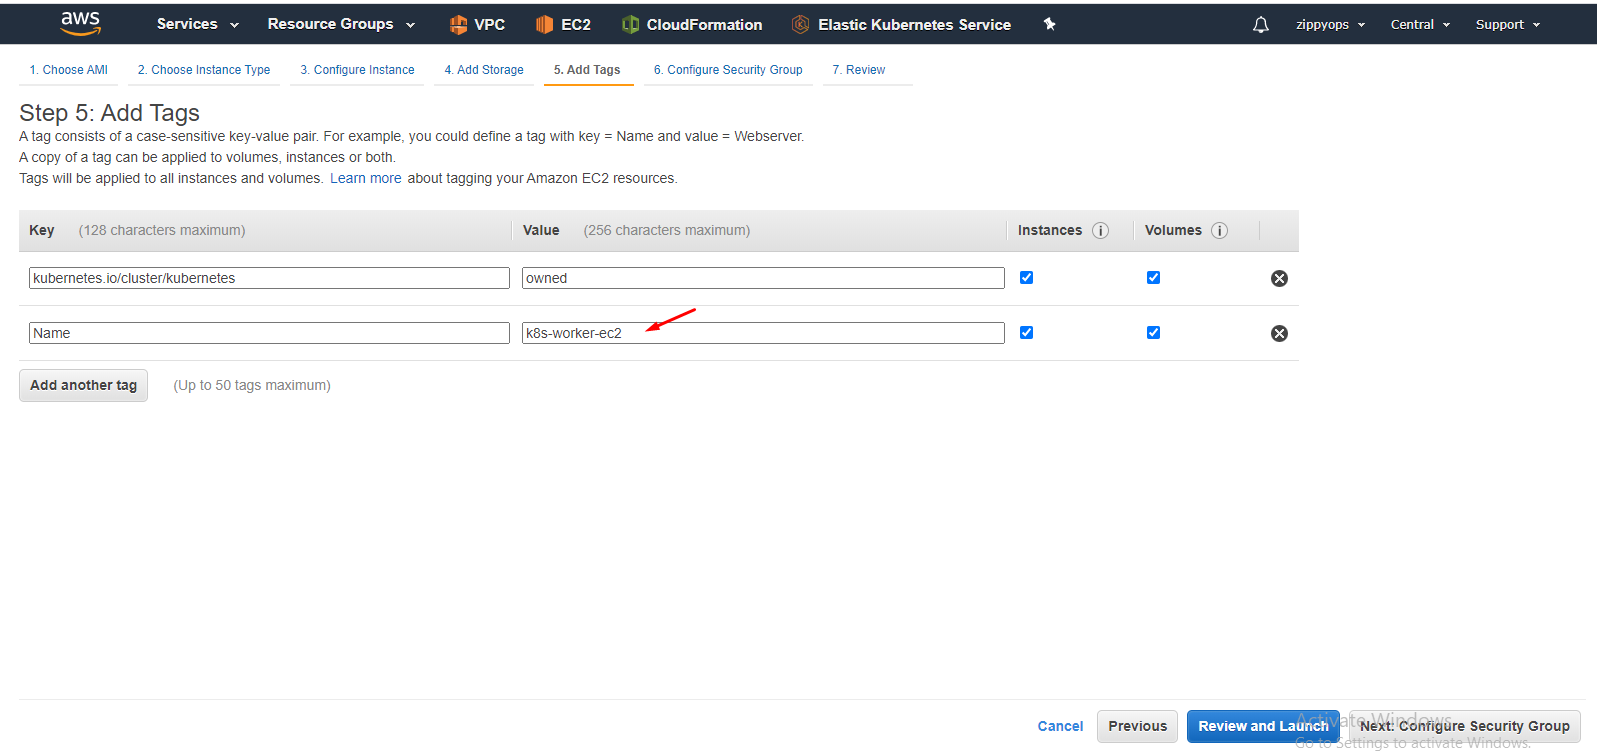
I leave the storage part as it is. Then in tag, create as below, Tagging is important for Kubernetes integration.

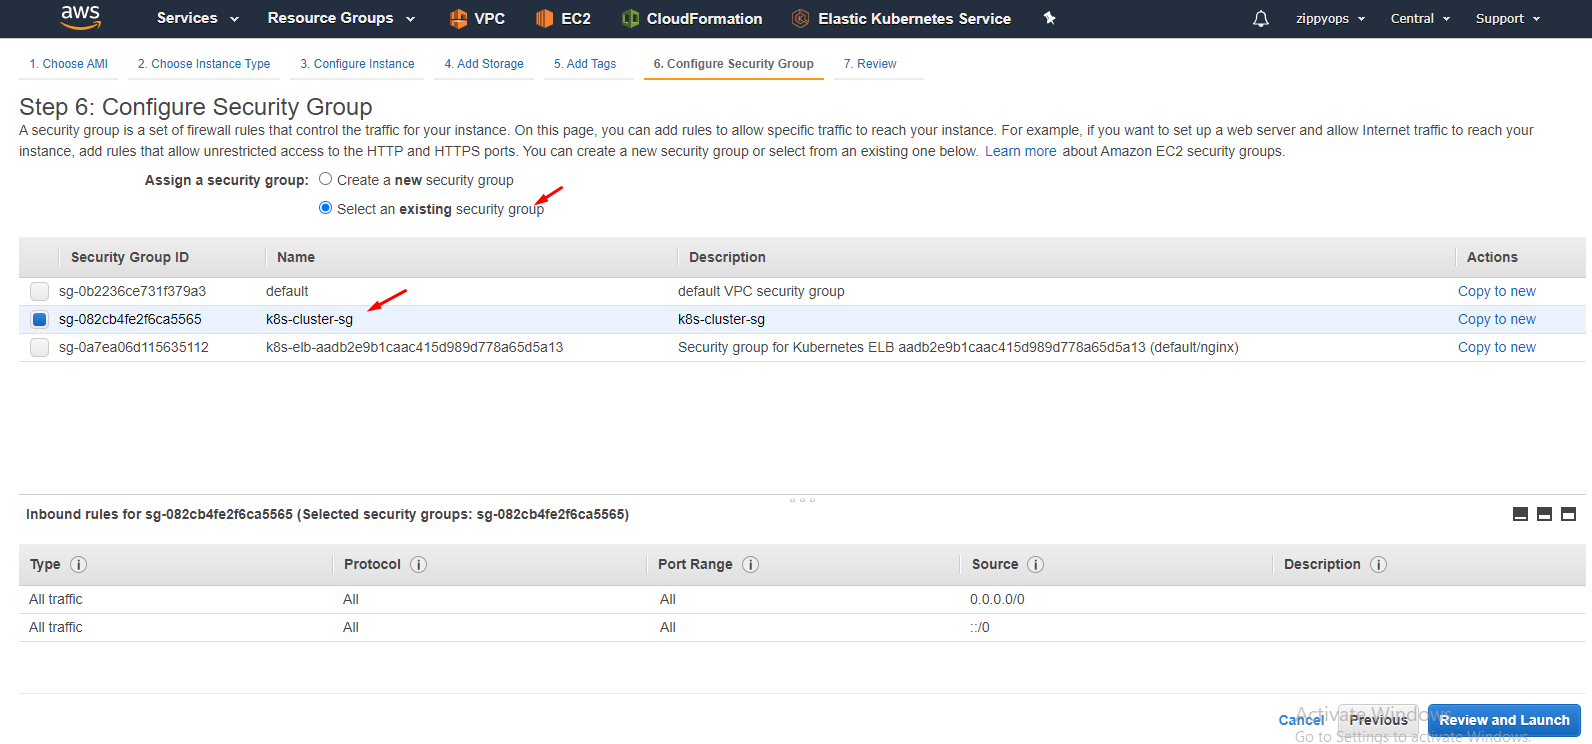
Select your security group. Review and create. Your master instance.
Follow the same procedure for worker nodes also.
Dropdown you can see the image. Select the image and select type General purpose - t2.medium size.


Select your vpc and subnet and then select your master IAM role. Leave other stuff as it is.
I leave the storage part as it is. Then in tag, create as below,
Select your security group.
Add tags to your worker node. Review and create your worker node.
Step 4: Open your putty and connect your aws master and worker node. Check your network connectivity in both nodes using the ping command. Now start the installation of Kubernetes.
Do it Both master and nodes
Step 1: Update your machines.
#yum update -y && yum upgrade -y
Step 2: set hostname for both.
#curl http://169.254.169.254/latest/meta-data/local-hostname
If you run the command you will get a sample hostname. Set the same using hostnamectl command.
#hostnamectl set-hostname
Now you can check your hostname.
#Hostname
Step 3: Put entry of both master's and nodes' ip ,hostname in /etc/hosts of both master and nodes(aws's private ip and hostname)
Step 4: disable selinux.
#setenforce 0
change "SELINUX=disabled" in /etc/sysconfig/selinux
Step 5: Enable br_netfilter Kernel Module
The br_netfilter module is required for Kubernetes installation. Enable this kernel module so that the packets traversing the bridge are processed by iptables for filtering and port forwarding, and the Kubernetes pods across the cluster can communicate with each other.
modprobe br_netfilter
echo '1' > /proc/sys/net/bridge/bridge-nf-call-iptables
Step 6: Disable SWAP
Disable SWAP for Kubernetes installation by running the following commands.
swapoff -a

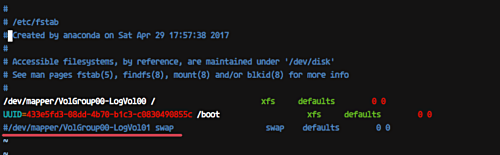
And then edit the '/etc/fstab' file. Comment the swap line UUID as below.
Step 7: Install Docker CE
Install the latest version of Docker-ce from the docker repository. Install the package dependencies for docker-ce.
#yum install -y yum-utils device-mapper-persistent-data lvm2
Add the Docker repository to the system and install docker-ce using the yum command.
#yum-config-manager --add-repo https://download.docker.com/linux/centos/docker-ce.repo
#yum install -y docker-ce
Wait for the docker-ce installation.
Step 8: Install Kubernetes
Add the Kubernetes repository to the centos 7 system by running the following command.
update this content in this file in aws.(aws has default content in it but we have update this if we didnot change kubeadm,kubelet,kubectl will install)
cat < /etc/yum.repos.d/kubernetes.repo
[kubernetes]
name=Kubernetes
baseurl=https://packages.cloud.google.com/yum/repos/kubernetes-el7-x86_64
enabled=1
gpgcheck=1
repo_gpgcheck=1
gpgkey=https://packages.cloud.google.com/yum/doc/yum-key.gpg
https://packages.cloud.google.com/yum/doc/rpm-package-key.gpg
EOF
Now install the Kubernetes packages kubeadm, kubelet, and kubectl using the yum command below.
#yum install -y kubelet kubeadm kubectl
After the installation is complete, restart all those servers.
#sudo reboot
Log in again to the server and start the services, docker, and kubelet
#systemctl start docker && systemctl enable docker
#systemctl start kubelet && systemctl enable kubelet
Step 9: Change the cgroup-driver
We need to make sure the docker-ce and Kubernetes are using the same 'cgroup'. Check docker cgroup using the docker info command.
#docker info | grep -i cgroup
And you see the docker is using 'cgroupfs' as a cgroup-driver.
Now run the command below to change the Kubernetes cgroup-driver to 'cgroupfs'.
#sed -i 's/cgroup-driver=systemd/cgroup-driver=cgroupfs/g' /etc/systemd/system/kubelet.service.d/10-kubeadm.conf
Above is actual command for local but in aws 10-kubeadm.conf path might vary .below given
#sed -i 's/cgroup-driver=systemd/cgroup-driver=cgroupfs/g' /usr/lib/systemd/system/kubelet.service.d/10-kubeadm.conf
Reload the systemd system and restart the kubelet service.
#systemctl daemon-reload
#systemctl restart kubelet
Now we're ready to configure the Kubernetes Cluster.
Only in Master:
Step 1: Kubernetes Cluster Initialization
In this step, we will initialize the Kubernetes master cluster configuration. Run the command below to set up the Kubernetes master.
#Kubeadm init
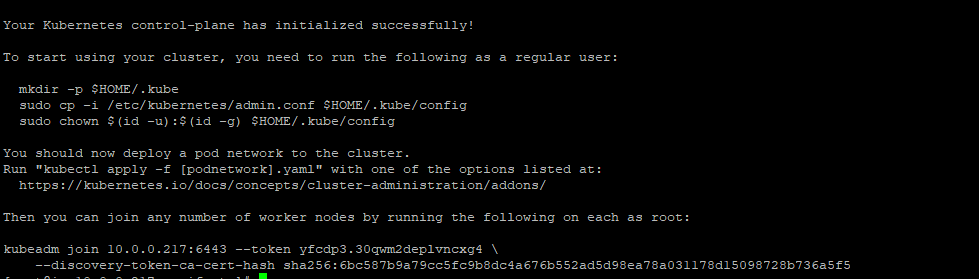
When the Kubernetes initialization is complete, you will get the result as below.
Note:
Copy the 'kubeadm join ... ... ...' command to your text editor. The command will be used to register new nodes to the Kubernetes cluster.
Now to use Kubernetes, we need to run some commands as on the result.
Create new '.kube' configuration directory and copy the configuration 'admin.conf'.
#mkdir -p $HOME/.kube
#sudo cp -i /etc/kubernetes/admin.conf $HOME/.kube/config
#sudo chown $(id -u):$(id -g) $HOME/.kube/config
Step 2: Next, deploy the flannel network to the Kubernetes cluster using the kubectl command. Install Flannel network for on-premises.
#kubectl apply -f https://raw.githubusercontent.com/coreos/flannel/master/Documentation/kube-flannel.yml
Install wave network for cloud.
#kubectl apply -f "https://cloud.weave.works/k8s/net?k8s-version=$(kubectl version | base64 | tr -d '\n')&env.WEAVE_MTU=1337"
Step 3: Now check the master details using the following commands.
#kubectl get nodes
#kubectl get pods
# kubectl get nodes
NAME STATUS ROLES AGE VERSION
ip-10-0-0-245.ca-central-1.compute.internal Ready master 2m42s v1.18.3
# kubectl get pods --all-namespaces
NAMESPACE NAME READY STATUS RESTARTS AGE
kube-system coredns-66bff467f8-7rngp 1/1 Running 0 3m56s
kube-system coredns-66bff467f8-kh7cq 1/1 Running 0 3m56s
kube-system etcd-ip-10-0-0-245.ca-central-1.compute.internal 1/1 Running 0 4m4s
kube-system kube-apiserver-ip-10-0-0-245.ca-central-1.compute.internal 1/1 Running 0 4m4s
kube-system kube-controller-manager-ip-10-0-0-245.ca-central-1.compute.internal 1/1 Running 0 4m4s
kube-system kube-proxy-qztkb 1/1 Running 0 3m57s
kube-system kube-scheduler-ip-10-0-0-245.ca-central-1.compute.internal 1/1 Running 0 4m4s
kube-system weave-net-x4mgg 2/2 Running 0 2m24s
See master is in the ready state. Everything should be in a running state. if anything goes down master will not get into the ready state.
Step 4: Kubernetes Configuration for integration
On the Kubernetes side of the house, you’ll need to make sure that the --cloud-provider=aws command-line flag is present for the API server, controller manager, and every Kubelet in the cluster.
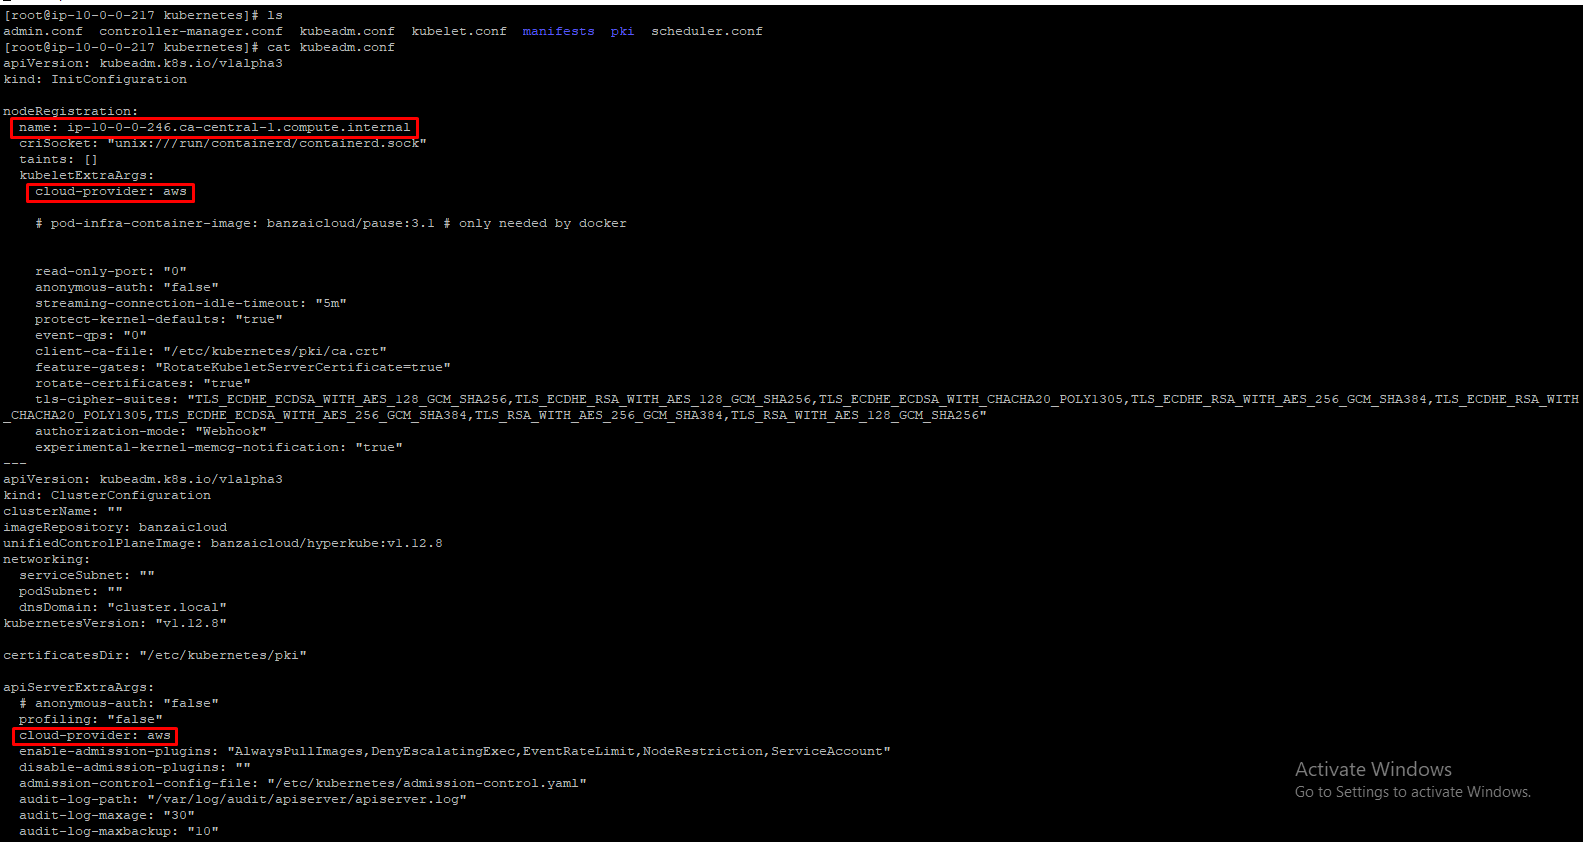
If you’re using kubeadm to set up your cluster, you can have kubeadm add the flags to the API server and controller manager by using the apiServerExtraArgs and controllerManagerExtraArgs sections in a configuration file, like this:
apiServerExtraArgs:
cloud-provider: aws
controllerManagerExtraArgs:
cloud-provider: aws
Likewise, you can use the node registration section of a kubeadm configuration file to pass extra arguments to the Kubelet, like this:
nodeRegistration:
kubeletExtraArgs:
cloud-provider: aws
And put the worker node entry in kubeadm.conf file.
nodeRegistration:
name:
kubeletExtraArgs:
cloud-provider: aws
You would need to substitute the correct fully-qualified domain name for each instance, of course.Do it in /etc/kubernetes/kubeadm.conf file like below.
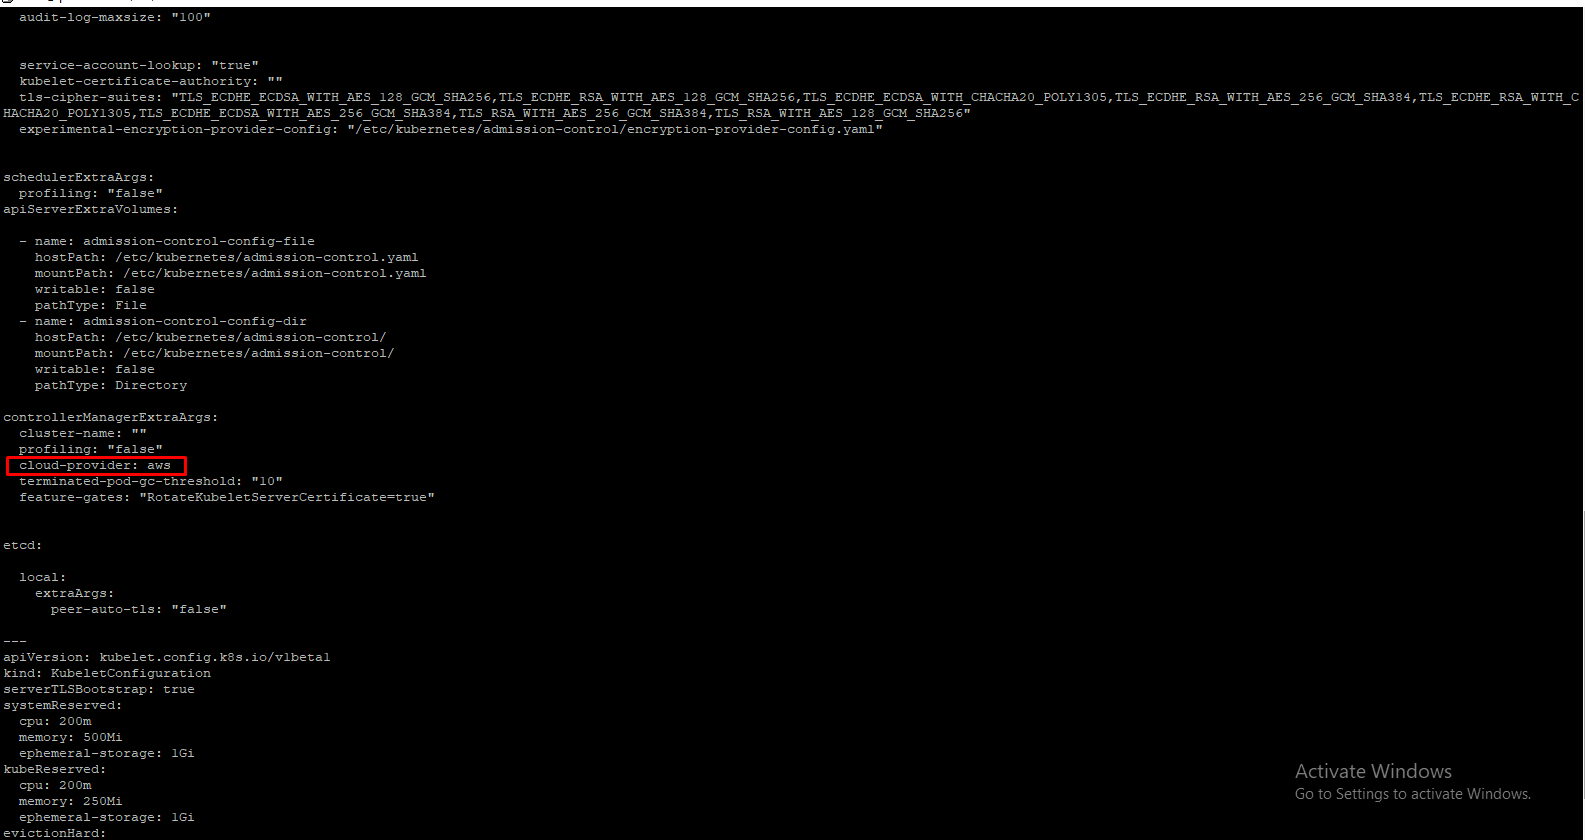
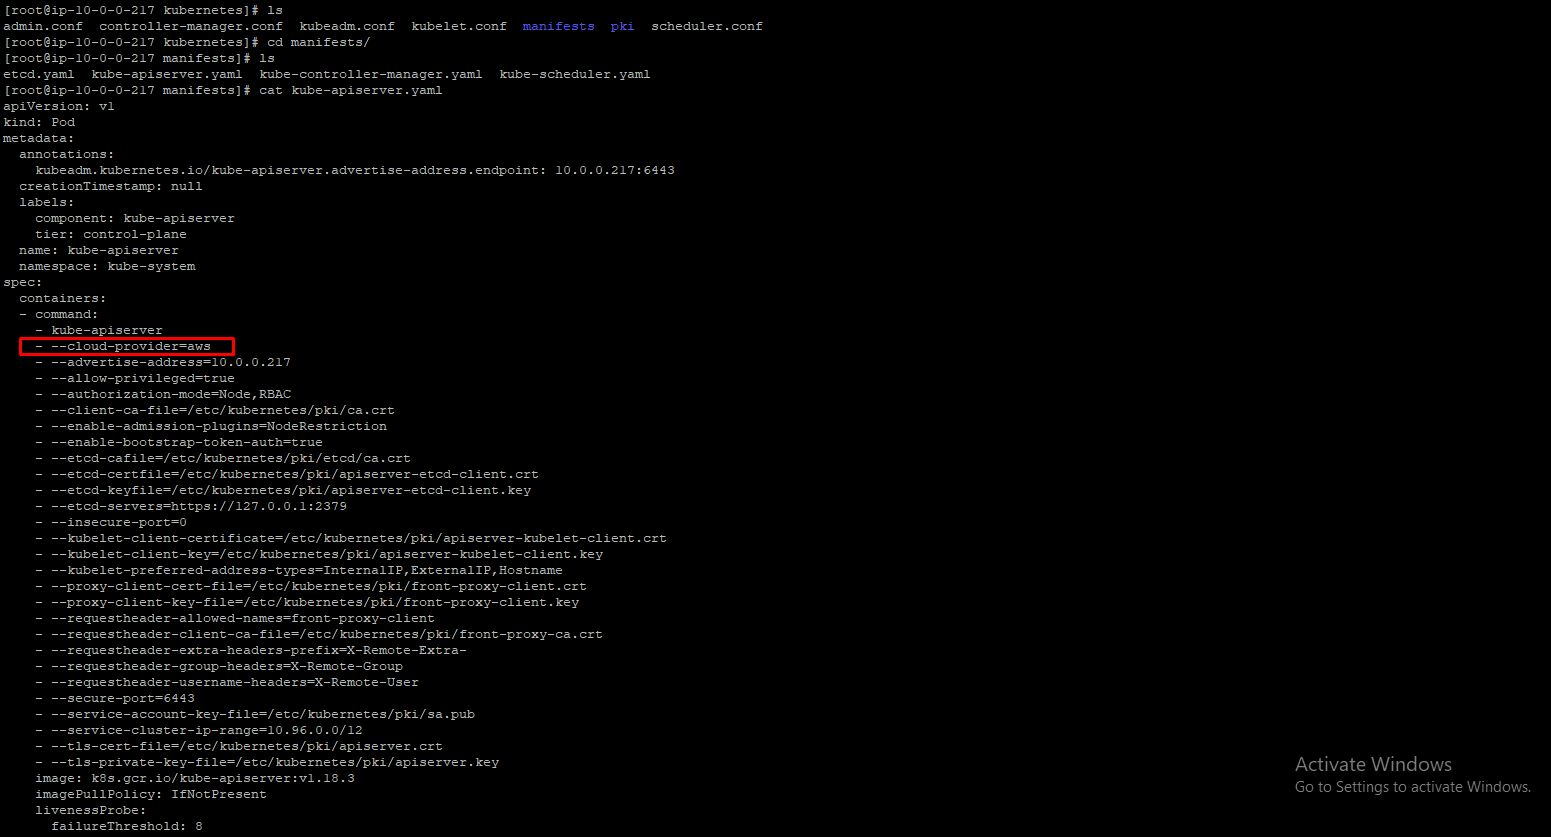
Then in /etc/kubernetes/manifest/kube-apiserver.yaml,
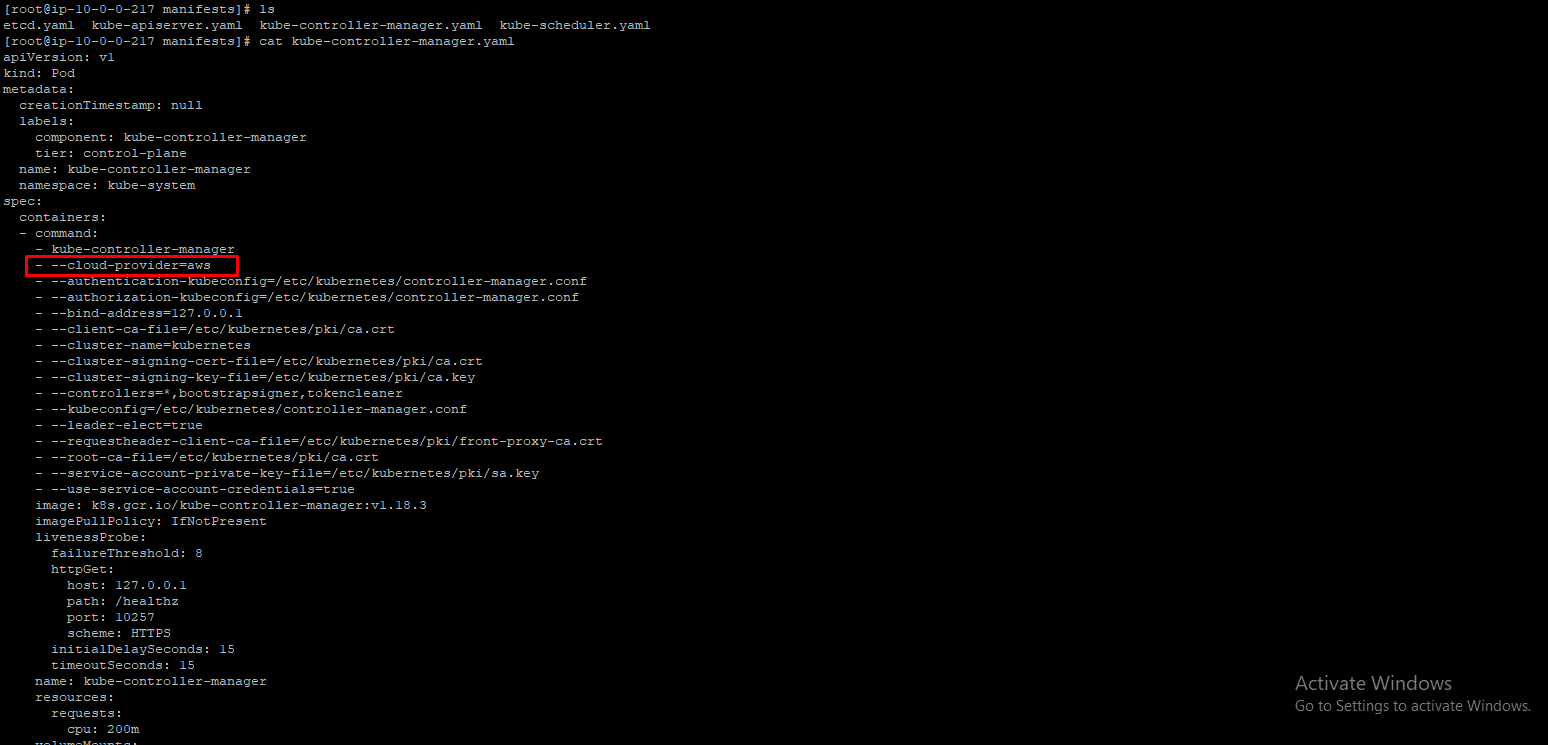
In /etc/kubernetes/manifest/kube-controller-manager.yaml file,
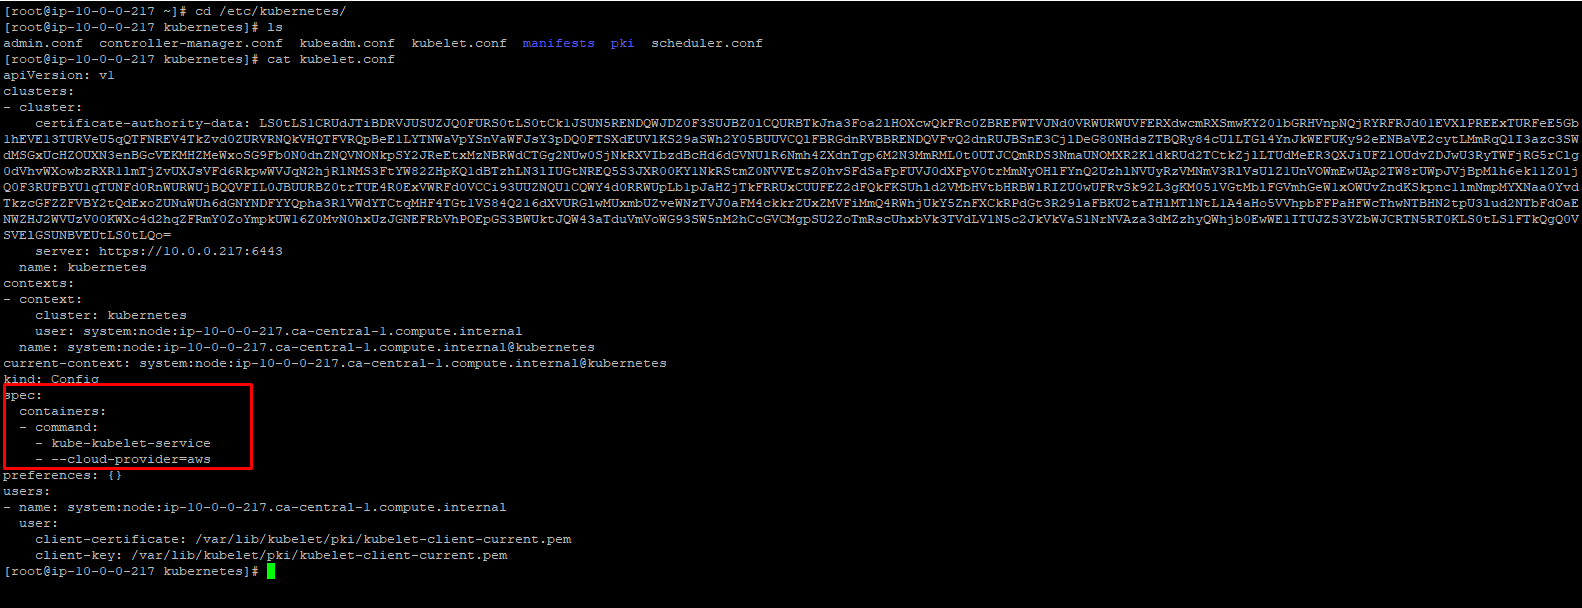
Then in /etc/kubernetes/kubelet.conf file,
That's all Kubernetes integration part. This all should b done before adding worker node to master
Step 5: Join the worker node to master.
Run the kube-join command in your node.
Example:
kubeadm join 10.0.0.245:6443 --token 7chytu.zj3346549i4j9k4n \ --discovery-token-ca-cert-hash sha256:c055b88f3258296d56d87f712b5534f9005c537401d57f057600195035fd4e13
Now run the kubectl get nodes command in your master. You might get master and node running.
# kubectl get nodes
NAME STATUS ROLES AGE VERSION
ip-10-0-0-150.ca-central-1.compute.internal Ready 2m22s v1.18.3
ip-10-0-0-245.ca-central-1.compute.internal Ready master 9m3s v1.18.3
Creating ebs and elb :
Step 1: Create a storage class for dynamic provisioning of ebs volume
To enable dynamic provisioning, a cluster administrator needs to pre-create one or more StorageClass objects for users. StorageClass objects define which provisioner should be used and what parameters should be passed to that provisioner when dynamic provisioning is invoked.
Run the following command to create a default storage class.
#kubectl apply -f https://raw.githubusercontent.com/kubernetes/kubernetes/master/cluster/addons/storage-class/aws/default.yaml
You can go to that link and check the storage class configuration.Here I gave,
#cat default.yaml
apiVersion: storage.k8s.io/v1
kind: StorageClass
metadata:
name: gp2
annotations:
storageclass.kubernetes.io/is-default-class: "true"
labels:
addonmanager.kubernetes.io/mode: EnsureExists
provisioner: kubernetes.io/aws-ebs
parameters:
type: gp2
PersistentVolumes that are dynamically created by a StorageClass will have the reclaim policy specified in the reclaimPolicy field of the class, which can be either Delete or Retain. If no reclaimPolicy is specified when a StorageClass object is created, it will default to Delete.
Step 2: create a persistent volumeclaim file.
Users request dynamically provisioned storage by including a storage class in their PersistentVolumeClaim. Before Kubernetes v1.6, this was done via the volume.beta.kubernetes.io/storage-class annotation. However, this annotation is deprecated since v1.6. Users now can and should instead use the storageClassName field of the PersistentVolumeClaim object. The value of this field must match the name of a StorageClass configured by the administrator.
#Cat persistentvolumeclaim.yaml
apiVersion: v1
kind: PersistentVolumeClaim
metadata:
name: claim1
spec:
accessModes:x
- ReadWriteOnce
storageClassName: gp2
resources:
requests:
storage: 30Gi
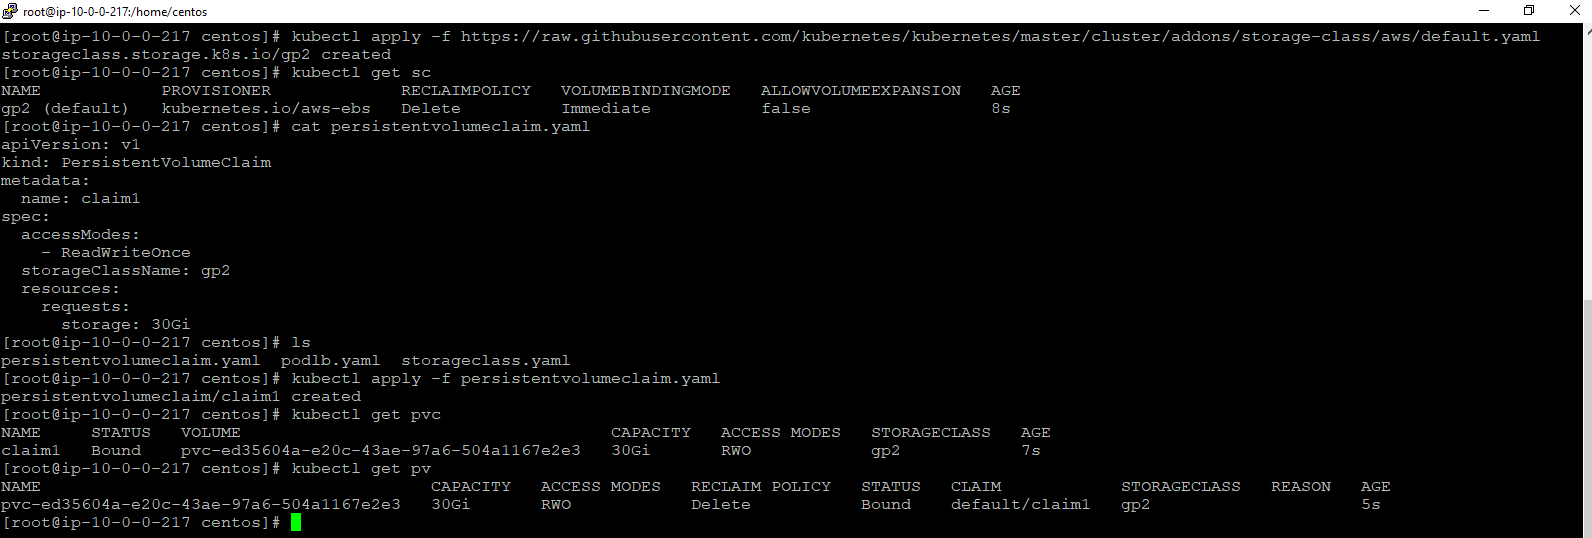
Once we created storage class & persistent volume claim, persistent volume dynamically will create which is shown in the above image.
Now go to the aws console. Navigate to the volume. You can see the ebs volume created.

Step 3: Now create a dynamic elastic load balancer. If we mention type: load balancer in service of the pod, it should create an elastic load balancer. I created nginx pod and their service.
#Cat podlb.yaml
apiVersion: v1
kind: Pod
metadata:
name: nginx
namespace: default
spec:
containers:
- image: nginx
name: nginx
ports:
- containerPort: 80
name: http
---
apiVersion: v1
kind: Service
metadata:
name: nginx
namespace: default
annotations: {}
spec:
externalTrafficPolicy: Local
type: LoadBalancer
ports:
- name: http
port: 80
protocol: TCP
targetPort: 80
selector:
app: nginx
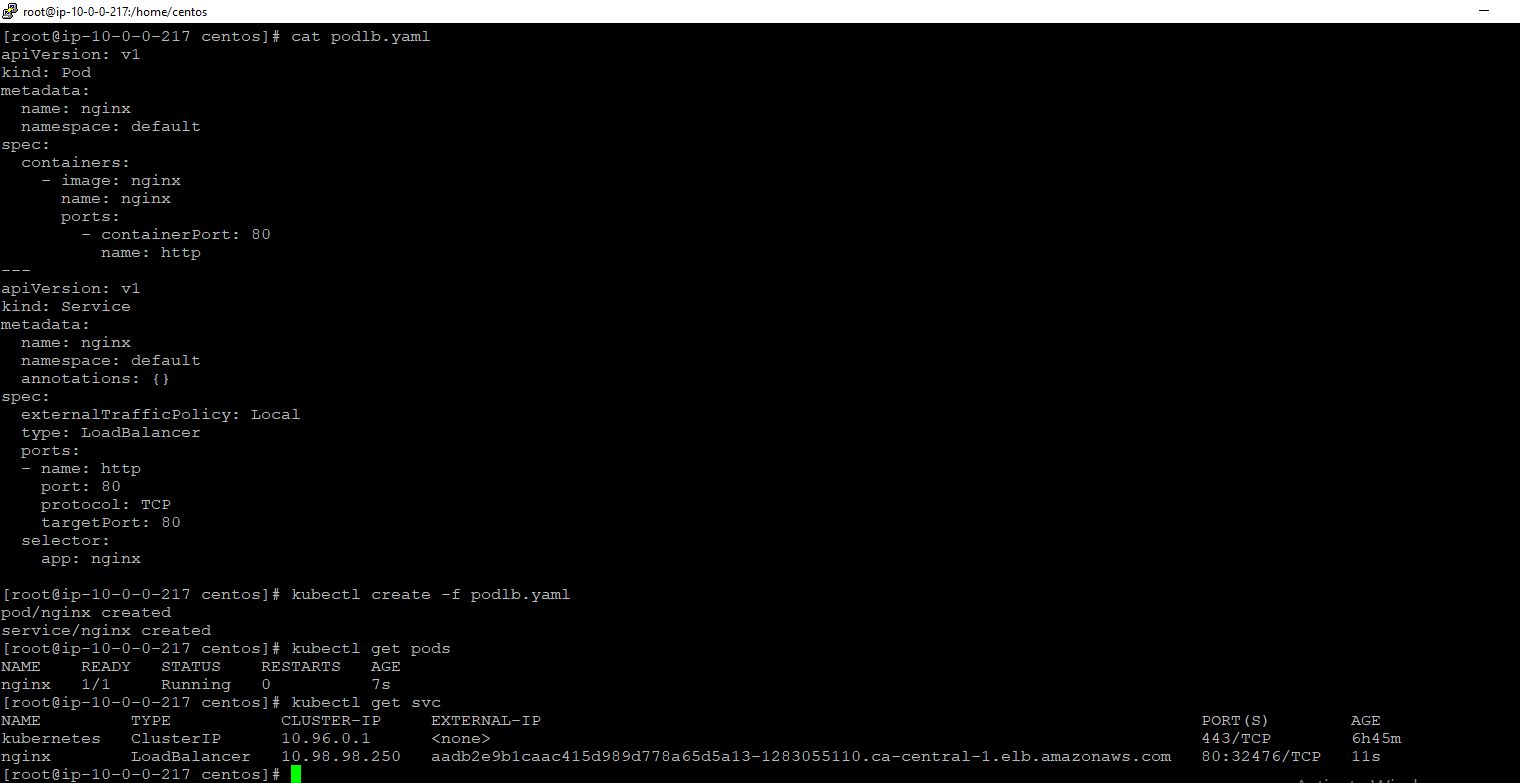
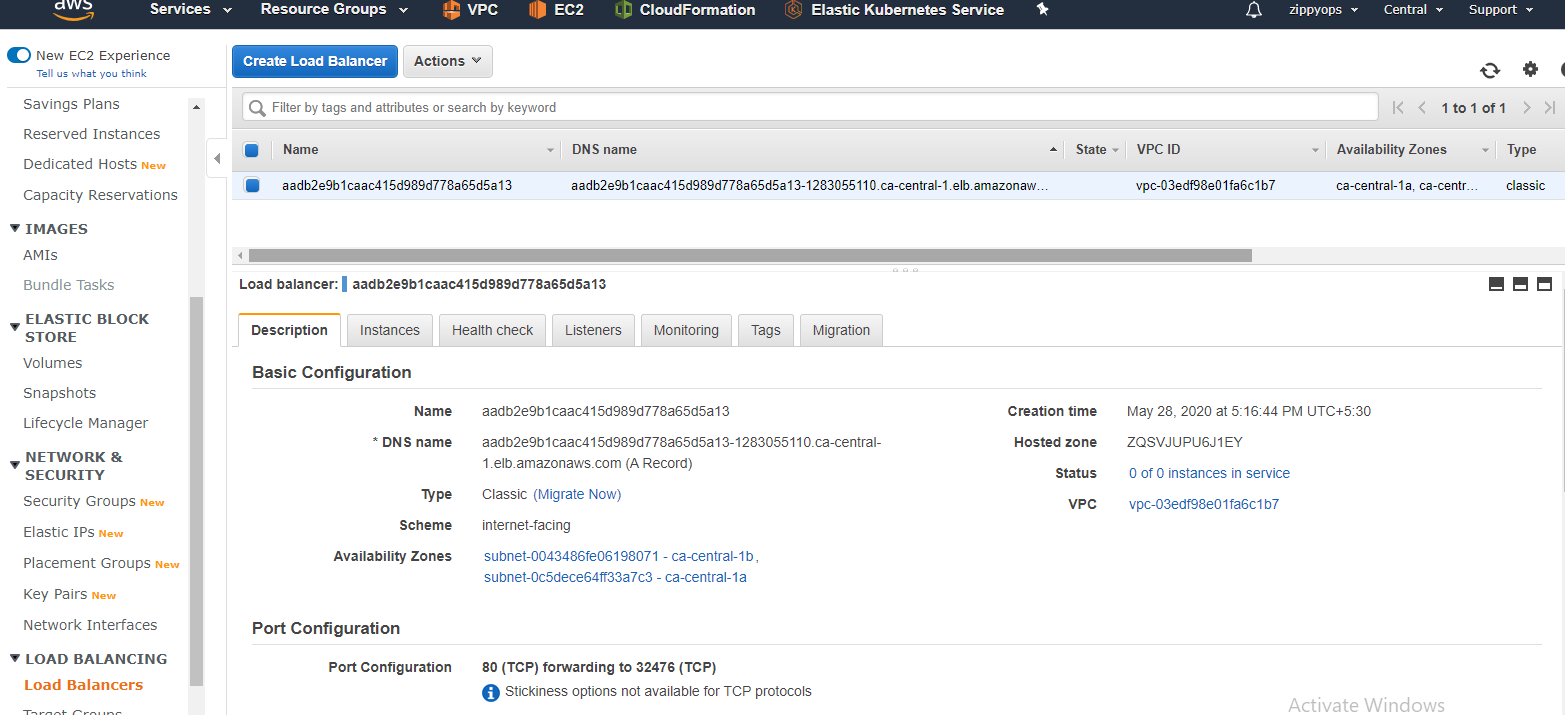
Now we can see the elb created in the aws console. This is the process of dynamic provisioning of ebs and elb using an aws cloud provider for Kubernetes.
Relevant Blogs:
Recent Comments
No comments
Leave a Comment
We will be happy to hear what you think about this post