Ansible Molecule testing

The molecule project is designed to aid in the development and testing of Ansible roles. Molecule provides support for testing with multiple instances, operating systems and distributions, virtualization providers, test frameworks, and testing scenarios.
Pre-request
Ansible installed with the latest version.
Ubuntu server
server setup ubuntu 18.04
1. Logging in as Root
To log into your server, you will need to know your server’s public IP address. You will also need the password or if you installed an SSH key for authentication, the private key for the root user’s account.
# ssh root@your_server_ip
2. Creating a New User
Once you are logged in as root, add the new user account that we will use to log in from now on.
# adduser zippyops
You will be asked a few questions, starting with the account password.
Enter a strong password and, optionally, fill in any of the additional information if you would like. This is not required and you can just hit ENTER in any field you wish to skip.
3. Granting Administrative Privileges
Now, we have a new user account with regular account privileges. However, we may sometimes need to do administrative tasks.
To avoid having to log out of our normal user and log back in as the root account, we can set up what is known as “superuser” or root privileges for our normal account. This will allow our normal user to run commands with administrative privileges by putting the word sudo before each command.
To add these privileges to our new user, we need to add the new user to the sudo group. By default, on Ubuntu 18.04, users who belong to the sudo group are allowed to use the Sudo command.
As root, run this command to add your new user to the sudo group (substitute the highlighted word with your new user):
# usermod -aG sudo zippyops
Now, when logged in as your regular user, you can type sudo before commands to perform actions with superuser privileges.
4. Setting Up a Basic Firewall
Ubuntu 18.04 servers can use the UFW firewall to make sure only connections to certain services are allowed. We can set up a basic firewall very easily using this application.
# ufw app list
We need to make sure that the firewall allows SSH connections so that we can log back in next time. We can allow these connections by using the below command:
# ufw allow OpenSSH
Enable the firewall using the below command:
# ufw enable
Type “y” and press ENTER to proceed. You can see that SSH connections are still allowed by using the below command:
# ufw status
Status: active
Docker installation:
First, update your existing list of packages:
# sudo apt update
Next, install a few prerequisite packages which let apt use packages over HTTPS:
# sudo apt install apt-transport-HTTP ca-certificates curl software-properties-common
Then add the GPG key for the official Docker repository to your system:
# curl -fsSL https://download.docker.com/linux/ubuntu/gpg | sudo apt-key add -
Add the Docker repository to APT sources:
# sudo add-apt-repository "deb [arch=amd64] https://download.docker.com/linux/ubuntu bionic stable"
Next, update the package database with the Docker packages from the newly added repo:
# sudo apt update
Make sure you are about to install from the Docker repo instead of the default Ubuntu repo:
# apt-cache policy docker-ce
You’ll see output like this, the version number for Docker may be different:
The output of apt-cache policy docker-ce
docker-ce:
Installed: (none)
Candidate: 18.03.1~ce~3-0~ubuntu
Version table:
18.03.1~ce~3-0~ubuntu 500
500 https://download.docker.com/linux/ubuntu bionic/stable amd64 Packages
Finally, install Docker:
# sudo apt install docker-ce
Now check the docker status:
# sudo systemctl status docker
docker service is active and running:
● docker.service - Docker Application Container Engine
Loaded: loaded (/lib/systemd/system/docker.service; enabled; vendor preset: enabled)
Active: active (running) since Tue 2021-03-30 07:49:28 UTC; 4h 12min ago
Docs: https://docs.docker.com
Main PID: 8828 (dockerd)
Tasks: 10
CGroup: /system.slice/docker.service
└─8828 /usr/bin/dockerd -H fd:// --containerd=/run/containerd/containerd.sock
install and Set Up Python3:
Let's update and upgrade the system using the below command:
# sudo apt update
# sudo apt -y upgrade
Now check the python version:
# python3 -V
Python 3.6.7
install python3-pip using the below command:
# sudo apt install -y python3-pip
Python packages can be installed using below syntax:
# pip3 install
# sudo apt install build-essential libssl-dev libffi-dev python3-dev
Setting Up a Virtual Environment:
Virtual environments enable you to have an isolated space on your server for Python projects, ensuring that each of your projects can have its own set of dependencies that won’t disrupt any of your other projects.
You can set up as many Python programming environments as you want. Each environment is basically a directory or folder on your server that has a few scripts in it to make it act as an environment.
First, install virtual environment:
# sudo apt install -y python3-venv
create a new directory called as environments using mkdir command:
# mkdir environments
# cd environments
creating a new environment:
log in as a non-root user create a new virtual environment(venv).
# python3.6 -m venv my_env
pyvenv sets up a new directory that contains a few items which we can view with the ls command:
# ls my_env
bin include lib lib64 pyvenv.cfg share
To use this environment, you need to activate it, using the below command:
# source my_env/bin/activate
(my_env) zippyops@ansible:~/environments#
sample hello world program:
create a new file using vi editor:
vi hello.py
print("zippyops making Automation work!")
add above the line, save & exit the file.
Once you exit out of vi and return to your shell, let’s run the program:
# python hello.py
zippyops making Automation work!
Next, in your activated environment, install the wheel package, which provides the bdist_wheel setuptools extension that pip uses to install Ansible:
(my_env) zippyops@ansible:~/environments# python3 -m pip install wheel
Now install molecule and docker with pip. ansible will be automatically installed as a dependency for the molecule.
(my_env) zippyops@ansible:~/environments# python3 -m pip install molecule docker
Create a new Role in Molecule:
(my_env) zippyops@ansible:~/environments# molecule init role nginx
Change into the directory of the newly created role:
(my_env) zippyops@ansible:~/environments# cd nginx

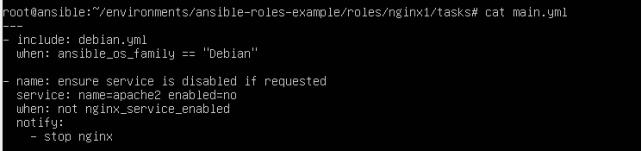
Update the code sample in the role shown below images:

add below lines in above debian.yml
- name: ensure nginx is installed
apt: pkg=nginx state=present


Finally, test the code using the below command:
(my_env) zippyops@ansible:~/environments/ansible-roles-example/roles/nginx1#molecule test
Relevant Blogs:
Recent Comments
No comments
Leave a Comment
We will be happy to hear what you think about this post