OPENLDAP

SETTING OpenLDAP
OpenLDAP is an open-source implementation of LDAP or Lightweight Directory Access Protocol. OpenLDAP allows storage and organizes user-related data centrally. OpenLDAP functions like a relational database & can store any data but it's normally used as an address book. It is used for authenticating and authorizing the users. Information stored in OpenLDAP is in a hierarchical manner & We can group the users into single or multiple groups based on necessity.
OPENLDAP – SERVER INSTALLATION
All the OpenLDAP packages are available with default package repositories, we need to install ‘OpenLDAP, ‘OpenLDAP-clients’ & ‘OpenLDAP-servers’ packages. Install them using the following command.
[root@ldaps ~]# yum install openldap openldap-servers openldap-clients –y
Once the packages have been installed, we will create password for ldap administrative user with the following command
[root@ldaps ~]# slappasswd
New password:
Re-enter new password:
enable it for boot,
[root@ldaps ~]# systemctl start slapd
[root@ldaps ~]# systemctl enable slapd
created symlink from /etc/systemd/system/multi-user.target.wants/slapd.service
to /usr/lib/systemd/system/slapd.service.
Configure LDAP
We will configure the LDAP server using the configuration file for OpenLDAP, named
‘olcDatabase={2}hdb.ldif’ located at ‘/etc/openldap/slapd.d/cn=config’. Open the file,
[root@ldap ~]# cat /etc/openldap/slapd.d/cn\=config/olcDatabase\=\{2\}hdb.ldif
# AUTO-GENERATED FILE - DO NOT EDIT!! Use ldapmodify.
# CRC32 a83a54af
dn: olcDatabase={2}hdb
objectClass: olcDatabaseConfig
objectClass: olcHdbConfig
olcDatabase: {2}hdb
olcDbDirectory: /var/lib/ldap
olcSuffix: dc=zippy,dc=com
olcRootDN: cn=Manager,dc=zippy,dc=com
olcDbIndex: objectClass eq,pres
olcDbIndex: ou,cn,mail,surname,givenname eq,pres,sub
structuralObjectClass: olcHdbConfig
entryUUID: d50473e6-af39-1038-820f-1b30c092411e
creatorsName: cn=config
createTimestamp: 20190118065549Z
entryCSN: 20190118065549.263220Z#000000#000#000000
modifiersName: cn=config
modifyTimestamp: 20190118065549Z
olcRootPW:{SSHA}ekQDCEOUKBM4niPJNCH/rNxXK8oUP0ol
here, ‘olcSuffix: dc=zippy,dc=com’ is used to define your preferred domain, which in
our case in ‘zippy.local’ & with ‘’olcRootPW’, we have defined the administrator password
for Domain admin.
Next make the changes in file ‘/etc/openldap/slapd.d/cn=config/olcDatabase={1}monitor.ldif’ to
make it as per domain,
[root@ldap~]# cat /etc/openldap/slapd.d/cn\=config/olcDatabase\=\{1\}monitor.ldif
# AUTO-GENERATED FILE - DO NOT EDIT!! Use ldapmodify.
# CRC32 7f436e4b
dn: olcDatabase={1}monitor
objectClass: olcDatabaseConfig
olcDatabase: {1}monitor
olcAccess: {0}to * by
dn.base="gidNumber=0+uidNumber=0,cn=peercred,cn=extern
al,cn=auth" read by dn.base="cn=Manager,dc=zippy,dc=com"
read by * none
structuralObjectClass: olcDatabaseConfig
entryUUID: d5046ebe-af39-1038-820e-1b30c092411e
creatorsName: cn=config
createTimestamp: 20190118065549Z
entryCSN: 20190118065549.263088Z#000000#000#000000
modifiersName: cn=config
modifyTimestamp: 20190118065549Z
Save the file & exit. Now run the slaptest to make sure that the configurations made are correct,
[root@ldap ~]# slaptest -u
5ca45174 ldif_read_file: checksum error on
"/etc/openldap/slapd.d/cn=config/olcDatabase={1}monitor.ldif"
5ca45174 ldif_read_file: checksum error on
"/etc/openldap/slapd.d/cn=config/olcDatabase={2}hdb.ldif"
config file testing succeeded
If you receive any checksum errors, forget about them. Make sure that config testing succeeds.
Setting up LDAP Database
After making the above-mentioned configurations, we will now set up a database for
OpenLDAP server.
There is a sample ldap database configuration file located in ‘/usr/share/openldap-servers’, we will use it as reference as our database file. Copy the file to ‘/usr/lib/ldap’ with the following command,
[root@ldap~]#cp
/usr/share/openldap-servers/DB_CONFIG.example /var/lib/ldap/DB_CONFIG
[root@ldap ~]# chown ldap:ldap /var/lib/ldap/*
Once done, add the following files to the ldap schema,
[root@ldap~]# ldapadd -Y EXTERNAL -H ldapi:/// -f /etc/openldap/schema/cosine.ldif
[root@ldap~]# ldapadd -Y EXTERNAL -H ldapi:/// -f /etc/openldap/schema/nis.ldif
[root@ldap~]#ldapadd -Y EXTERNAL -H ldapi:/// -f /etc/openldap/schema/inetorgperson.ldif
Next we need to generate a file named ‘base.ldif’ which will contain information regarding our OU,
[root@ldap ~]# cat /root/base.ldif
dn: dc=zippy,dc=com
dc: zippy
objectClass: top
objectClass: domain
dn: cn=ldapadm ,dc=zippy,dc=com
objectClass: organizationalRole
cn: Manager
description: LDAP Manager
dn: ou=Employees,dc=zippy,dc=com
objectClass: organizationalUnit
ou: Employees
dn: ou=Visitors,dc=zippy,dc=com
objectClass: organizationalUnit
ou: Visitors
Now build the directory structure with the following command,
[root@ldap ~]# ldapadd -x -W -D “cn=Manager,dc=zippy,dc=com” -f /root/base.ldif
adding new entry “dc=zippy,dc=com”
adding new entry “cn=ldapadm ,dc=zippy,dc=com”
adding new entry “ou=Employees,dc=zippy,dc=com”
adding new entry “ou=Visitors,dc=zippy,dc=com”
OPEN-LDAP – CLIENT INSTALLATION
Now that we have our OpenLDAP ready with some users configured, we will add the LDAP
authentication to a remote machine & will use our LDAP users for logging into the system.
Firstly open the terminal on a remote machine & install the following packages to install
OpenLDAP client on the machine,
[root@client ~]# yum install -y openldap-clients nss-pam-ldapd
Once the packages have been installed, run the following command to configure the ldap authentication,
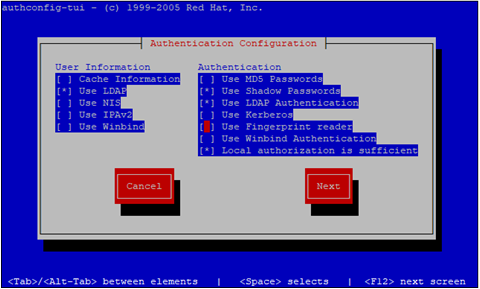
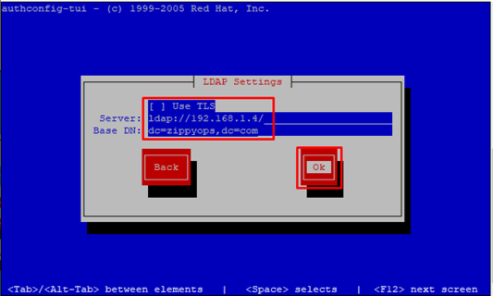
[root@client ~]# authconfig-tui
configure the ldap authentication as shown in pictures below,
Once done, you can check if the configuration has been successfully or not by using the following command,
[root@kubernetesmaster ~]# getent passwd AK
AK:*:1009:500:Ak:/home/users/AK:
That’s it, we can now use the LDAP users to log in to the client machines
Relevant Blogs:
Recent Comments
No comments
Leave a Comment
We will be happy to hear what you think about this post