Request-Level Authentication and Authorization With Istio and Keycloak
Learn how to enable request-level authentication for your applications using Istio’s request authentication/authorization and Keycloak.
Kubernetes has made it easier to manage containerized microservices at scale. However, you get a limited set of security features with Kubernetes. A key component of application security is the prevention of unauthorized access. Standards-based identity and access management (IAM) for user authentication, such as SAML, WS-Fed, or the OpenID Connect/OAuth2 standards, have to be used to ensure secure access to the application. Multi-factor authentication (MFA) can also be implemented as an additional security measure.
Yet there is no native way to implement these security features in Kubernetes. Even crucial security aspects like request-level authentication and authorization are not supported out of the box.
This is where tools like service mesh help us. From routing, traffic shaping, observability, and security, a service mesh comes with many useful features that your developers can add to your application without building them from scratch.
In this blog post, we will talk about two security features of service mesh: request-level authentication and authorization. Later in the article, we will implement request-level authentication and authorization using Istio service mesh and Keycloak.
What Is Request-Level Authentication and Authorization?
Most applications use a modern web framework and offer one or more API endpoints to allow users, programs, and other applications to access your application. These API endpoints provide the below functionalities:
- Allow your application users to access data on your server through a browser or a mobile app.
- End users and other programs can get programmatic access to data managed by your application.
- Enable and manage communication among different services of your application.
These API endpoints can be abused or misused if accessed by unauthorized users. Your application should have a mechanism in place to authenticate and authorize end users and allow access to authenticated requests only.
This process of validating the credentials each request carries is called request-level authentication. Request-level authorization is the process of allowing access to resources based on the legitimacy of credentials in the request.
One of the most popular methods for request-level authentication and authorization is JWT (JSON Web Token) authentication.
JWT(JSON Web Token) Authentication
JSON Web Token (JWT) is a popular open-source authentication standard that defines a comprehensive way for transmitting data between parties securely in the form of a JSON object. This information shared between parties can be verified and trusted because it is signed digitally using a strong encryption mechanism.
JSON Web Tokens (JWT) are made up of three components:
- Header: It specifies the algorithm used for encrypting the token’s content.
- Payload: It contains information the token securely transmits, also known as claims.
- Signature: It is used to verify the authenticity of the payload.
Istio and JWT
Istio is one of the most popular and widely used service mesh. It comes with many features that help you to efficiently monitor and secure your services. From a security point of view, one feature that plays a critical role is the ability to validate the JWT attached to the end-user requests.
Before end-user requests hit your application, Istio will:
- Validate and verify JWT attach to the end-user request.
- Forward only authenticated requests to the application.
- Deny access to unauthenticated requests.
This security feature of Istio is very useful in offloading authentication and authorization logic from your application code. You don’t have to worry about writing the authentication code yourself. Istio will manage the authentication part by validating the JWT token present in the request header.
Popular Authentication Providers for JWT
There are many authentication providers available, and you can select any one of them depending on your project’s requirements. Here are the few popular authentication providers which support JWT.
Auth0: Auth0 is the most popular and well-established authentication provider for integrating your application for authentication and authorization. Auth0 comes with a free tier as well which covers most of the things required for authentication and authorization for your application.
Firebase Auth: Firebase Auth is another popular authentication service provider that allows you to add authentication and authorization to your application. Firebase allows you to add sign-in methods such as identity providers, including Google, Facebook, email and password, and phone number.
Google Auth: Google OIDC is one of the well-known authentication providers which you can use for both authentication and authorization.
KeyCloak: Keycloak is a popular open-source authentication service provider. Keycloak provides all the features that a typical authentication provider does. Setting up and using Keycloak is fairly straightforward, as we will see in this blog post.
|
Authentication Provider |
Open SourceKeycloak |
SSO Support |
JWT Support |
|
Auth0 |
No |
Yes |
Yes |
|
Firebase Auth |
No |
Yes |
Yes |
|
Google Auth |
No |
Yes |
Yes |
|
Keycloak |
Yes |
Yes |
Yes |
What Is Keycloak?
Keycloak is an open-source authentication service provider and identity and access management tool that lets you add authentication and authorization to applications. It provides all the native authentication features, including user federation, SSO, OIDC, user management, and fine-grained authorization.
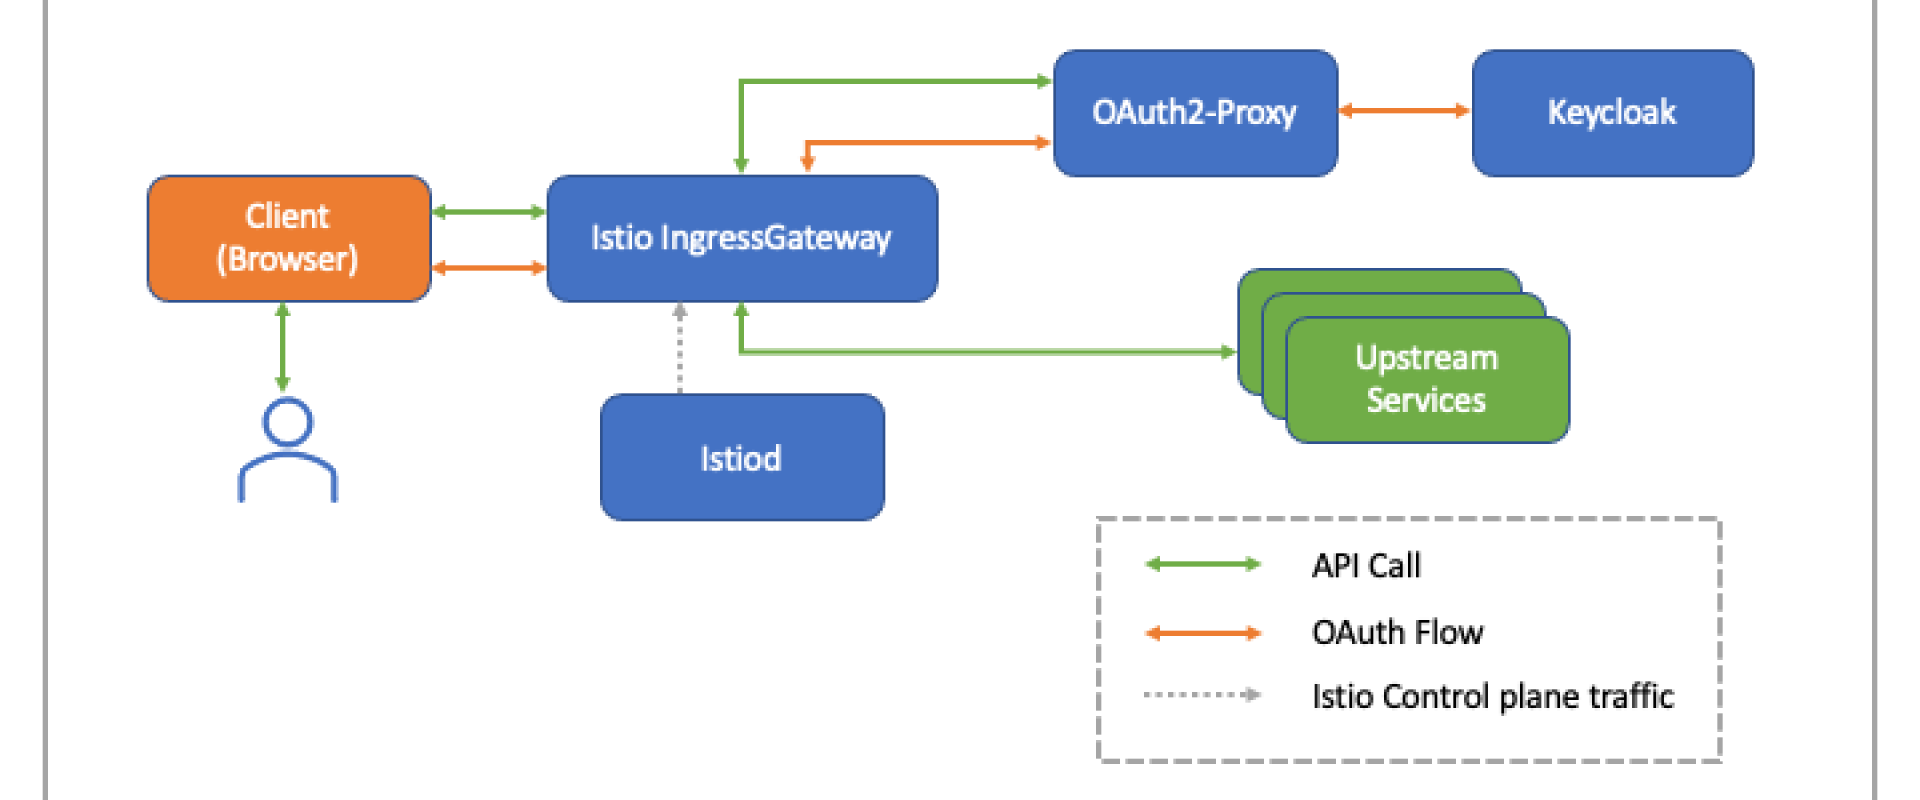
Istio Request Authentication and Authorization
In Istio, RequestAuthentication is used for end-user authentication. It is a custom resource that defines methods for validating credentials attached to the requests. Istio performs request-level authentication by validating JWT attached to the requests.
RequestAuthentication lets us create authentication policies for workloads running in your mesh and define rules for validating JWTs. Based on the configured authentication rules, Istio will reject and accept the end user request.
Istio Authorization Policy allows us to restrict access to application resources for authenticated requests only, so it is critical to use an authorization policy with request authentication.
Implementing Request-Level Authentication and Authorization Using Istio and Keycloak
In the last section, we learned about what is request-level authentication and authorization and how Istio supports JWT validation. Now, we will implement it using Istio and Keycloak.
Prerequisites
- Kubernetes cluster: We will be using a kind cluster with MetalLB installed for the external load balancer. Read about how to install and use metallb on a kind cluster.
- Demo application: We will be using a book-info application.
Installing Istio
Installing Istio on a Kubernetes cluster is straightforward. For step-by-step instructions, you can follow the official documentation for installing Istio.
Please follow these steps to install Istio on your cluster.
- Download the latest version of Istio. At the time of writing this blog latest version of Istio is 1.17.2
Shell
curl -L https://istio.io/downloadIstio | sh -
sudo cp istio-1.17.2/bin/istioctl /usr/local/bin/
- Install the Istio on your Kubernetes cluster using istioctl with a demo configuration profile.
Shell
istioctl install --set profile=demo -y
✔ Istio core installed
✔ Istiod installed
✔ Ingress gateways installed
✔ Egress gateways installed
✔ Installation comple Making this installation the default for injection and validation.
Thank you for installing Istio 1.17. Please take a few minutes to tell us about your install/upgrade experience! https://forms.gle/hMHGiwZHPU7UQRWe9
Verify Istio installation.
Shell
istioctl verify-install
Once Istio is installed and running in your cluster, you can enable automatically injecting Istio sidecar to your pods in two ways.
1. You can enable Istio sidecar injection for the namespace by
adding the label istio-injection=enabled to the
namespace, so all pods running in that namespace will have Istio sidecar
injected.
2. You can enable Istio sidecar injection for a particular pod
by adding the label sidecar.istio.io/inject=true to the
pod. That pod would automatically have Istio sidecar injected.
Install Demo App
Now install the demo book-info app. All Kubernetes manifests we are using in this blog post can be found on this GitHub repo.
Clone git repo.
Shell
git clone https://github.com/infracloudio/istio-keycloak.git
Move into the cloned git repo and install the app.
Shell
cd istio-keycloak
Install the MySQL database first and wait for the DB pod to go into a running state.
Shell
kubectl apply -f app/database.yaml
kubectl get pods -w
NAME READY STATUS RESTARTS AGE
book-info-db-598c7d9f5-m5l57 0/1 ContainerCreating 0 14s
book-info-db-598c7d9f5-m5l57 1/1 Running 0 25s
Once the DB pod is ready, install the demo app.
Shell
kubectl apply -f app/app.yaml
List the pods from the default namespace. You will find two containers in the app pod. It is because we have enabled auto Istio sidecar injection for app pods by setting the pod label to “sidecar.istio.io/inject: "true,” which automatically injects Istio sidecars in each pod of our book-info app.
Shell
kubectl get pods
NAME READY STATUS RESTARTS AGE
book-info-747f77b58-s9r88 2/2 Running 0 59s
book-info-db-598c7d9f5-m5l57 1/1 Running 0 2m39s
Now, we will set up an Istio gateway and virtual service to access the app. Gateway allows us to configure ingress traffic to our application from external systems and users. Plus, the Istio gateway does not include any traffic routing configuration, so we have to create a virtual service to route traffic coming in from the Istio gateway to the backend kubernetes service.
Shell
kubectl apply -f istio-manifests/ingressGateway.yaml
kubectl apply -f istio-manifests/virtualService.yaml
To access and verify the app, you have first to get the external IP of the Istio ingress gateway.
Shell
LB_IP=$(kubectl get svc istio-ingressgateway -o=jsonpath='{.status.loadBalancer.ingress[0].ip}' -n istio-system)
List book details. It will return an empty array as there is no book added to the DB yet.
Shell
curl -X GET -H “host: book-info.test.io” http://$LB_IP/getbooks
[ ]
Now, we will add a book by calling addbook endpoint.
Shell
curl -X POST -H "host: book-info.test.io" -d '{"isbn": 9781982156909, "title": "The Comedy of Errors", "synopsis": "The authoritative edition of The Comedy of Errors from The Folger Shakespeare Library, the trusted and widely used Shakespeare series for students and general readers", "authorname": "William Shakespeare", "price": 10.39}' "http://$LB_IP/addbook"
{
"isbn": 9781982156909,
"title": "The Comedy of Errors",
"synopsis": "The authoritative edition of The Comedy of Errors from The Folger Shakespeare Library, the trusted and widely used Shakespeare series for students and general readers",
"authorname": "William Shakespeare",
"price": 10.39
}
Now again, we will list the books. This time you will find the book which we have added just now.
curl -XGET -H "host:
book-info.test.io" “http://$LB_IP/getbooks”
Shell
[
{
"isbn": 9781982156909,
"title": "The Comedy of Errors",
"synopsis": "The authoritative edition of The Comedy of Errors from The Folger Shakespeare Library, the trusted and widely used Shakespeare series for students and general readers",
"authorname": "William Shakespeare",
"price": 10.39
}
]
Setup Keycloak for JWT Authentication
For now, we can simply view and add books just by hitting the right endpoint — which means anyone can access the application and do the same — making it insecure. Hence, we need an authentication mechanism in place that will only allow authenticated requests to access this application. For that, we will be using Keycloak.
We will implement Keycloak on the Kubernetes cluster and configure it for issuing JWT tokens for authentication.
Installing and configuring Keycloak is fairly easy. You can follow the official documentation on installing Keycloak on Kubernetes.
Install Keycloak:
Shell
kubectl create -f https://raw.githubusercontent.com/keycloak/keycloak-quickstarts/latest/kubernetes-examples/keycloak.yaml
List the pods:
Shell
kubectl get pods -l app=keycloak -w
NAME READY STATUS RESTARTS AGE
keycloak-5bc5c7fbf-jjq29 0/1 ContainerCreating 0 19s
keycloak-5bc5c7fbf-jjq29 0/1 Running 0 29s
Configure Keycloak
Now, to configure the Keycloak to issue JWT tokens for authentication, we have to get the load balancer IP of the Keycloak service first.
Shell
kubectl get svc -l app=keycloak -o=jsonpath='{.items[0].status.loadBalancer.ingress[0].ip}'
Open your preferred browser and hit the load balancer IP with port 8080. Once the welcome page is open, click on Administration Console to open the login page. From here, you can log in with default admin credentials (Username: admin, Password: admin).
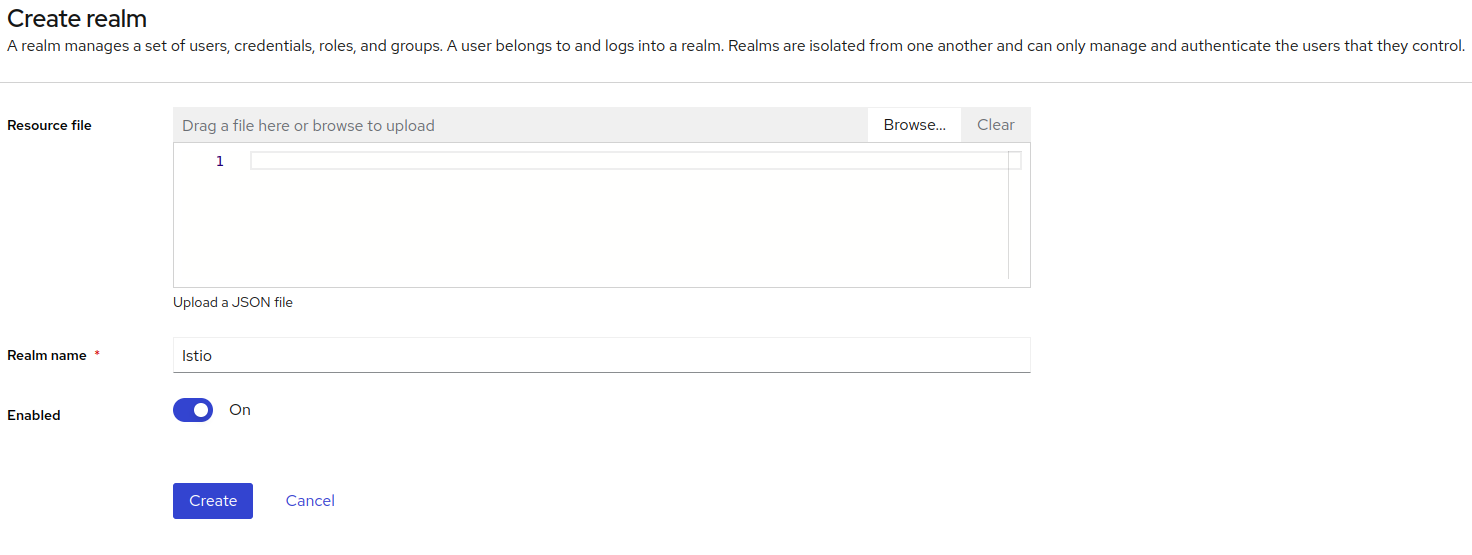
Create Realm
By default, Keycloak comes with the master realm, but for our use, we will create a new realm. You can follow the below steps to create a new realm.
- Click the word master in the top-left corner, then click Create Realm.
- Enter Istio in the Realm name field.
- Click Create.
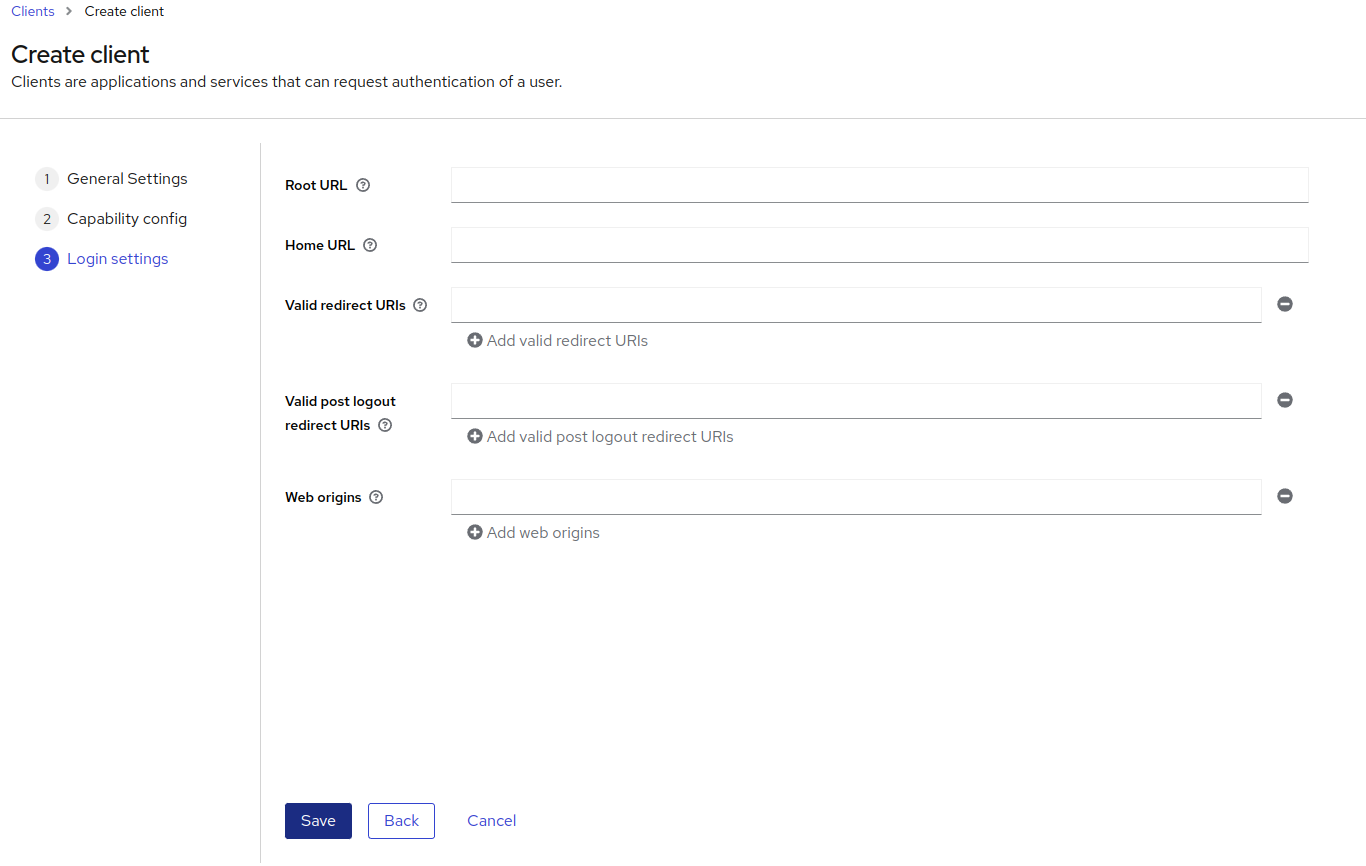
Create Oauth Client
- From the top-left corner, select the realm ‘Istio’ which we just created.
- Click on Clients and then Create a Client.
- Select OpenID Connect as the client type and give Istio as the Client ID. Add Istio as the Name for the client and click next.

- On the second page, let the default setting as it is and click on next.
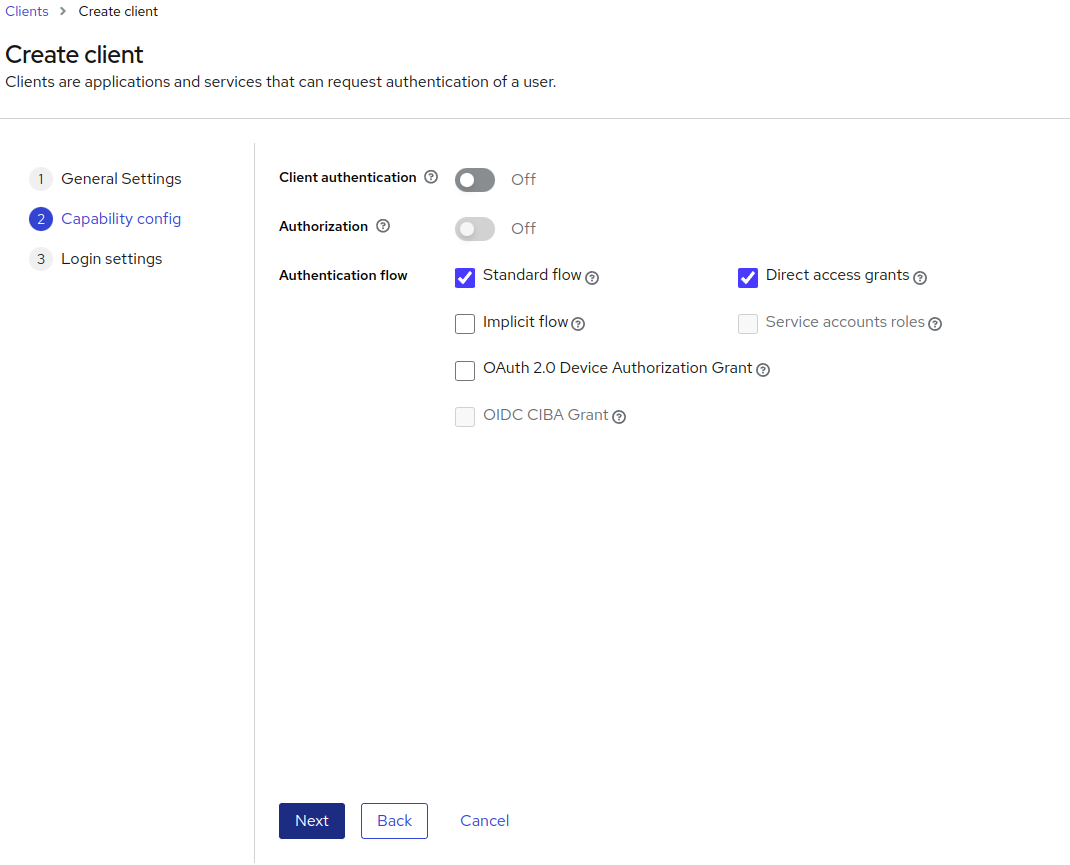
- On the third page, similarly, don’t change the default setting and press the Save button.
Roles and User Creation
We will be creating two roles: one for normal users who can only view book details and another one for admin users who can view and add books. Similarly, we will create two users, one normal user with a user role assigned, and another one will be our admin user with an admin role assigned.
Create Roles
- From the left pane, select the Realm roles and click on Create role. Enter the Role name as admin, and click on Create.
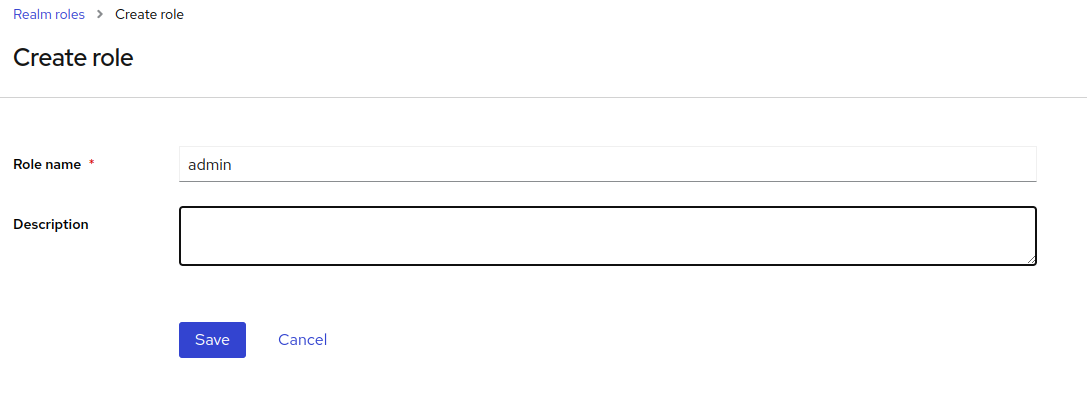
- Similarly, create a role for a normal user as well with the Role name as the user.
Create Users
- From the left pane, select the Users and click on Add User. Enter the username as book-admin. You can leave the rest of the value as it is and click on Create.
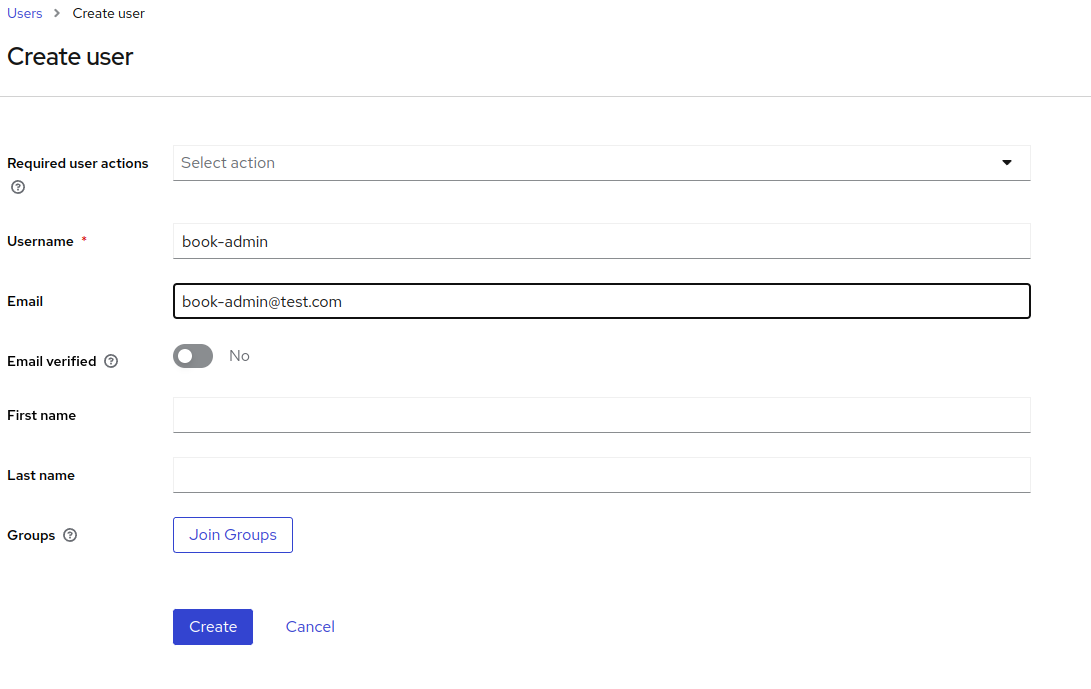
- Similarly, create another user with a username as book-user.
Set Password for Users
Once both users are created, we will set passwords for them.
- From the left pane, select Users and click on the book-admin user. From the top menu, click on Credentials and click on Set password. Enter a strong password and confirm it. Turn off the Temporary, and finally, click on the Save button.
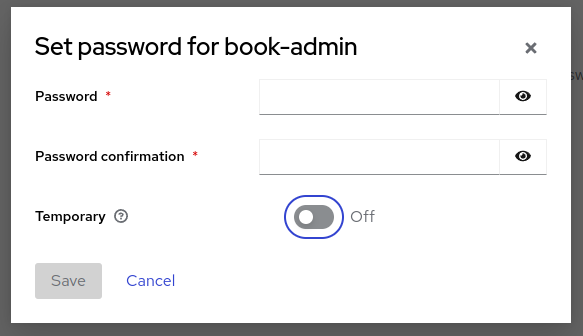
- Similarly, you can set the password for the book-user user.
Role Assignments
- From the left pane, select Users and click on the book-admin user. From the top menu, select Role Mapping and click on Assign role. Check the admin role from the list which we have created recently and click on assign.
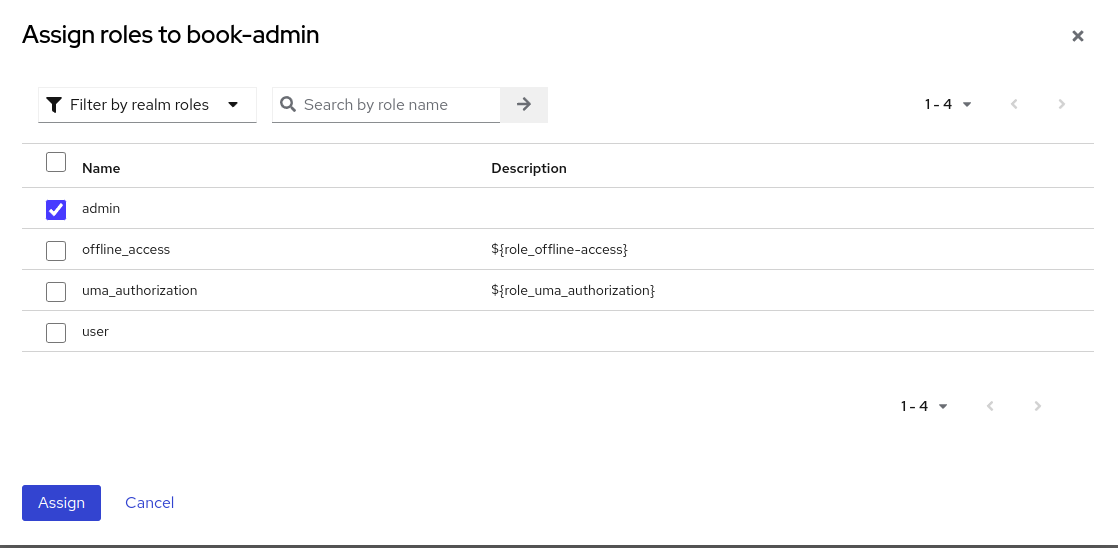
- Similarly, you can assign a user role to a book-user user.
Get the Required Endpoints
We need endpoints to generate JWT tokens and JWT verification. These endpoints would look like the following.
Token Generation URL:
http://
Token Verification URL:
http://
That’s it. We have successfully set up the Keycloak for implementing request level authentication and authorization for our demo app.
Istio Request-Level Authentication and Authorization
We have a sample book-info app running and configured Keycloak for issuing JWT tokens. Now. we can use Istio’s RequestAuthentication and Authorization policies to validate the JWT tokens and authorize the access requests.
Enable Request Authentication
First, we get the load balancer IP of the Keycloak service.
Shell
Keycloak_IP=$(kubectl get svc -l app=keycloak -o=jsonpath='{.items[0].status.loadBalancer.ingress[0].ip}')
LB_IP=$(kubectl get svc istio-ingressgateway -o=jsonpath='{.status.loadBalancer.ingress[0].ip}' -n istio-system)
Then we will be creating a RequestAuthentication for
validating JWT tokens from Keycloak. You can find all Kubernetes manifests that
we are using in this repo.
Now create a RequestAuthentication for
validating JWT tokens using Keycloak as the issuer.
Shell
kubectl apply -f - <<>
apiVersion: security.istio.io/v1beta1
kind: RequestAuthentication
metadata:
name: book-info-request-authentication
spec:
selector:
matchLabels:
app: book-info
jwtRules:
- issuer: "http://$Keycloak_IP:8080/realms/Istio"
jwks_Uri: "http://$Keycloak_IP:8080/realms/Istio/protocol/openid-connect/certs"
EOF
Now we will try to access the book-info application’s getbooksendpoint.
Shell
curl -X GET -H "host: book-info.test.io" http://$LB_IP/getbooks
[
{
"isbn": 9781982156909,
"title": "The Comedy of Errors",
"synopsis": "The authoritative edition of The Comedy of Errors from The Folger Shakespeare Library, the trusted and widely used Shakespeare series for students and general readers",
"authorname": "William Shakespeare",
"price": 10.39
}
]
We are still able to access the endpoint without a JWT token despite enabling request authentication for the book-info app. This is happening because we have not yet created an authorization policy to restrict access to authenticated requests only.
So, next, we will create an authorization policy.
Shell
kubectl apply -f - <<>
apiVersion: security.istio.io/v1beta1
kind: AuthorizationPolicy
metadata:
name: book-info-auth
spec:
selector:
matchLabels:
app: book-info
rules:
- from:
- source:
requestPrincipals: ["*"]
EOF
We will try accessing getbooks endpoint.
Shell
curl -X GET -H "host: book-info.test.io" http://$LB_IP/getbooks
RBAC: access denied
This time requests get denied. Now only requests with valid JWT will be allowed to access the endpoints.
Now, let’s try generating the JWT using the book-user user’s
credentials by calling the token generation endpoint.
Shell
curl -X POST -d "client_id=Istio" -d "username=book-user" -d "password=user123" -d "grant_type=password" "http://$Keycloak_IP:8080/realms/Istio/protocol/openid-connect/token"
{"access_token":"*****","expires_in":300,"refresh_expires_in":1800,"refresh_token":"*****","token_type":"Bearer","not-before-policy":0,"session_state":"382dd7d6-a440-43fc-b9f8-13f4dc84fe3f","scope":"profile email"}
Copy the access token and use it as an authorization bearer
while calling getbooks endpoint.
Shell
curl -X GET -H "host: book-info.test.io" -H "Authorization: Bearer *****” http://$LB_IP/getbooks
[
{
"isbn": 9781982156909,
"title": "The Comedy of Errors",
"synopsis": "The authoritative edition of The Comedy of Errors from The Folger Shakespeare Library, the trusted and widely used Shakespeare series for students and general readers",
"authorname": "William Shakespeare",
"price": 10.39
}
]
This time we are able to access the getbooks endpoint.
Similarly, you can try generating a token for book-admin user
and try accessing the getbooks endpoint.
Now, let’s try adding a new book using addbook endpoint.
Shell
curl -X POST -d '{"isbn": 123456789123, "title": "Test Book 1", "synopsis": "This is test book 1", "authorname": "test-author1", "price": 10.39}' "http://$LB_IP/addbook"
RBAC: access denied
Adding a new book failed because access is denied. Now we will
generate a token for book-user and
try adding the book.
Shell
curl -X POST -d "client_id=Istio" -d "username=book-user" -d "password=user123" -d "grant_type=password" "http://$Keycloak_IP:8080/realms/Istio/protocol/openid-connect/token"
{"access_token":"*****","expires_in":300,"refresh_expires_in":1800,"refresh_token":"*****","token_type":"Bearer","not-before-policy":0,"session_state":"ccbf94e1-b3c1-4260-8ade-cb0d778b8235","scope":"profile email"}
Shell
curl -X POST -H "Authorization: Bearer *****" -d '{"isbn": 123456789123, "title": "Test Book 1", "synopsis": "This is test book 1", "authorname": "test-author1", "price": 10.39}' "http://$LB_IP/addbook"
"isbn": 123456789123,
"title": "Test Book 1",
"synopsis": "This is test book 1",
"authorname": "test-author1",
"price": 10.39
}
As you can see, we are able to add books. Similarly, you can add books using a book-admin user.
The Issue With the Current Setup
In our current setup, both book-user and book-admin users
are able to add books, but only book-admin should
be allowed to add books. While book-user should
only be allowed to view books and not be allowed to add books.
We can restrict access of a particular endpoint to a particular user/role by extracting the role from raw JWT claim data and using conditions in the authorization policy. Now let's see how we can control the finer-grained access using Istio authorization policies.
We will modify the authorization policy to allow only book-admin users
to access /addbook endpoint and allow all
users to access /getbooks endpoint.
Shell
kubectl apply -f - <<>
apiVersion: security.istio.io/v1beta1
kind: AuthorizationPolicy
metadata:
name: book-info-auth
spec:
selector:
matchLabels:
app: book-info
rules:
- to:
- operation:
methods: ["GET"]
paths: ["/bookdetails"]
- from:
- source:
requestPrincipals: ["*"]
to:
- operation:
methods: ["GET"]
paths: ["/getbooks", "/getbookbytitle*"]
- from:
- source:
requestPrincipals: ["*"]
to:
- operation:
methods: ["POST"]
paths: ["/addbook*"]
when:
- key: request.auth.claims[realm_access][roles]
values: ["admin"]
EOF
authorizationpolicy.security.istio.io/book-info-auth configured
Now we will try adding a new book with a book-user user.
Shell
curl -X POST -d "client_id=Istio" -d "username=book-user" -d "password=user123" -d "grant_type=password" "http://$Keycloak_IP:8080/realms/Istio/protocol/openid-connect/token"
{"access_token":"*****","expires_in":300,"refresh_expires_in":1800,"refresh_token":"*****","token_type":"Bearer","not-before-policy":0,"session_state":"9fb6bcc9-57b9-4eda-8052-71daeb887b92","scope":"profile email"}
Shell
curl -X POST -H "Authorization: Bearer *****" -d '{"isbn": 123456789125, "title": "Test Book 3", "synopsis": "This is test book 3", "authorname": "test-author3", "price": 10.39}' "http://$LB_IP/addbook”
RBAC: access denied
This time we are not allowed to add books using book-user since
we have allowed only users with admin roles to add books.
Now we will check adding a book with the admin-user user.
Shell
curl -X POST -d "client_id=Istio" -d "username=book-admin" -d "password=admin123" -d "grant_type=password" "http://$Keycloak_IP:8080/realms/Istio/protocol/openid-connect/token"
{"access_token":"*****","expires_in":300,"refresh_expires_in":1800,"refresh_token":"*****","token_type":"Bearer","not-before-policy":0,"session_state":"a9d5398a-1e7d-4cbb-a4bf-8b7bdd70f75e","scope":"profile email"}
Shell
curl -X POST -H "Authorization: Bearer *****" -d '{"isbn": 123456789125, "title": "Test Book 3", "synopsis": "This is test book 3", "authorname": "test-author3", "price": 10.39}' "http://$LB_IP/addbook”
{
"isbn": 123456789125,
"title": "Test Book 3",
"synopsis": "This is test book 3",
"authorname": "test-author3",
"price": 10.39
}
We can add books with a book-admin user
since we allow only users with admin roles to add books, and we have already
assigned a book-admin user
an admin role in Keycloak. Also, both users can view the books since we have
allowed anyone with a valid JWT token to access the /getbooks endpoint.
This Istio feature of request authentication and authorization, along with Keycloak, offers a fantastic request-level authentication and authorization mechanism for your application — which is missing in native Kubernetes.
Best Practices and Considerations for Request-Level Authentication and Authorization
Securing your application from unauthorized access is an essential requirement; however, implementing it requires substantial effort. If you are planning to do it, these best practices and considerations for request-level authentication and authorization would help you:
- Always secure endpoints in your application using SSL or TLS certificates. TLS secures your application by encrypting the messages in transit, as only the receiver has the key to decrypt it.
- Choose an authentication provider that suits your requirements, and always use OAuth2 with OpenID Connect for request-level authentication.
- Make sure you are using different permissions/roles for different API endpoints. You can create a set of permissions and roles in your authentication provider and use them for fine-grained access control of your application API endpoints.
- Decide when to use request-level authentication and authorization. You don’t need to authenticate and authorize each request. Your application may contain some API endpoints, which require public access, like /healthz or /ping or /public, so carefully choose which endpoints you want to protect.
Summary
Securing your applications by using proper authentication and authorization is an important task. During the application development phase, developers invest a good amount of time to build a good authentication and authorization mechanism for their application. However, using tools like Istio and Keycloak takes that burden out of the developer's shoulder, and this authentication and authorization mechanism can be configured at the infrastructure level.
In this blog post, we learned how Istio simplifies request-level authentication and authorization using Keycloak. However, things can be complex in the real world, where your application might have hundreds of services running in different clusters and accessed by thousands or millions of users. That’s it, folks! I hope you found this blog informative.
We Provide consulting, implementation, and management services on DevOps, DevSecOps, DataOps, Cloud, Automated Ops, Microservices, Infrastructure, and Security
Services offered by us: https://www.zippyops.com/services
Our Products: https://www.zippyops.com/products
Our Solutions: https://www.zippyops.com/solutions
For Demo, videos check out YouTube Playlist: https://www.youtube.com/watch?v=4FYvPooN_Tg&list=PLCJ3JpanNyCfXlHahZhYgJH9-rV6ouPro
If this seems interesting, please email us at [email protected] for a call.
Relevant Blogs:
Recent Comments
No comments
Leave a Comment
We will be happy to hear what you think about this post