Service Now

Introduction
ServiceNow is a software platform that supports IT Service Management (ITSM). It helps you to automate IT Business Management (ITBM). This cloud-based platform is designed based on ITIL guidelines.
ServiceNow focuses on service orientation toward the tasks, activities, and processes. It uses machine learning to leverage data and workflows to help modern enterprise becomes faster and more scalable. Servicenow provides everything as a service.so ServiceNow includes both PAAS(platform as a service) and SAAS(software as service).
It offers the flexibility, power, and dependability to achieve the goals of the incident and problem management. Moreover, users are free to select their most comfortable support interface. It provides all the information to the technician to diagnose and repair issues while removing the dependency on spreadsheets and emails.
Servicenow offers services in the below-given departments,
IT Service Automation Application:
This ServiceNow product offers visibility into end-to-end business services by understanding the relationship with the underlying IT resources. It also helps to enhance the availability by knowing service health and reducing event loss time by quickly finding disruptions in the system.
Business Management Applications:
IT business management is a strategic portfolio planning and execution tool. It helps you to focus on the areas which need the highest attention and accelerate time to value.
Custom Service Management:
The tool allows you to connect customer service with other departments to identify and resolve issues. It significantly reduces the cost and increases customer satisfaction. It helps you to increase customer satisfaction, boost efficiency and improve productivity.
HR management:
HR management service tool helps you to improve employee satisfaction. It is a single access point for efficient, personalized HR services. It also helps you to improve HR productivity, streamline employee transactions and optimize service delivery.
Enterprise Security Response Engine:
This performance analytics tool allows you to connect with your existing security tools. It helps you to quickly respond to incidents and vulnerabilities according to the potential impact on your business. The tools help you to improve the speed and efficiency of your security response. The security response engine also helps you to reduce the time spent on basic tasks.
ServiceNow Architecture:
The java-based platform using a tomcat web server and running on Linux.
MYSQL database.
Mozilla Rhino javascript engine.

HOW TO GET ACCESS TO SERVICENOW
For Cloud-based ServiceNow instance follow the below steps:
Step 1: Go to Servicenow official portal https://developer.servicenow.com/
Step 2: Register and create an account. If you have an account already you can sign in.

Step 3: Fill in all the details and you will get a mail to verify the account. Once you verified your account you will redirect to the sign-in page automatically.

After verified your account.

Step 4: Then sign in to your account. Once you sign in to your account, the developer Agreement popup will come. Click and submit the agreement.

Step 5: Then go to Request an instance.

Step 6: Select any region in which your instance should provision. Then click request.

Step 7: Now your instance started to a provision in that region.

Step 8: Once the instance is provisioned in that region, you will get this popup that includes your username and password. Then you can access your instance by clicking open instance.

Or
Click Return to the developer site then clicks the instance URL like below.

Step 9: Then you will lead to the below password reset page. There you have filled in the username and password of the instance which we got after request an instance. Then click submit.

Finally, you can get the dashboard of your instance and start access.

MID SERVER INSTALLATION:
Servicenow on-premises is going to deprecate soon still if you want on-premises mean you can download a MID Server from the ServiceNow dashboard and use MID Server.
Using MID Server we can communicate with cloud-based ServiceNow instance. Other we can use only cloud ServiceNow.
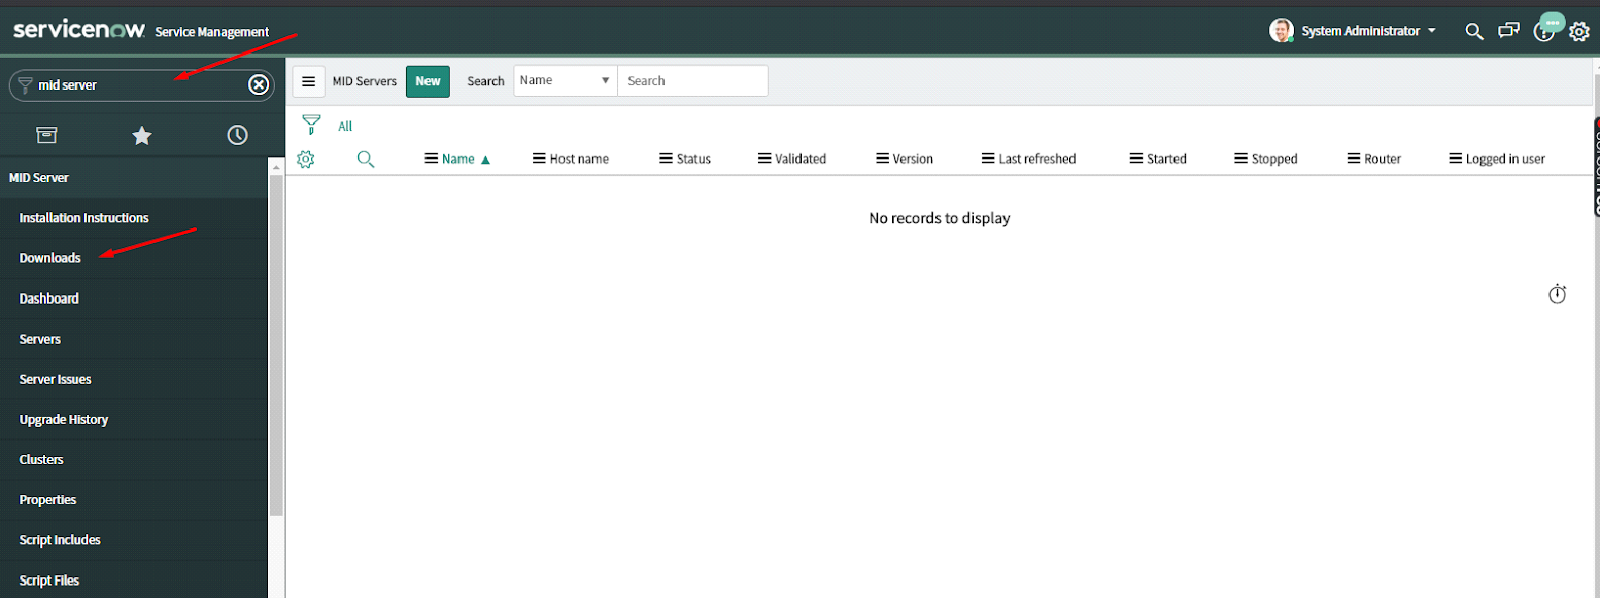

Download the zip file in /opt/
Unzip the zip file and get /opt/agent/config.xml

You get the mid server and validate the mid server

Incident Management:
These tickets are used for unplanned and sudden interruptions in an IT service delivery.
Navigate to the incident by searching “incident” in the search bar. search bar > type “incident”
Options:
Create new: To create a new incident.
Open: To open the incident and can see or change the details of the created incident.
All: To list out the incidents.
Problem Management: These tickets are used for the root cause of several incidents. Problem Management focuses on the main reason or problem behind many similar incidents. For example a server issue. Search bar > type “problem”.
Options:
Create New: To create a problem.
Open: To open a problem.
All: To list out all the problems.
Initially, it is a bit difficult for everyone to differentiate between a problem and an incident. Let’s get it more clear, Incident Management is entirely focused on resolving a specific issue and restoring the usual flow of business as quickly as possible. Whereas, Problem Management revolves around finding the root cause of similar incidents and resolving them to prevent future mishappening.
So, if your ticketing system is not able to differentiate between an Incident and a Problem, it is a serious threat for all of your company’s IT operations. If a system ignores the root cause of similar incidents, and they keep coming, again and again, it can simply affect the efficiency of your IT services.
We can understand this more clearly with the help of a general life example. If a person has terrible health issues, then the support of some random medicines will not help for a long time. The issues will arise again after passing out the effect of medicines. To make him/her completely alright, a specialist doctor will need to examine him/her deeply so that the main problem (like weak eyesight for headache, Typhoid for continuous loose motions, etc.) can be resolved. Here, ServiceNow works as a Doctor to cure out the main problem in your working process in Problem Management.
Change Management: As its name suggests, these tickets are used if you want to make any change in your IT environment. In simple words, you can use these tickets if you want to add, remove, or modify anything under the hood of your IT services. For eg: replacing a legacy system.
Request Management: These tickets are used for smaller requests when you need something from IT support.
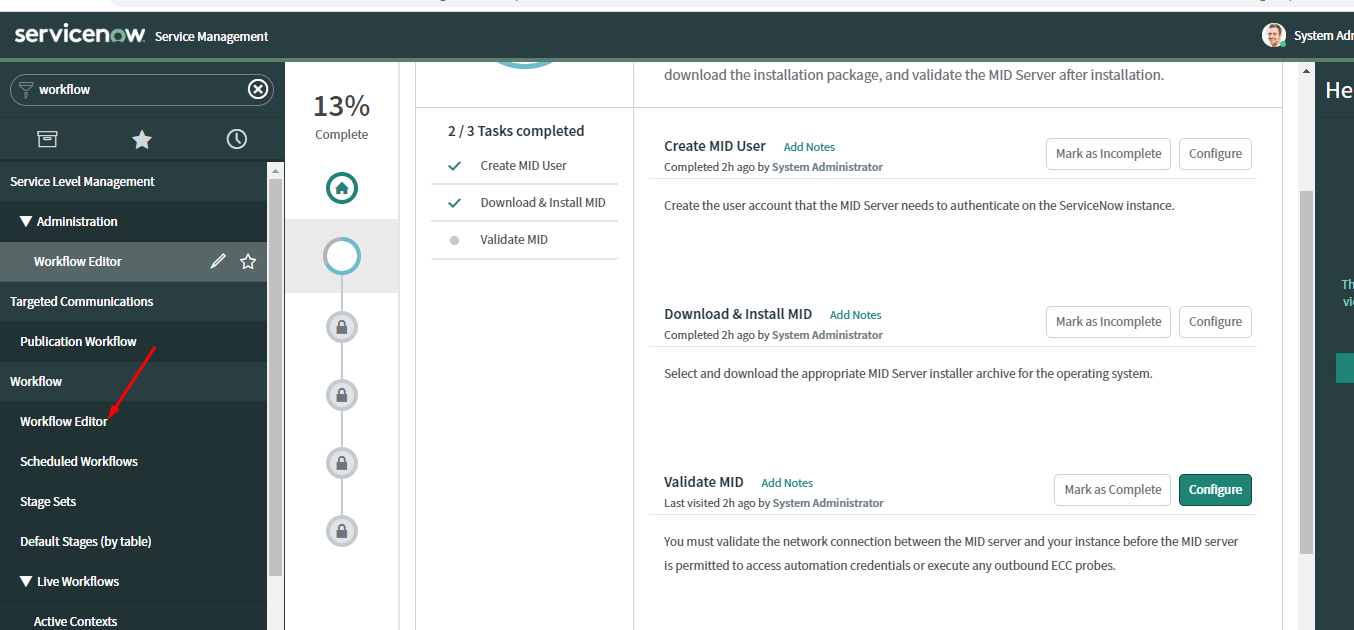
Workflow: Workflow provides a drag-and-drop interface for automating multi-step processes across the platform. Each workflow consists of a sequence of activities, such as generating records, notifying users of pending approvals, or running scripts. The graphical Workflow Editor represents workflows visually as a type of flowchart. It shows activities as boxes labeled with information about that activity and transitions from one activity to the next as lines connecting the boxes.
To create a workflow: search bar > type “workflow” > workflow editor > new workflow.
You will get a popup to enter details if you clicked the new workflow. You can access the core components sidebar only you submitted the new workflow.
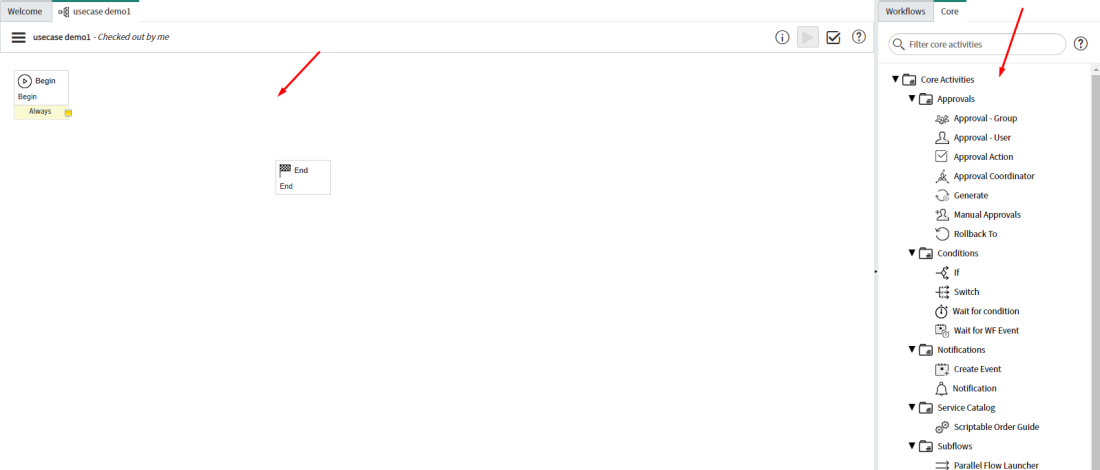
Core components: which are placed on the left side. The core has all the components such as conditions, run script, task, and so on...
Once you completed a workflow you have to save and publish your workflow. If you do not publish your workflow the workflow will not run or trigger.
We can validate our workflow by click validate option on the right side. Also, We can run our workflow by clicking the run button on the right side.
Have to publish your workflow by clicking three dots on the left side. Then navigate to publish. Here also we can validate workflow by navigating to validate workflow.
There are many options if you click that three dots button. Once you create a new workflow, you will see the two default steps Begin and End. Then we can go to the core and drag and drop the components.
Flow Designer: Flow Designer is a Now Platform® feature that enables rich process automation capabilities in a consolidated design environment. It enables process owners to use natural language to automate approvals, tasks, notifications, and record operations without having to code.
You can expand the Flow Designer solution to integrate with external instances and third-party applications with a separate subscription to IntegrationHub.
Difference between Workflow and Flow designer: The Flow designer is used to reduce scripting so that it can be created easily and understood by non-technical users. It's just that you don't need to have more scripting knowledge to do a flow designer which will reduce the development effort. The same functionality can be achieved by both the Flow designer and in Workflow Editor. The only thing is that Flow Designer would have an extension to the Integration hub. In workflow also we can trigger a third-party application using scripts.
All contexts: The Workflow Context maintains the state of the overall process in the Workflow Context record. The Workflow Context maintains the state of the individual activities as they execute in a series of related lists. These lists maintain the state of currently executing activities, the result of finished activities, and the execution path the workflow took through the process model.
The Workflow Context canvas provides a visual representation of the execution path the workflow took through the process model. The state of each activity (finished, executing, canceled, error) is represented using the color palette. The executed paths are represented in the color blue; the non-executed paths are represented in grey. Active and historic workflow contexts, as well as the activities within them, can be viewed using the Live Workflows section of the Workflow application menu.
Viewing a workflow context
Workflow contexts can be found below,
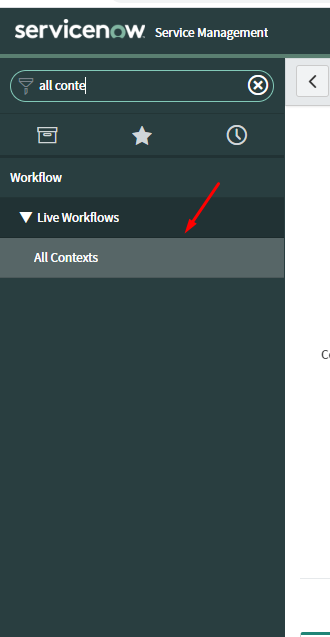
In the search bar, search workflow. Then navigating to Workflow > All Contexts. Or directly search All contexts.
If you want to see the graphical view of execution of workflow mean to navigate to Workflow > All Contexts > click the started option > show workflow. Here we can see which stage is passed and which failed.
SOAP (SOAP stands for Simple Object Access Protocol ): SOAP is a protocol that was designed before REST and came into the picture. The main idea behind designing SOAP was to ensure that programs built on different platforms and programming languages could easily exchange data.
Navigation:
Search bar > type “system web service” > soap
REST (REST stands for Representational State Transfer): This was designed specifically for working with components such as media components, files, or even objects on a particular hardware device. Any web service that is defined on the principles of REST can be called a RestFul web service. A Restful service would use the normal HTTP verbs of GET, POST, PUT and DELETE for working with the required components.
Options:
Navigate to search bar > type “rest” > rest API explorer > explore if you are using a new instance.
There you can see many options left side Name, API name, Api Versions .but common are get, post, delete and patch options.
For example, we are clicking Table Api in Api Name:
Get: It is useful to retrieve details of the existing incident table.
Post: It is useful to create a new incident table.
Delete: It is used to delete an existing incident table
Put: It is used to modify an existing incident table.
Patch: It is used to update an existing incident table.
Difference between SOAP and REST :
SOAP needs more bandwidth for its usage whereas REST doesn't need much bandwidth. SOAP only works with XML formats whereas REST work with plain text, XML, HTML, and JSON.
INBOUND:
Inbound means that other applications make calls to ServiceNow's REST API to get information from SN, or create/update records.
Navigation:
Search bar > type “system web services” > Inbound.
OUTBOUND:
Outbound means that ServiceNow makes calls to other applications' REST API to get information from the other application or create/update records.
Navigation:
Search bar > type “system web services” > Outbound.
Usecase: 1
Here we are going to see how incidents automatically get closed using workflow once the incident is created.
Condition 1: Once workflow started, the incident stat should change to In progress and priority has to change to High.
Condition 2: Then workflow should get approval from the system admin. If the admin approved our ticket, the incident state should change to closed automatically.
Condition 3: if the admin rejected our ticket, the incident state has to change to cancel.
Workflow procedure and Snapshots:
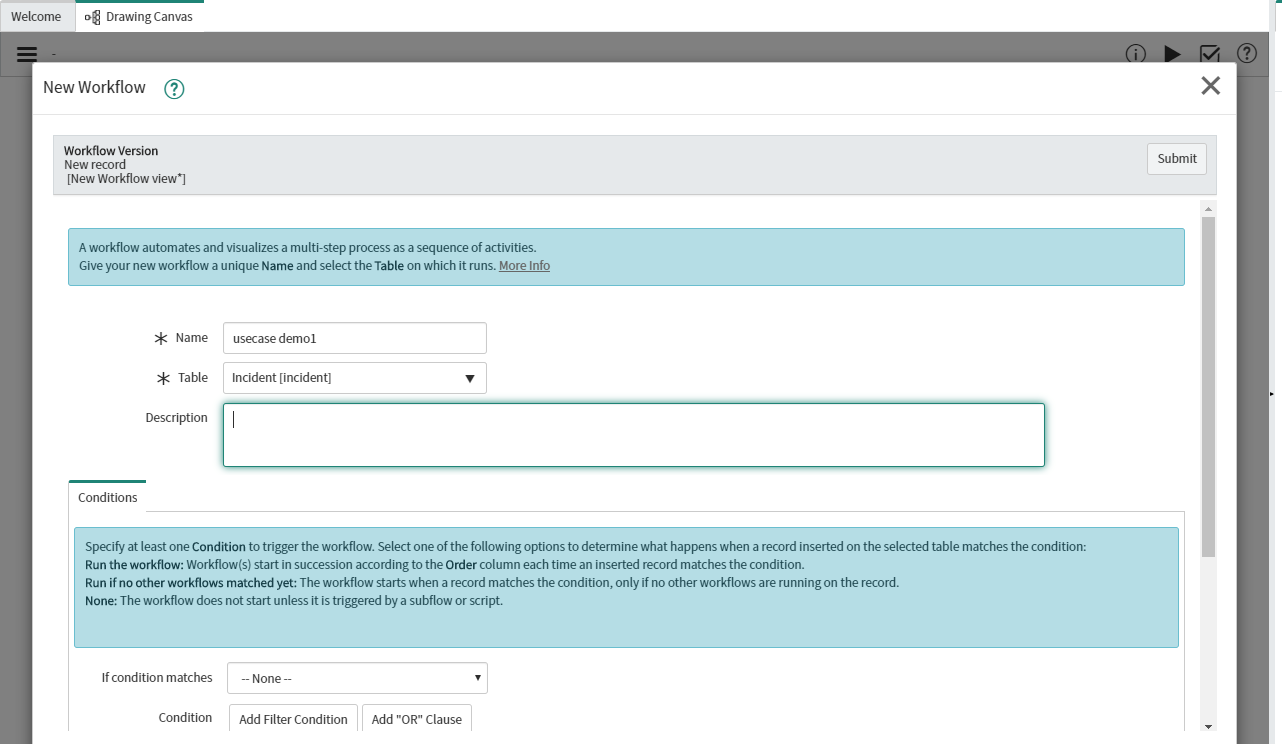
Step 1: First we are going to create a new workflow. Navigate to workflow > new workflow. Then you will get a board to entire details.

Here you can see the right side note. Before we can not access core components before we submit our workflow.

Step 2: Enter workflow Name and Assign Incident to a table. we just left conditions as it is now then submit workflow.

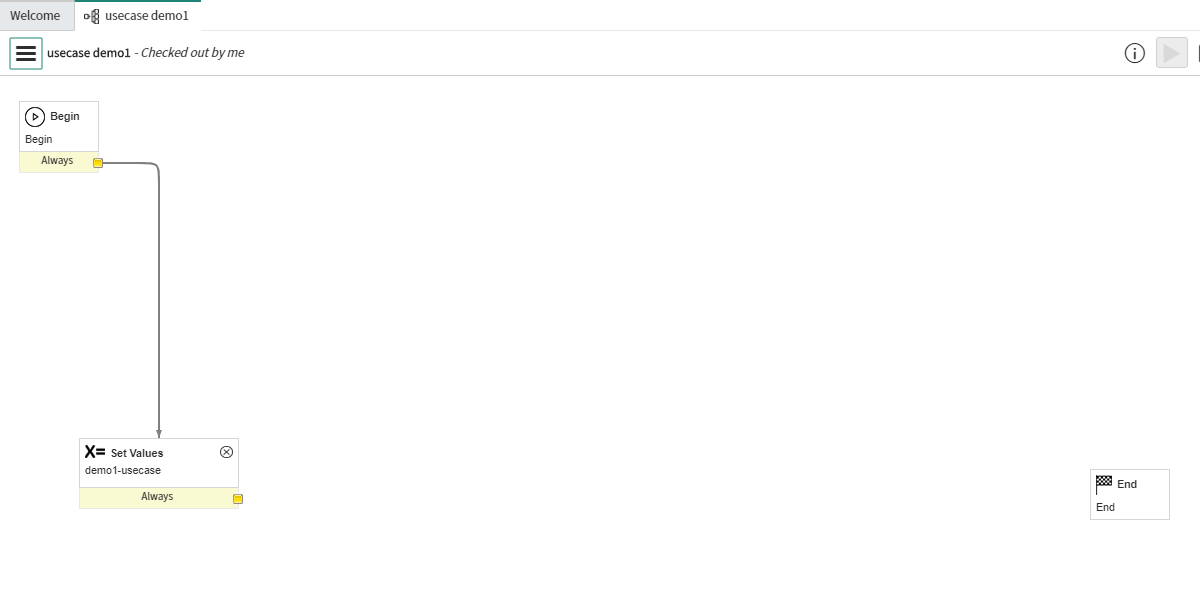
Step 3: Now you can see only two default steps Begin and End. And you can see the core components now accessible.

Now delete the connect arrow which connects Begin and End by selecting the arrow and entering the delete button on your keypad.

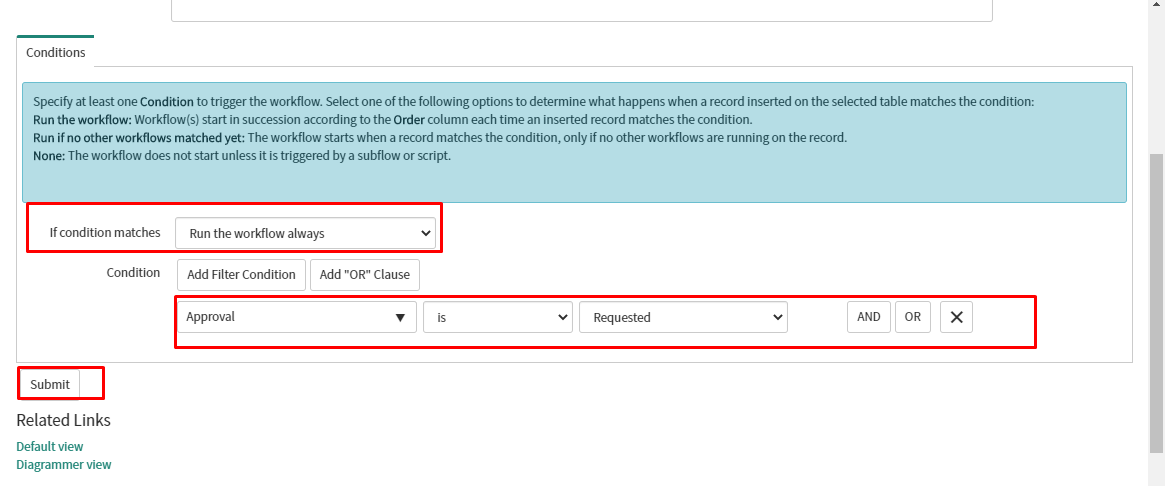
Step 4: Now we are going to apply conditions to our workflow to start. So click the three hyphens. Then click properties. Here you can see the option to validate workflow.

Step 5: Now In this board, click conditions and enter your conditions to start a workflow automatically.

We just enter as below for our demo. You can use the “AND” or “OR” option to add the field. If you click AND mean all conditions should be passed, OR mean Either or conditions. Then we just leave other options on the right side as It is. You won't mean you can use it.

Submit our workflow.

Step 6: workflow looks like this after deleting the arrow.
Now we are going to set values to change the state of the incident as per the condition after workflow start incident state has changed too in progress.

Here we change incident state to In Progress and priority to High and submit.
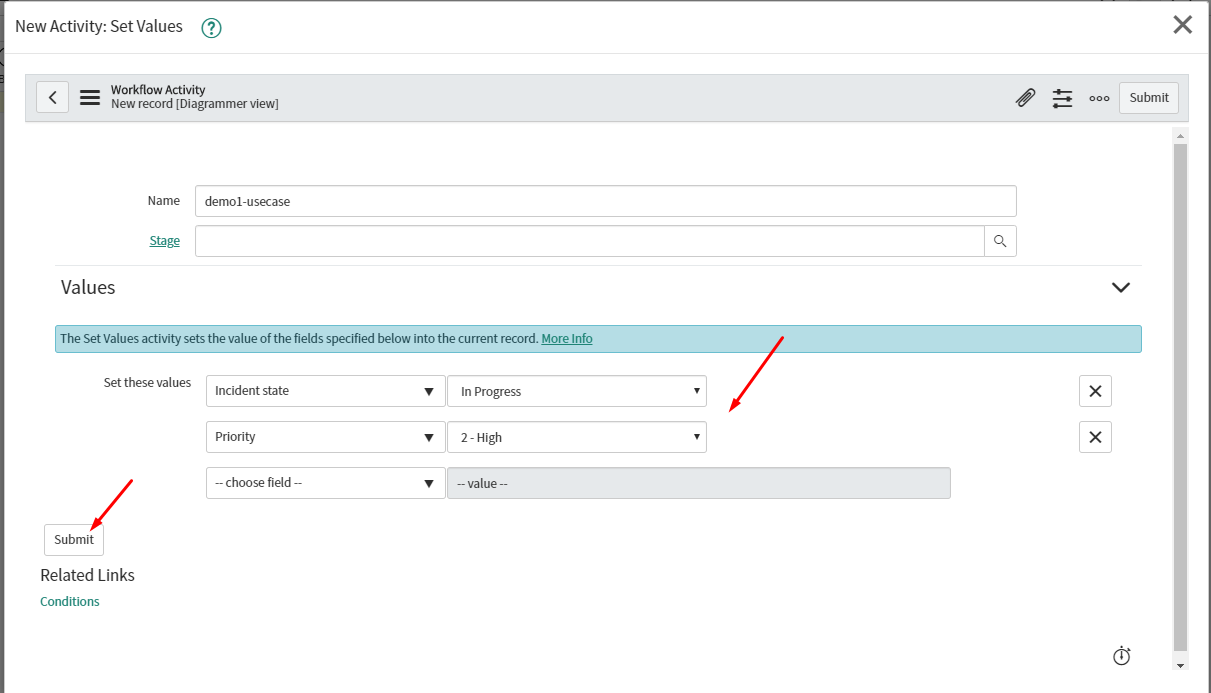
Now workflow has set values. we just connect Begin to set values so that after begin step, set values will run.
Step 7: Then the Approval part. Click approval-user.

Give any name Here. And click unlock users and there you can use it to approve the workflow. just a system administrator here.


If you want to remove any user mean to have to click on that user name and click that removed symbol.

Or you can add a system administrator by clicking add me button. Add me only add system administrator.

Or this is also one of the ways to add admin.


left other parts as it is. Then submit the approval stage.

Step 8: Now we are going to set values to change incident state to closed if user-approved our workflow or change incident state to canceled if a user rejects our workflow.


Step 9: Here our complete workflow.

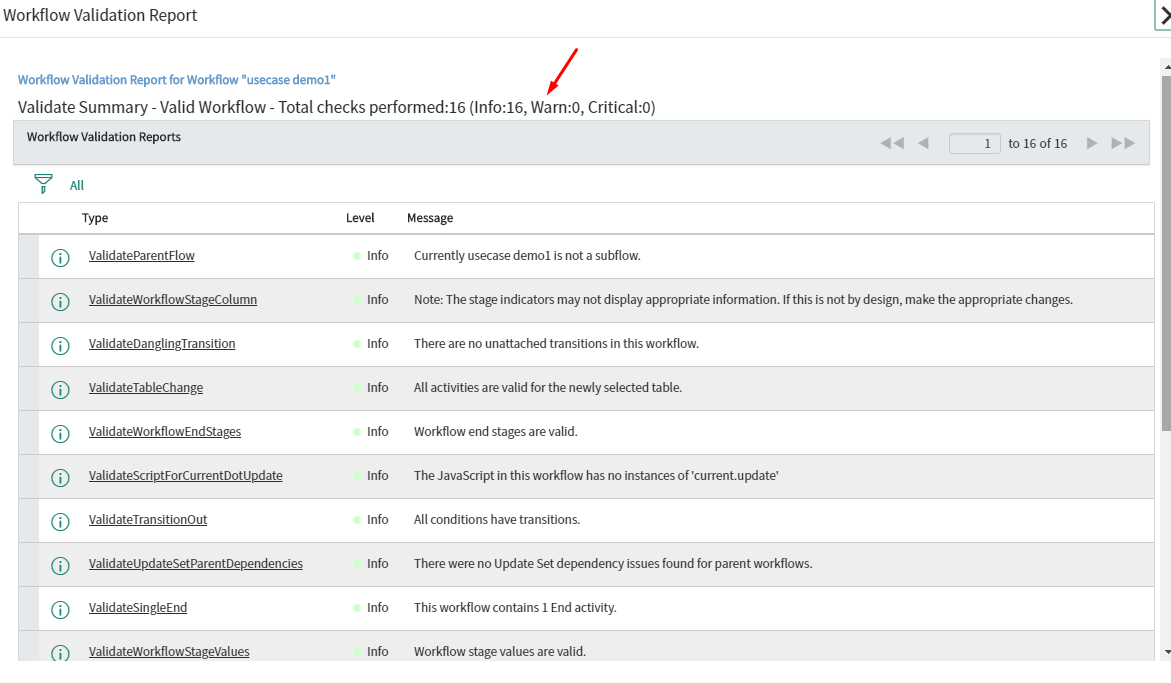
Step 10: Now validate workflow. No error and warnings.
Step 11: Now create an incident and give the appropriate condition. If the incident conditions match with workflow means the workflow will get start other than it will not start.

we gave the system administrator to our watch list. Watch list mean that user can watch our every process.


Now our incident automatically changes to an in-progress state and priority changed to high. So our workflow gets started.

Step 12: Now go to All context to check the workflow running process.
Here we can see the workflow which we created. Click on the date.

Then click show workflow.

Here our workflow has run and waiting for approval.

Step 13: Go to approval which belongs to the service desk. There you can see our incident requested for approval.

Approve your incident.

Now get approved by admin.

Step 14: Now go to open to check your incident. There you cannot find your incident because as per our condition once our workflow gets approved the incident automatically should be closed. The open option is for check running and on-hold incidents. To see the closed incidents and all incidents go to the “ALL” option which belongs to the incident.

In ALL, you can see your closed incident.

Step 15: Here our completed workflow.

Usecase-2 :
In this, we are going to see how we can use REST API EXPLORER.
Case I: Get using Table API
Step 1: You can see the left side Name, API Name, API Version, and right side you can see Table Name and other stuff.

Step 2: Assign the Incident table in the table name and give your incident id to sysparm_query.

We just leave these. And the Required format is JSON. Then submit.

Here at the end, you can see the many language options to see our response.

Step 3: Here are details of that incident which we retrieved using the get option.


Here response body, we can see our incident details.

we just change the curl option and the python option. Instead of getting an option, we can use these too.


Step 4: Now we coping to get the URL.

Step 5: Put it on the web then we can see the full view. It will ask for the user name and password of your ServiceNow instance.


Case 2: POST using Table API.
Step 1: Now POST Type. Then select table name as an incident. Post basically used to create a new table or incident.

Step 2: here required formate and then select add file which belongs to the build option.

Step 3: Now add your incident condition. Using this condition our incident will automatically create. Submit.

Step 4: Now you will get your response.

Here the incident id which creates automatically. Note your id and check within incidents.

Step 5: Go to open incident. There we can see our incident created.

Here are the conditions.

Case 3: PUT using Table API
Step 1: Put basically to modify our tables. we just note down any sys_id from the URL.

Step 2: Then assigned the incident to the table name. And entered that sys_id which we noted down.

Step 3: In add field, we just modify the incident by adding a work note to that sys_id incident. submit.

Step 4: Here we will get a response.
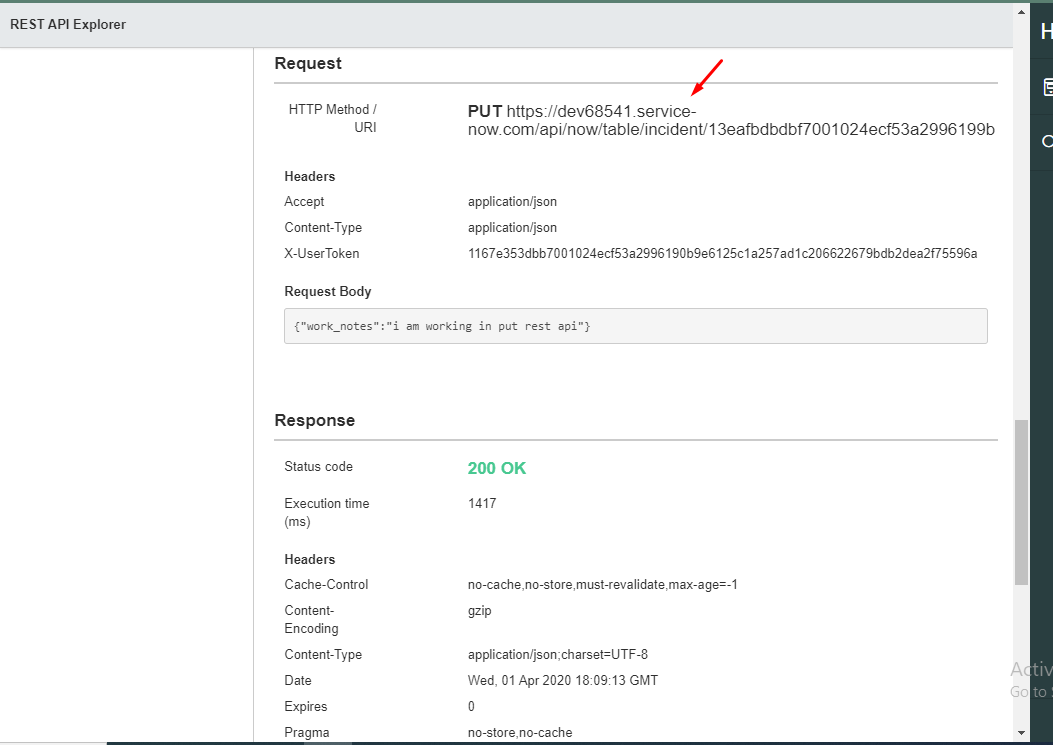
Step 5: Here we can see where our changes have applied, note that id, and go to an incident. Open that incident, Finally here our content.

Servicenow approved incident data fetching:
To search the navigator in the incident and create the new incident

To adding the custom field
Click to menu and click to configure and then from layout


In that layout adding the custom field and approval action

To click the create the new field
Name: filename
And click the add button
Finally, click the save button
Get the incident field value and then approval

In that approval to select the requested
To create the workflow
To navigator in search the workflow editor
Click the new workflow

Apply the condition
Like this and click to submit button

To select the Approval-user in the core activity
In that workflow add core activity in RunCommand and then set value activity
Click to mouse right-side button and then show to add core and custom activity
To click core activity


Click to update
Menu button to validate workflow

Validation result
Set the credentials

To click the new

Created incident approve the request to approved state

It shows approve and reject buttons so click to approve button
Click to request its show like
See our workflow status

Click to show the workflow

Showing the workflow status

It all is executed
Next, we see about RESTapi explore to get the custom field values

Update the sysparm_query= approval=approved^ORDERBYDESCsys_created_on

Update the sysparm_fields

And click to send button
{
"result": [
{
"number": "INC0010069",
"u_server": "centos",
"u_filename": "audit.log"
}
]
}
You get the json format output
incident="$(curl 'https://dev65067.service-now.com/api/now/table/incident?sysparm_query=approval=approved^ORDERBYDESCsys_created_on&sysparm_fields=number,u_server,u_filename&sysparm_limit=1' 2>/dev/null --request GET --header "Accept:application/json" --user 'admin':'Zippyops@123' | jq | grep number | awk '{print $2}' | sed 's/"//g' | sed 's/,//g' )"
filename="$(curl 'https://dev65067.service-now.com/api/now/table/incident?sysparm_query=approval=approved^ORDERBYDESCsys_created_on&sysparm_fields=number,u_server,u_filename&sysparm_limit=1' 2>/dev/null --request GET --header "Accept:application/json" --user 'admin':'Zippyops@123' | jq | grep filename | awk '{print $2}' | sed 's/"//g' | sed 's/,//g' )"
server="$(curl 'https://dev65067.service-now.com/api/now/table/incident?sysparm_query=approval=approved^ORDERBYDESCsys_created_on&sysparm_fields=number,u_server,u_filename&sysparm_limit=1' 2>/dev/null --request GET --header "Accept:application/json" --user 'admin':'Zippyops@123' | jq | grep server | awk '{print $2}' | sed 's/"//g' | sed 's/,//g' )"
this curl command using to passing the variable value
Relevant Blogs:
Terraform execution in pipeline
Zabbix threshold configuration
Ansible Terraform VS Cloudformation
Types of Openstack configuration
Recent Comments
No comments
Leave a Comment
We will be happy to hear what you think about this post