Setting up Request Rate Limiting With NGINX Ingress
Master request rate limits in Kubernetes with NGINX Ingress. Set up, test, and secure web apps using NGINX and Locust for peak performance.
In today's highly interconnected digital landscape, web applications face the constant challenge of handling a high volume of incoming requests. However, not all requests are equal, and excessive traffic can put a strain on resources, leading to service disruptions or even potential security risks. To address this, implementing request rate limiting is crucial to preserve the stability and security of your environment.
Request rate limiting allows you to control the number of requests per unit of time that a server or application can handle. By setting limits, you can prevent abuse, manage resource allocation, and mitigate the risk of malicious attacks such as DDoS or brute-force attempts. In this article, we will explore how to set up request rate limiting using NGINX Ingress, a popular Kubernetes Ingress Controller. We will also demonstrate how to test the rate-limiting configuration using Locust, a load-testing tool.
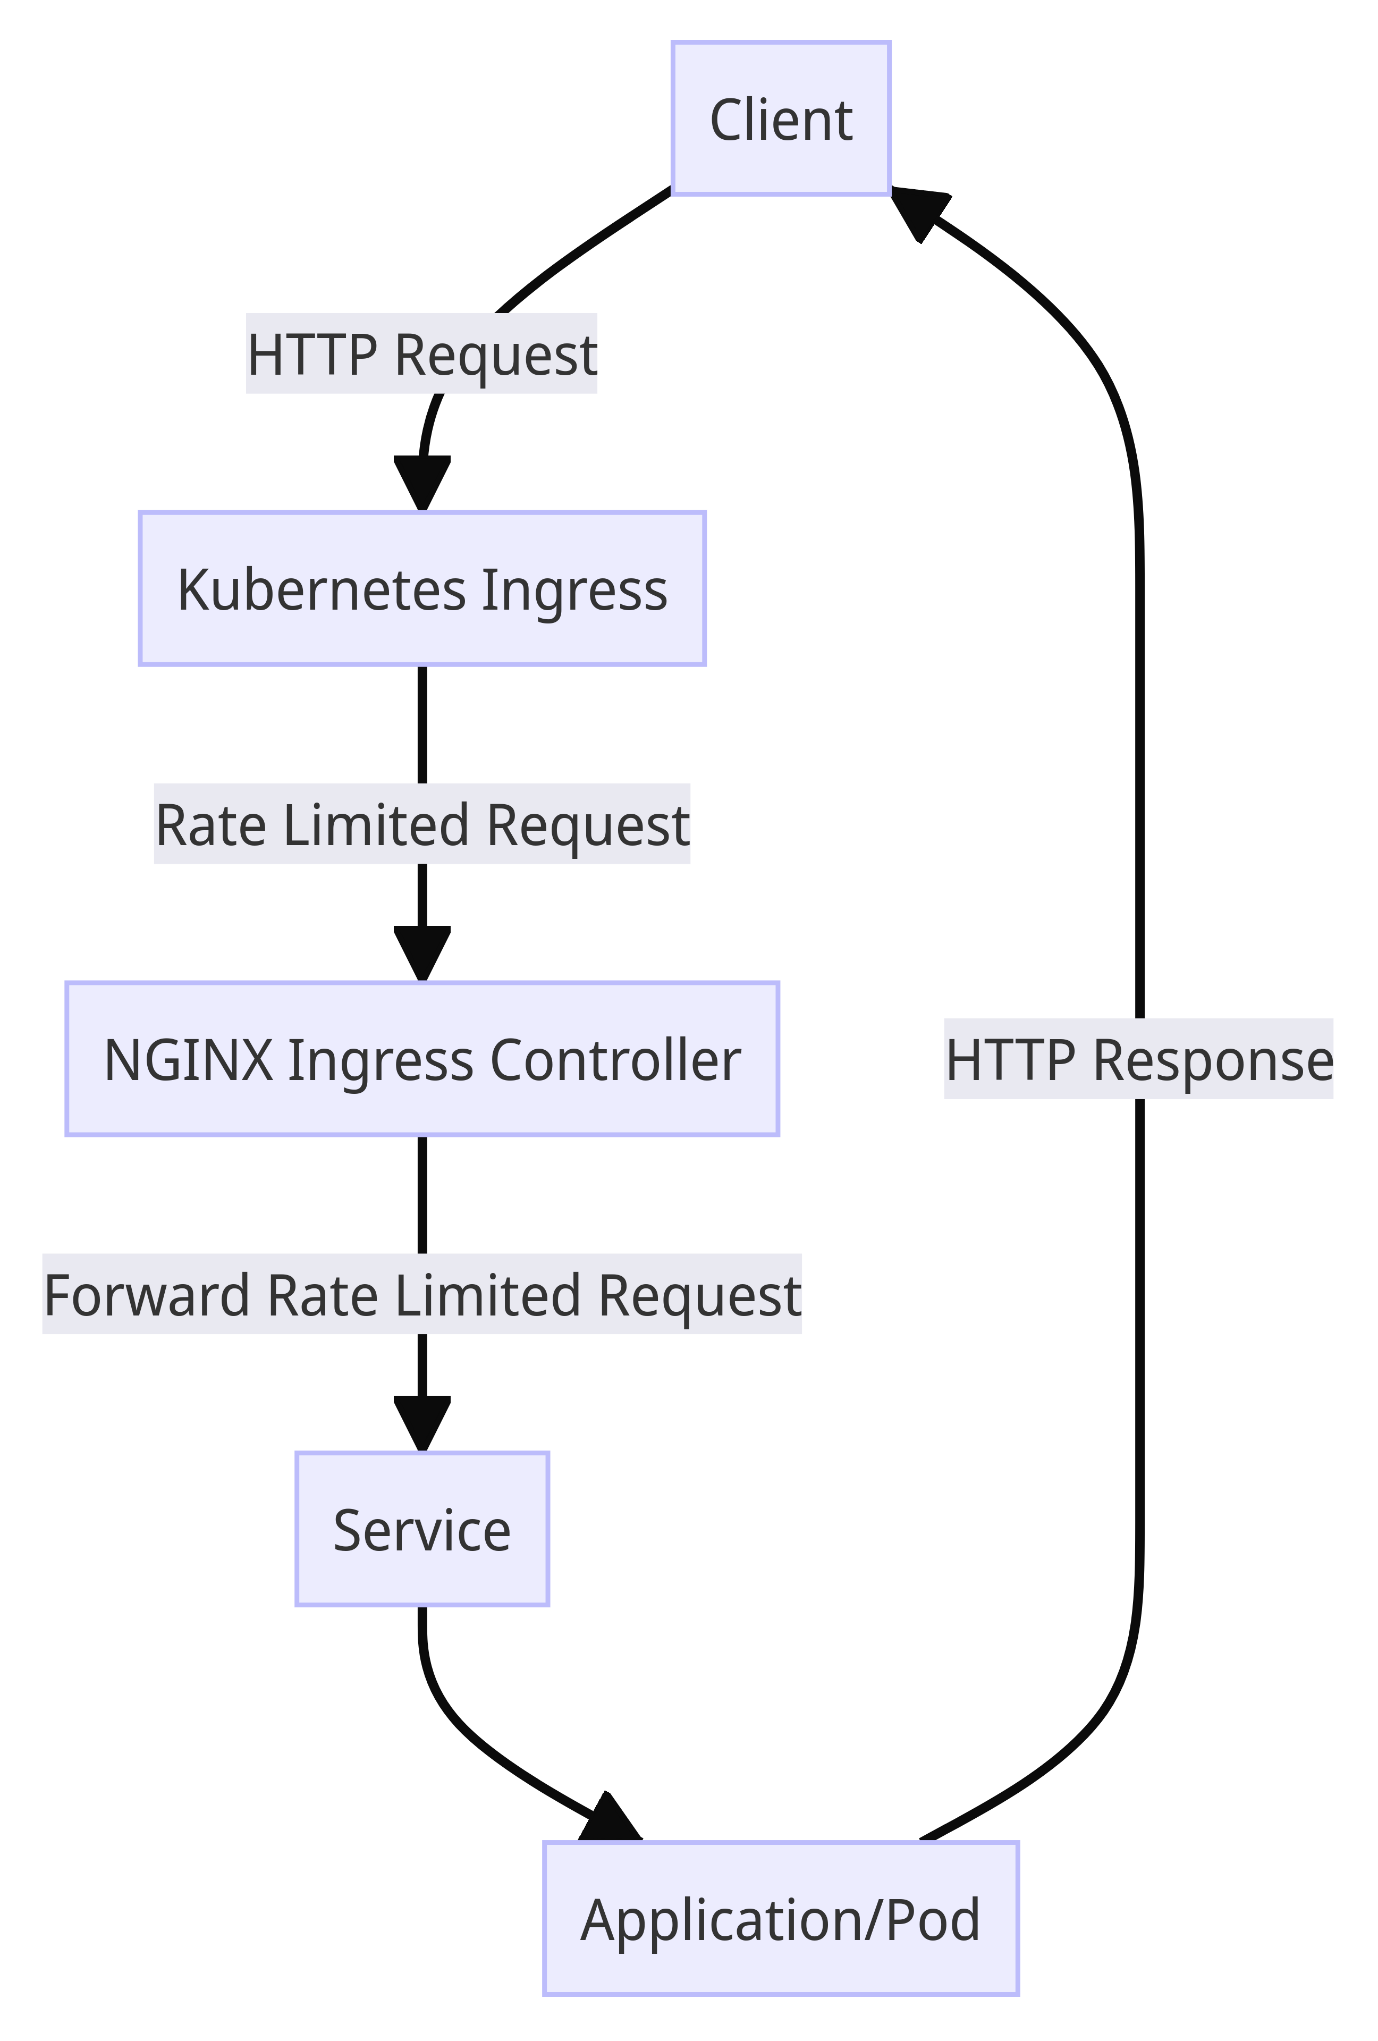
To provide a clear overview of the setup process, let's visualize the workflow using a flow diagram:
Now that we
understand the purpose and importance of rate limiting let's dive into the
practical steps.
Creating a Kubernetes Deployment
Before we can configure rate limiting, we need to have a sample application running. For the purpose of this demonstration, we will create a simple NGINX deployment in the default namespace of Kubernetes. NGINX is a widely used web server and reverse proxy known for its performance and scalability.
To create the Nginx deployment, save the following YAML content
to a file named nginx-deployment.yaml:
YAML
Apply the
deployment using the kubectl command:
Shell
kubectl apply -f nginx-deployment.yaml
The NGINX deployment is now up and running, and we can proceed to the next step.
Creating a Kubernetes Service
In order to expose the NGINX deployment to the outside world, we need to create a Kubernetes Service. The Service acts as a stable endpoint for accessing the NGINX deployment and ensures load balancing among the replicas.
Save the following
YAML content to a file named nginx-service.yaml:
YAML
Apply the service
using the kubectl command:
Shell
kubectl apply -f nginx-service.yaml
With the service in place, the NGINX deployment is accessible within the Kubernetes cluster.
Installing NGINX Ingress Controller
Next, we need to install the NGINX Ingress Controller. NGINX is a popular choice for managing ingress traffic in Kubernetes due to its efficiency and flexibility. The Ingress Controller extends Nginx to act as an entry point for external traffic into the cluster.
To install the NGINX Ingress Controller, we will use Helm, a package manager for Kubernetes applications. Helm simplifies the deployment process by providing a standardized way to package, deploy, and manage applications in Kubernetes.
Before proceeding, make sure you have Helm installed on your system. You can follow the official Helm documentation to install it.
Once Helm is installed, run the following command to add the NGINX Ingress Helm repository:
Shell
helm repo add ingress-nginx https://kubernetes.github.io/ingress-nginxTo install the NGINX Ingress Controller, use the following Helm command:
Shell
helm install my-nginx ingress-nginx/ingress-nginxThis command will deploy the NGINX Ingress Controller with default configurations. The controller will handle incoming requests and route them to the appropriate services within the cluster.
Now that we have the NGINX Ingress Controller installed let's proceed to configure rate limiting.
Creating a Kubernetes Ingress Resource
To apply rate limiting using the NGINX Ingress Controller, we will create a Kubernetes Ingress Resource. The Ingress Resource defines how incoming traffic should be routed and what rules should be applied.
Create a file
named rate-limit-ingress.yaml and add the following YAML content:
YAML
In this example, we
set the following rate limits:
-
10
requests per second (
limit-rps) -
100
requests per minute (
limit-rpm) -
1000
requests per hour (
limit-rph) -
100
connections (
limit-connections)
These limits can be adjusted according to your specific requirements.
Apply the Ingress
Resource using the kubectl command:
Shell
kubectl apply -f rate-limit-ingress.yaml
The NGINX Ingress Controller will now enforce the specified rate limits for the NGINX service.
Introduction to Locust UI
Before we test the rate-limiting configuration, let's briefly introduce Locust, a popular open-source load-testing tool. Locust is designed to simulate a large number of concurrent users accessing a system and measure its performance under different loads.
Locust offers a user-friendly web UI that allows you to define test scenarios using Python code and monitor the test results in real time. It supports distributed testing, making it ideal for running load tests from Kubernetes clusters.
To install Locust locally for curiosity purposes, you can use the following pip command:
Shell
pip install locustOnce installed, you can access the Locust UI by running the following command:
Shell
locustBy default, the Locust UI is accessible at port 8089. However, please note that for the purposes of this article, we will deploy Locust in Kubernetes to test the rate-limiting configuration. We will cover this in the next section.
Running Locust from Kubernetes
To test the rate-limiting configuration, we will deploy Locust in the Kubernetes cluster and configure it to target the NGINX service exposed by the NGINX Ingress Controller.
First, we need to
deploy Locust in Kubernetes. Save the following YAML content to a file
named locust-deployment.yaml:
YAML
This deployment
will create a single replica of the Locust container, which runs the
Locust load testing tool. The container is configured to target the Nginx
service by specifying its hostname: http://nginx-service.default.svc.cluster.local.
Apply the
deployment using the kubectl command:
Shell
kubectl apply -f locust-deployment.yaml
Next, we need to access the Locust UI. Since the Locust deployment is running inside the cluster, we can use port forwarding to access the UI on our local machine.
Run the following command to set up port forwarding:
Shell
kubectl port-forward deployment/locust-deployment 8089:8089
The Locust UI will now be accessible on port 8089.
Open a web browser and navigate port 8089 to access the Locust UI.
Now, let's set up a simple test scenario in Locust to verify the rate limiting.
1. In the Locust UI, enter the desired number of users to simulate and the spawn rate.
2. Set the target host to the hostname or public IP associated with the NGINX Ingress Controller.
3. Add a task
that sends a GET request to /index.html.
4. Start the test and monitor the results.
Locust will simulate the specified number of users, sending requests to the NGINX service. The rate-limiting configuration applied by the NGINX Ingress Controller will control the number of requests allowed per unit of time.
Conclusion
Implementing request rate limiting is essential for preserving the stability and security of your web applications. In this article, we explored how to set up request rate limiting using NGINX Ingress, a popular Kubernetes Ingress Controller. We also demonstrated how to test the rate-limiting configuration using Locust, a powerful load-testing tool.
By following the steps outlined in this article, entry-level DevOps engineers can gain hands-on experience in setting up request rate limiting and verifying its effectiveness. Remember to adjust the rate limits and test scenarios according to your specific requirements and application characteristics.
Rate limiting is a powerful tool, but it's important to use it judiciously. While it helps prevent abuse and protect your resources, overly strict rate limits can hinder legitimate traffic and user experience. Consider the nature of your application and the expected traffic patterns, and consult with stakeholders to determine appropriate rate limits.
With the knowledge gained from this article, you are well-equipped to implement request rate limiting in your Kubernetes environment and ensure the stability
We Provide consulting, implementation, and management services on DevOps, DevSecOps, DataOps, Cloud, Automated Ops, Microservices, Infrastructure, and Security
Services offered by us: https://www.zippyops.com/services
Our Products: https://www.zippyops.com/products
Our Solutions: https://www.zippyops.com/solutions
For Demo, videos check out YouTube Playlist: https://www.youtube.com/watch?v=4FYvPooN_Tg&list=PLCJ3JpanNyCfXlHahZhYgJH9-rV6ouPro
If this seems interesting, please email us at [email protected] for a call.
Relevant Blogs:
Recent Comments
No comments
Leave a Comment
We will be happy to hear what you think about this post