What You Need to Know to Debug a Preempted Pod on Kubernetes
The preemption of pods is a problem for any Kubernetes administrator. This article gives you some hints to make debugging easier.
The purpose of this post is to share some thoughts on the management of a Kubernetes platform in production. The idea is to focus on a major problem that many beginners encounter with this platform, namely: the management of preempted pods.
What Is a Preempted Pod?
Preemption is a famous nightmare on every orchestration platform, this is not something dedicated to Kubernetes, but several aspects of this platform can be the root cause of an unexpected preemption.
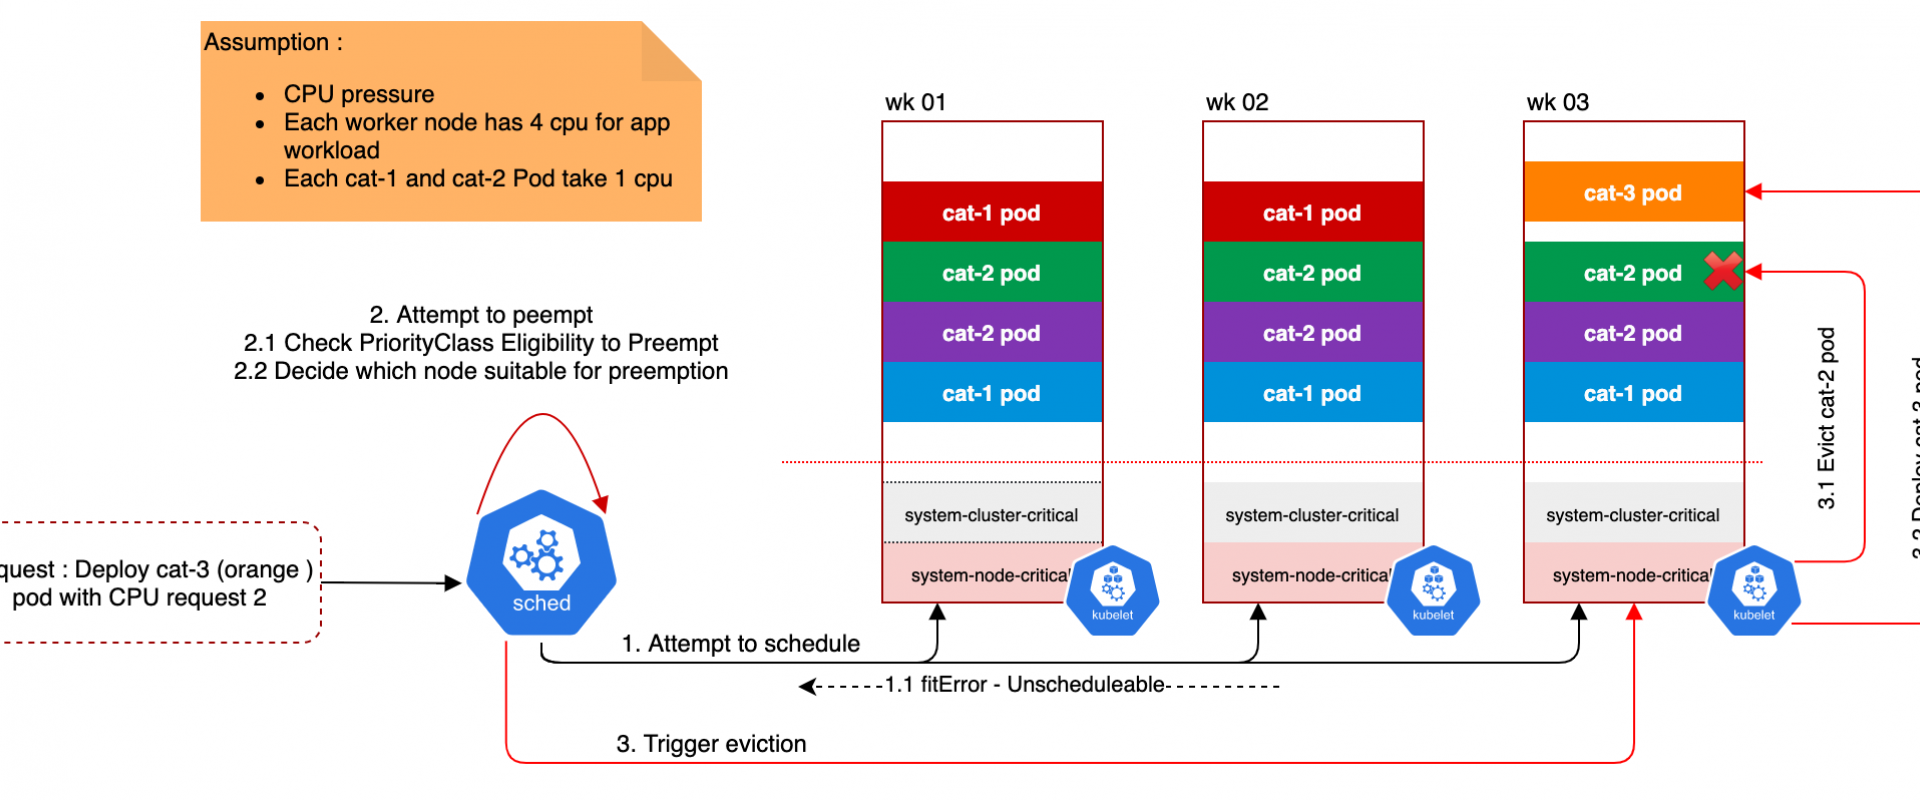
Let’s put it in context, when a pod creation is requested, the definition of the pod goes into a queue. The scheduler picks a pod from the queue and tries to find a node where the pod can start with the allocated resources (aka. Requests and Limits). If the scheduler cannot find space on an appropriate node that satisfies all the requirements of the pod, preemption logic is triggered for the pending pod and the status of the pod is updated to provide information to the user.
When a pod is preempted and has been set with a high priority, Kubernetes will automatically search for one or more pods with lower priority to request their graceful ending in order to prioritize the deployment of this new pod. Fortunately, preemption does not necessarily remove all lower priority pods from a node, it can do so selectively to avoid the preemption of hundreds of containers at the same time and thus minimize the operations necessary to orchestrate the pods.
In some use cases, it may be difficult to understand the path that led Kubernetes to preempt or evict a pod and create this involuntary disruption of the workload, especially in environments lacking observability. It is therefore important to understand what Kubernetes resources may be at the beginning of a preemption.
What Are Limits, Requests, and Quotas?
Kubernetes is an orchestration platform, meaning it has native components to control the distributed resources (CPU, memory, and disk) available on a cluster. Kubernetes uses this information to attach, schedule, and start a pod on a node based on the required and available resources.
To do this, Kubernetes uses three concepts:
1. Requests
2. Limits
3. Quotas / LimitRange
Queries and limits are defined at the container level and can therefore be managed by the containerized application team. A query defines the resources allocated to start the container. During its life cycle, a container may exceed the resources allocated to start the application. It is therefore necessary to control the number of resources that may be required by this container by defining a limit. These two parameters allow Kubernetes to evaluate on which node the container can be scheduled.
If these data are omitted, Kubernetes considers that the container can consume as many resources as necessary. This behavior requires another level of control, not at the pod level, but at the namespace level. This type of control is usually managed by the DevOps teams to minimize the impact of a container misconfiguration. These limits are called quotas or LimitRange. They define how many resources can be allocated to a single namespace.
This information is important because it ensures control of the resources and therefore the cost of the platform. This is especially important for the FinOps team to predict and potentially reduce infrastructure costs.
These configurations are also the first thing to check as part of the preemption of pods. Indeed, a lack of resources is the first cause of preemption for any orchestrator.
How Quality of Service Is Determined?
Quality of Service (QoS) is not something you can directly control by setting it in a definition YAML file. Kubernetes is the only one that can define and attach a quality of service class to a pod, and that is why it is important to understand the concept as it determines the scheduling and eviction priority of pods.
Basically, a QoS class is used by the Kubernetes scheduler to make decisions about scheduling pods on nodes based on multiple factors:
- The limits and requests allocated to a new pod
- The free CPU and memory resources available on a node
- The priority of the existing pods compared to the priority of the new pod
Kubelet uses it to govern the order in which pods are evicted and to enable more complex pod placement decisions using advanced CPU management policies.
Kubernetes uses three different QoS classes, in order of priority:
1. Guaranteed, pods are considered top priority and are guaranteed to not be killed until they exceed their limits.
2. Best Effort, pods have some form of minimal resource guarantee but can use more resources when available. Under system resources pressure, these containers are more likely to be killed once they exceed their requests.
3. Burstable, pods will be treated as the lowest priority. Processes in these pods are the first to get killed if the system runs out of resources.
What Is a Priority Class?
A priority class is defined at a cluster level and used at the pod level, it is used by Kubernetes to classify, order and prioritize the queue listing the tasks to be performed, especially the creation of pod, but it is also used for the eviction (or preemption) of the pod when a cluster lacks resources.
The principle is relatively simple, the place is reserved for resources with the highest priorities. It is important to set a priority policy on a cluster so that Kubernetes can intelligently manage the critical resources of your organization.
This policy must be defined by the DevOps team and understood by all engineering teams in order to facilitate its adoption and therefore its implementation in the YAML definition files.
Numbers are not easy to remember and read, it is recommended to use priority class names like Critical, High, Normal, Low, or None to facilitate the use and understanding of the class attached to a pod.
In the context of pre-empted pods, checking the priority class of a pod is probably the second thing to do in order to understand its priority from the point of view of Kubernetes.
What Are Affinities?
Affinities are used by orchestrator platforms to define the best localization for a resource on a cluster. These definitions are rules that orchestrators should follow if possible, as they have the ability to be required or preferred.
In the Kubernetes framework, affinities are defined at the pod level and allow interaction with two components of a cluster:
<!--[if !supportLists]-->1. Other pods to potentially deploy two pods as close as possible to each other.
<!--[if !supportLists]-->2. A node to deploy a pod on a specific node type, like a node with a GPU or an SSD drive.
The Kubernetes scheduler is based on the labels attached to the resources in order to respect affinity or anti-affinity.
Affinities add another level of integration that requires some understanding of the resources of a cluster. This integration can play a role in the preemption of pods. Adding an affinity can force Kubernetes to move existing resources to other nodes to deploy two new pods on the same node. On the other hand, adding an anti-affinity can force Kubernetes to move resources and if conditions cannot be met, the pods may not be deployed at all.
It is therefore important to use affinities carefully and document their use to facilitate the debug phase in case of preemption.
What Is a Graceful Period Shutdown?
The graceful period shutdown is not an active part of preempted pods, but it needs to be understood because it can create confusion on what Kubernetes does during preemption.
Generally speaking, Kubernetes always tries to stop an application in the best possible way by giving him time to finish his work. But, when this period exceeds the expected time, Kubernetes kills the pod and therefore the application. This aspect of Kubernetes should be taken into account in the containerization of an application in order to avoid any data loss.
As part of preempted pods, this graceful shutdown period can create confusion for some people as the scheduler will continue to prioritize his tasks during this period and therefore new pods will be created. Thus, there is a latency between the request for termination of a pod and its recreation. To minimize this gap, the graceful end period can be reduced to zero. It is recommended to use this method carefully to avoid any impact on the data managed by a container.
How to Prevent Preemption?
Certain problems that cause pod preemption can be avoided by using automated processes if they are applicable to the context of the Kubernetes cluster.
Cluster Auto Scaling
Cluster auto-scaling is an effective but expensive way to prevent pod preemption when it is related to a lack of computing resources.
This solution should not be applied to all priority classes, but only to the most important ones in order to control the cost of resources. This obviously requires a relevant classification of applications and their priorities.
Cluster auto-scaling must be coupled with a robust observability platform to identify preemption as early as possible and take all necessary actions.
Auto-scaling can be seen as a temporary solution to give engineering teams time to identify a permanent solution.
Pre-Commit Hook
Following best management practices is highly recommended to prevent human error and thus keep a healthy Kubernetes cluster at all times.
Adding control points to the definition files, whether in the integration pipeline or even as a pre-commit command to prevent a developer from pushing a pod into production with high priority for no reason is good practice. There are now several tools (such as Datree, Checkov, etc.) that can be easily integrated into an automation process, allowing the development of customizable control points in order to block a deployment if a rule is violated.
Security policies and Kubernetes governance can also be defined on each cluster to ensure that no one does anything wrong manually on an existing cluster. These policies can be easily managed by an Open Policy Agent and a Gatekeeper to reject the application if a rule is not followed.
The combination of the two checkpoints can prevent human error and probably save you hours of debugging, but their implementation requires monitoring to detect any deviating behavior and accurate documentation to facilitate the adoption of these security policies.
We Provide consulting, implementation, and management services on DevOps, DevSecOps, Cloud, Automated Ops, Microservices, Infrastructure, and Security
Services offered by us: https://www.zippyops.com/services
Our Products: https://www.zippyops.com/products
Our Solutions: https://www.zippyops.com/solutions
For Demo, videos check out YouTube Playlist: https://www.youtube.com/watch?v=4FYvPooN_Tg&list=PLCJ3JpanNyCfXlHahZhYgJH9-rV6ouPro
If this seems interesting, please email us at [email protected] for a call.
Relevant blogs:
What You Should Know Before Setting Up Your First CI/CD Pipeline
Why You Should Stop Relying on Jenkins Plug-ins
Kubernetes as Sustainability Tool
10 Best Infrastructure-as-Code Tools for Automating Deployments in 2022
Recent Comments
No comments
Leave a Comment
We will be happy to hear what you think about this post