Dockerizing ML Models: A Deployment Guide
This comprehensive guide for ML enthusiasts will take you through the journey to packaging and running ML models with Docker.
In the rapidly evolving domain of machine learning (ML), the ability to seamlessly package and deploy models is as crucial as the development of the models themselves. Containerization has emerged as the game-changing solution to this, offering a streamlined path from the local development environment to production. Docker, a leading platform in containerization, provides the tools necessary to encapsulate ML applications into portable and scalable containers.
This article delves into the step-by-step process of containerizing a simple ML application with Docker, making it accessible to ML practitioners and enthusiasts alike. Whether you're looking to share your ML models with the world or seeking a more efficient deployment strategy, this tutorial is designed to equip you with the fundamental skills to transform your ML workflows using Docker.
Docker and Containerization
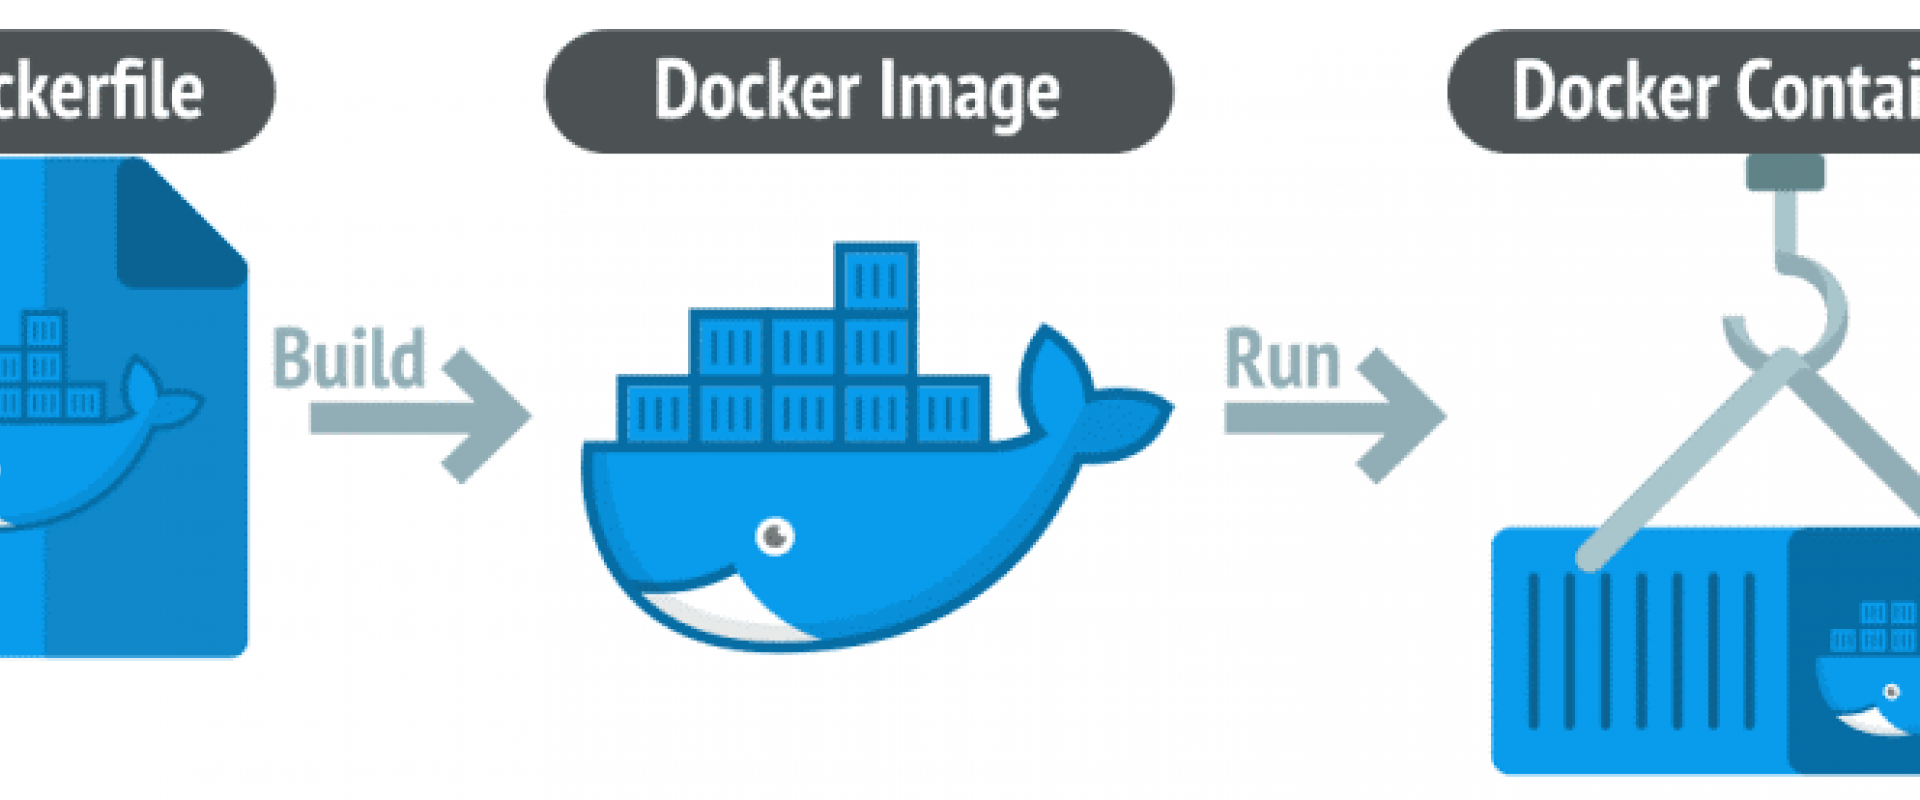
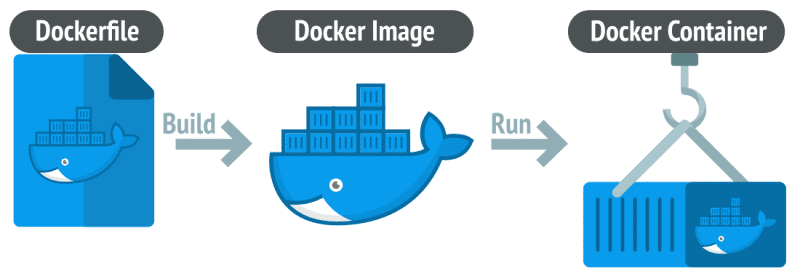
Docker is a powerful platform that has revolutionized the development and distribution of applications by utilizing containerization, a lightweight alternative to full-machine virtualization. Containerization involves encapsulating an application and its environment — dependencies, libraries, and configuration files — into a container, which is a portable and consistent unit of software. This approach ensures that the application runs uniformly and consistently across any infrastructure, from a developer's laptop to a high-compute cloud-based server.
Unlike traditional virtual machines that replicate an entire operating system, Docker containers share the host system's kernel, making them much more efficient, fast to start, and less resource-intensive. Docker's simple and straightforward syntax hides the complexity often involved in deployment processes, streamlining the workflow and enabling a DevOps approach to the lifecycle management of the software development process.
Tutorial
Below is a step-by-step tutorial that will guide you through the process of containerizing a simple ML application using Docker.
Setting Up Your Development Environment
Before you start, make sure you have Docker installed on your machine. If not, you can download it from the Docker website.
Creating a Simple Machine Learning Application
For this tutorial, let's create a simple Python application that uses the Scikit-learn library to train a model on the Iris dataset.
Create a Project Directory
Open your terminal or command prompt and run the following:
Shell
mkdir ml-docker-app
cd ml-docker-app
Set up a Python Virtual Environment (Optional, but Recommended)
Shell
python3 -m venv venv
On Windows use venv\Scripts\activate
Create a requirements.txt File
List the Python packages that your application requires. For our simple ML application:
Shell
scikit-learn==1.0.2
pandas==1.3.5
Create the Machine Learning Application Script
Save the following code into a file named app.py in the ml-docker-app directory:
Python
from sklearn import datasets
from sklearn.model_selection import train_test_split
from sklearn.ensemble import RandomForestClassifier
from sklearn.metrics import accuracy_score
import joblib
# Load dataset
iris = datasets.load_iris()
X = iris.data
y = iris.target
# Split dataset into training set and test set
X_train, X_test, y_train, y_test = train_test_split(X, y, test_size=0.3)
# Create a Gaussian Classifier
clf = RandomForestClassifier()
# Train the model using the training sets
clf.fit(X_train, y_train)
# Predict the response for test dataset
y_pred = clf.predict(X_test)
# Model Accuracy, how often is the classifier correct?
print(f"Accuracy: {accuracy_score(y_test, y_pred)}")
# Save the trained model
joblib.dump(clf, 'iris_model.pkl')
Install the Dependencies
Run the following command to install the dependencies listed in requirements.txt:
Shell
pip install -r requirements.txt
Run Your Application
Run your application to make sure it works:
Shell
python3 app.py 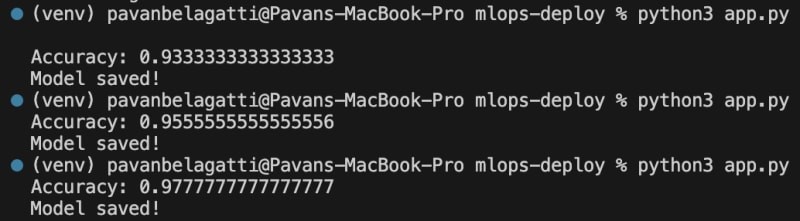
You should see the accuracy of the model printed to the console and a file named iris_model.pkl created, which contains the trained model.
This script provides an end-to-end flow of a very basic machine learning task: loading data, preprocessing it, training a model, evaluating the model, and then saving the trained model for future use.
Containerize the Application With Docker
Create a ‘Dockerfile’
In the root of your ml-docker-app directory, create a file
named Dockerfile with
the following content:
Python
# Use an official Python runtime as a parent image
FROM python:3.9-slim
# Set the working directory in the container
WORKDIR /usr/src/app
# Copy the current directory contents into the container at /usr/src/app
COPY . .
# Install any needed packages specified in requirements.txt
RUN pip install --no-cache-dir -r requirements.txt
# Run app.py when the container launches
Build the Docker Image
Run the following command in your terminal to build the Docker image:
Shell
docker build -t ml-docker-app .
Run the Docker Container
Once the image is built, run your application in a Docker container:
Shell
docker run ml-docker-app
If everything is set up correctly, Docker will run your Python script inside a container, and you should see the accuracy of the model outputted to your terminal, just like when you ran the script natively.
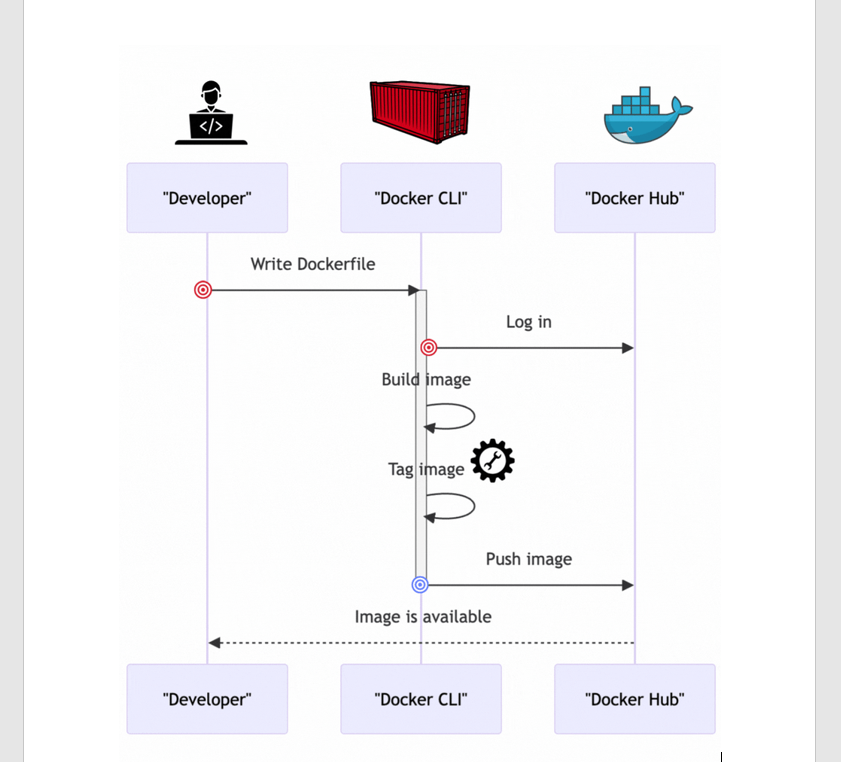
Tag and Push the Container to DockerHub
Log in to Docker Hub from the Command Line
Once you have a Docker Hub account, you need to log in through the command line on your local machine. Open your terminal and run:
Shell
docker login
You will be prompted to enter your Docker ID and password. Once logged in successfully, you can push images to your Docker Hub repository.
Tag Your Docker Image
Before you can push an image to Docker Hub, it must be tagged with your Docker Hub username. If you don’t tag it correctly, Docker will not know where to push the image.
Assuming your Docker ID is a username, and you want to name your Docker image ml-docker-app, run:
Shell
docker tag ml-docker-app username/ml-docker-app
This will tag the local ml-docker-app image as username/ml-docker-app, which prepares it to be pushed to your Docker Hub repository.
Push the Image to Docker Hub
To push the image to Docker Hub, use the docker push command followed by the name of the image you want to push:
Shell
docker push username/ml-docker-app
Docker will upload the image to your Docker Hub repository.
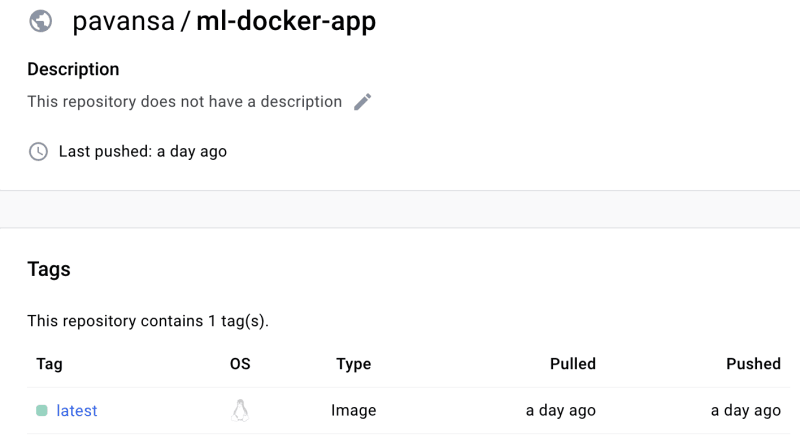
Check the Pushed Container Image on Docker Hub
You can go to your Docker Hub repository and see the recently pushed image.

That's it! You have successfully containerized a simple machine learning application, pushed it to Docker Hub, and made it available to be pulled and run from anywhere.
We Provide consulting, implementation, and management services on DevOps, DevSecOps, DataOps, Cloud, Automated Ops, Microservices, Infrastructure, and Security
Services offered by us: https://www.zippyops.com/services
Our Products: https://www.zippyops.com/products
Our Solutions: https://www.zippyops.com/solutions
For Demo, videos check out YouTube Playlist: https://www.youtube.com/watch?v=4FYvPooN_Tg&list=PLCJ3JpanNyCfXlHahZhYgJH9-rV6ouPro
If this seems interesting, please email us at [email protected] for a call.
Recent Comments
No comments
Leave a Comment
We will be happy to hear what you think about this post