Ways To Reduce JVM Docker Image Size
Explore different JVM Docker container image size optimizations through experiments with base images and the creation of custom JRE, jlink, and jdeps.
This blog post focuses on optimizing the size of JVM Docker images. It explores various techniques such as multi-stage builds, jlink, jdeps, and experimenting with base images. By implementing these optimizations, deployments can be faster, and resource usage can be optimized.
The Problem
Since Java 11, there is no pre-bundled JRE provided. As a result, basic Dockerfiles without any optimization can result in large image sizes. In the absence of a provided JRE, it becomes necessary to explore techniques and optimizations to reduce the size of JVM Docker images.
Now, let's take a look at the simplest version of the Dockerfile for our application and see what's wrong with it. The project we will use in all the examples is Spring Petclinic.
The simplest Dockerfile for our project looks like this:
NOTE: Do not forget to build your JAR file.
Dockerfile
FROM eclipse-temurin:17
VOLUME /tmp
COPY target/spring-petclinic-3.1.0-SNAPSHOT.jar app.jar
After we have built the JAR file of our project, let's build our Dockerfile image and compare the sizes of our JAR file and the created Docker image.
Dockerfile
docker build -t spring-pet-clinic/jdk -f Dockerfile .
docker image ls spring-pet-clinic/jdk
# REPOSITORY TAG IMAGE ID CREATED SIZE
# spring-pet-clinic/jdk latest 3dcd0ab89c3d 23 minutes ago 465MB
If we look at the SIZE column, we can see that the size of our Docker image is 465MB! That's a lot, you might think, but maybe it's because our JAR is pretty big?
In order to verify this, let's take a look at the size of our JAR file using the following command:
Dockerfile
ls -lh target/spring-petclinic-3.1.0-SNAPSHOT.jar | awk '{print $9, $5}'
# target/spring-petclinic-3.1.0-SNAPSHOT.jar 55M
According to the output of our command, you can see that the size of our JAR file is only 55MB. If we compare it to the size of a built Docker image, our JAR file is almost nine times smaller! Let's move on to analyze the reasons and how to make it smaller.
What Are the Reasons for Big Docker Images, and How To Reduce Them?
Before we move on to the optimization of our Docker image, we need to find out what exactly is causing it to be so relatively large. To do this, we will use a tool called Dive which is used for exploring a docker image, layer contents, and discovering ways to shrink the size of your Docker/OCI image.
To install Dive, follow the guide in their README:
Now, let’s find out why our Docker image has such a size by
exploring layers by using this command: dive
spring-pet-clinic/jdk (instead of spring-pet-clinic/jdk use
your Docker image name).
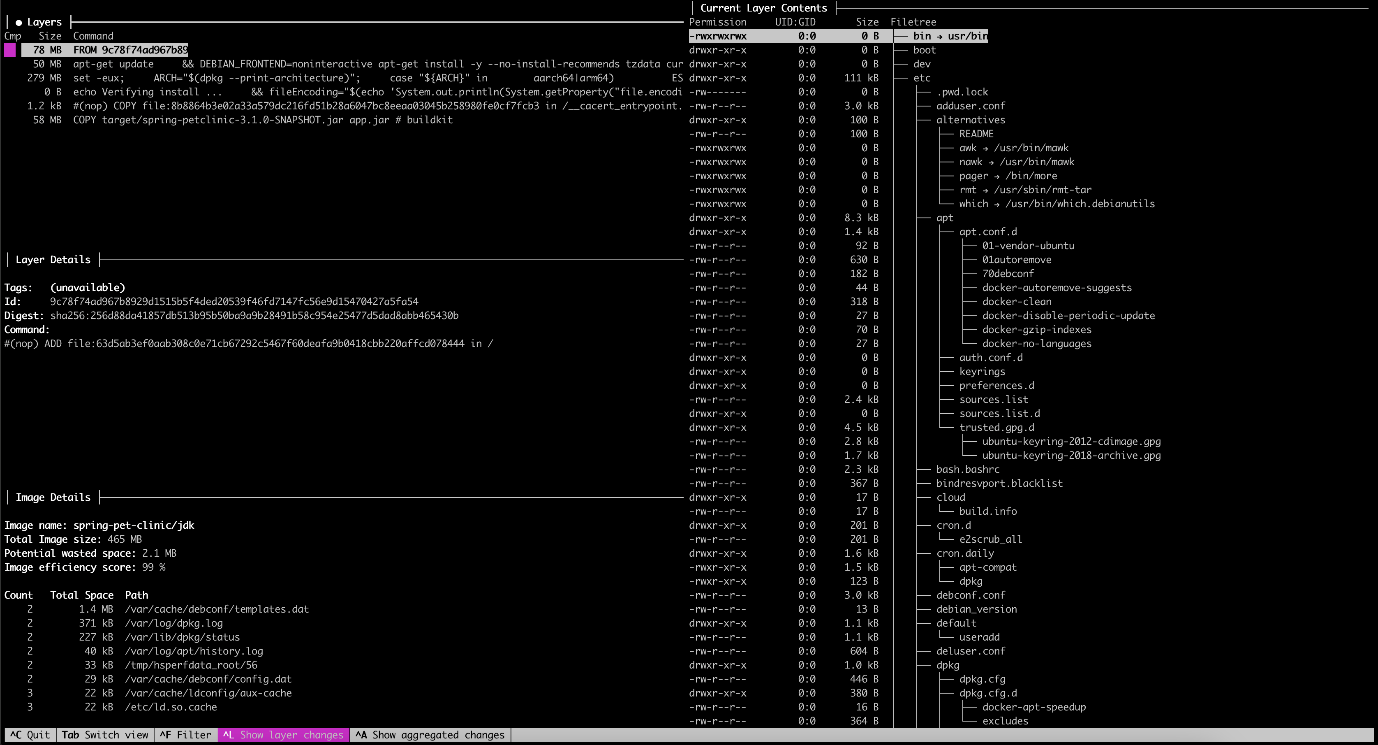
Its output may feel a little bit overwhelming, but don’t worry, we will explore its output together. For our purpose, we are mostly interested only in the top left part, which is the layers of our Docker image. We can navigate between layers by using the “arrow” buttons. Now, let’s find out which layers our Docker image consists of.
Remember, these are the layers of Docker image built from our basic Dockerfile.
1. The first layer is our operating system. By default, it is Ubuntu.
2. In the next one, it installs tzdata, curl, wget, locales, and some more different utils, which takes 50MB!
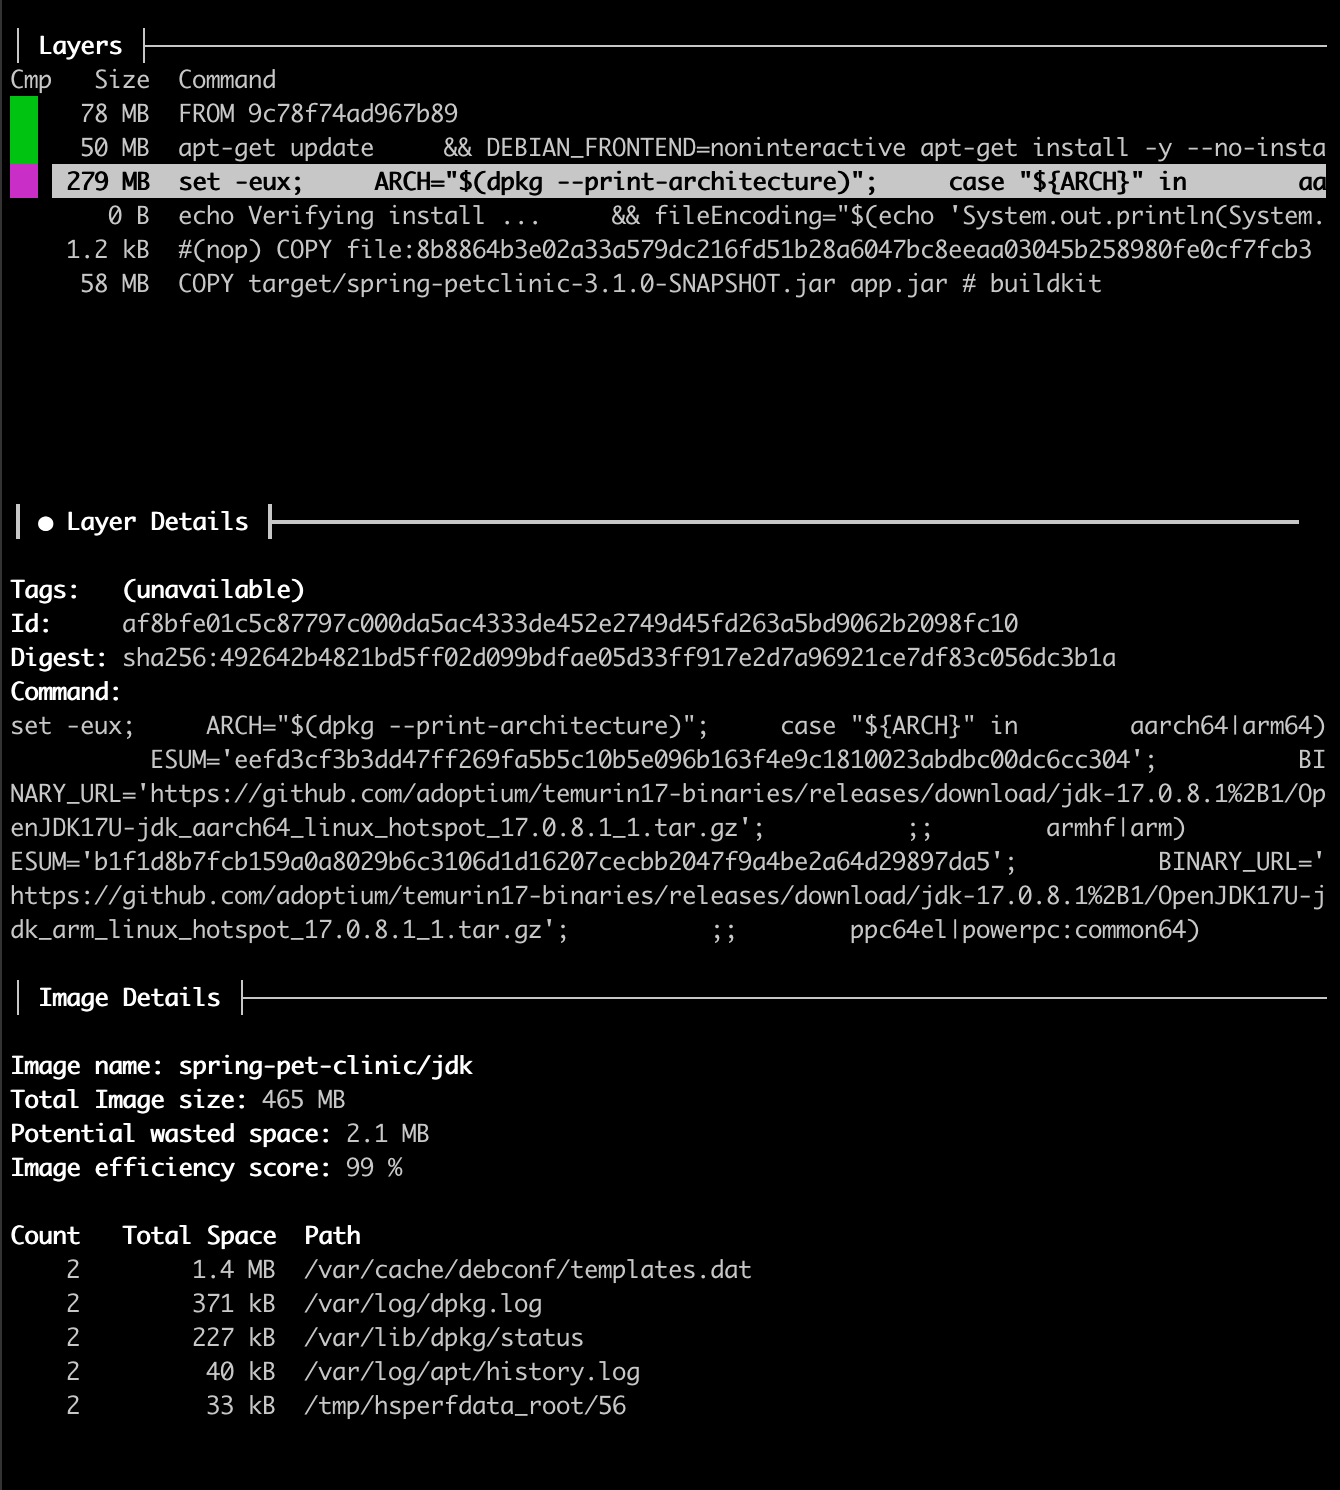
3. The third layer, as you can see from the screenshot above, is our entire Eclipse Temurin 17 JDK, and it takes 279MB, which is pretty big.
4. And the last one is our built JAR, which takes 58MB.
Now that we understand what our Docker image consists of, we can see that a big part of our Docker image includes the entire JDK and things such as timezones, locales, and different utilities, which is unnecessary.
The first optimization for our Docker images is to use jlink tool included in Java 9 along with modularity. With jlink, we can create a custom Java runtime that includes only the necessary components, resulting in a smaller final image.
Now, let's take a look at our new Dockerfile incorporating the jlink tool, which, in theory, should be smaller than the previous one.
Dockerfile
# Example of custom Java runtime using jlink in a multi-stage container build
FROM eclipse-temurin:17 as jre-build
# Create a custom Java runtime
RUN $JAVA_HOME/bin/jlink \
--add-modules ALL-MODULE-PATH \
--strip-debug \
--no-man-pages \
--no-header-files \
--compress=2 \
--output /javaruntime
# Define your base image
FROM debian:buster-slim
ENV JAVA_HOME=/opt/java/openjdk
ENV PATH "${JAVA_HOME}/bin:${PATH}"
COPY --from=jre-build /javaruntime $JAVA_HOME
# Continue with your application deployment
RUN mkdir /opt/app
COPY target/spring-petclinic-3.1.0-SNAPSHOT.jar /opt/app/app.jar
CMD ["java", "-jar", "/opt/app/app.jar"]
To understand how our new Dockerfile works, let's walk through it:
- We use multi-stage Docker build in this Dockerfile and it consists of 2 stages.
- For the first stage, we use the same base image as in the previous Dockerfile.
-
Also,
we employ jlink tool to create a custom JRE, including all Java modules
using
—add-modules ALL-MODULE-PATH -
The
second stage uses the
debian:buster-slimbase image and sets the environment variables forJAVA_HOMEandPATH. It copies the custom JRE created in the first stage to the image. - The Dockerfile then creates a directory for the application, copies the application JAR file into it, and specifies a command to run the Java application when the container starts.
Let’s now build our container image and find out how much smaller it has become.
Dockerfile
docker build -t spring-pet-clinic/jlink -f Dockerfile_jlink .
docker image ls spring-pet-clinic/jlink
# REPOSITORY TAG IMAGE ID CREATED SIZE
# spring-pet-clinic/jlink latest e7728584dea5 1 hours ago 217MB
Our new container image is 217MB in size, which is two times smaller than our previous one.
Stripping Container Image Size, Even More, Using Java Dependency Analysis Tool (Jdeps)
What if I told you that the size of our container image can be made even smaller? When paired with jlink, you can also use the Java Dependency Analysis Tool (jdeps), which was first introduced in Java 8, to understand the static dependencies of your applications and libraries.
In our previous example, for the jlink —add-modules parameter,
we set ALL-MODULE-PATH which
adds all existing Java modules in our custom JRE, and obviously, we don’t need
to include every module. This way we can use jdeps to analyze the project's
dependencies and remove any unused ones, further reducing the image size. Let’s
take a look at how to use jdeps in our Dockerfile:
Dockerfile
# Example of custom Java runtime using jlink in a multi-stage container build
FROM eclipse-temurin:17 as jre-build
COPY target/spring-petclinic-3.1.0-SNAPSHOT.jar /app/app.jar
WORKDIR /app
# List jar modules
RUN jar xf app.jar
RUN jdeps \
--ignore-missing-deps \
--print-module-deps \
--multi-release 17 \
--recursive \
--class-path 'BOOT-INF/lib/*' \
app.jar
> modules.txt
# Create a custom Java runtime
RUN $JAVA_HOME/bin/jlink \
--add-modules $(cat modules.txt) \
--strip-debug \
--no-man-pages \
--no-header-files \
--compress=2 \
--output /javaruntime
# Define your base image
FROM debian:buster-slim
ENV JAVA_HOME=/opt/java/openjdk
ENV PATH "${JAVA_HOME}/bin:${PATH}"
COPY --from=jre-build /javaruntime $JAVA_HOME
# Continue with your application
deployment
RUN mkdir /opt/server
COPY --from=jre-build /app/app.jar /opt/server/
CMD ["java", "-jar", "/opt/server/app.jar"]
Even without going into details, you can see that our Dockerfile has become much larger. Now let's analyze each piece and what it is responsible for:
- We still use multi-stage Docker build.
-
Copy
our built Java app and set
WORKDIRto/app. - Unpacks the JAR file, making its contents accessible for jdeps tool.
- The second RUN instruction runs jdeps tool on the extracted JAR file to analyze its dependencies and create a list of required Java modules. Here's what each option does:
1. --ignore-missing-deps: Ignores
any missing dependencies, allowing the analysis to continue.
2. --print-module-deps: Specifies
that the analysis should print the module dependencies.
3. --multi-release
17: Indicates that the application JAR is compatible with multiple
Java versions, in our case, Java 17.
4. --recursive: Performs a
recursive analysis to identify dependencies at all levels.
5. --class-path
'BOOT-INF/lib/*': Defines the classpath for the analysis,
instructing "jdeps" to look in the "BOOT-INF/lib" directory
within the JAR file.
6. app.jar
> modules.txt: Redirects the output of the "jdeps"
command to a file named "modules.txt," which will contain the list of
Java modules required by the application.
-
Then,
we replace the
ALL-MODULE-PATHvalue for—add-modulesjlink parameter with$(cat modules.txt)to include only necessary modules -
# Define your base imagesection stays the same as in the previous Dockerfile. -
# Continue with your application deploymentwas modified to COPY out JAR file from the previous stage.
The only thing left to do is to see how much the container image has shrunk using our latest Dockerfile:
Dockerfile
docker build -t spring-pet-clinic/jlink_jdeps -f Dockerfile_jdeps .
docker image ls spring-pet-clinic/jlink_jdeps
# REPOSITORY TAG IMAGE ID CREATED SIZE
# spring-pet-clinic/jlink_jdeps latest d24240594f1e 3 hours ago 184MB
So, by using only the modules we need to run our application, we reduced the size of our container image by 33MB, not a lot, but still nice.
Conclusion
Let's take another look, using Dive, at how our Docker images have shrunk after our optimizations.
Instead of using the entire JDK, in this case, we built our
custom JRE using jlink tool and using debian-slim base
image. Which significantly reduced our image size. And, as you can see, we
don’t have unnecessary stuff, such as timezones, locales, big OS, and entire
JDK. We include only what we use and need.
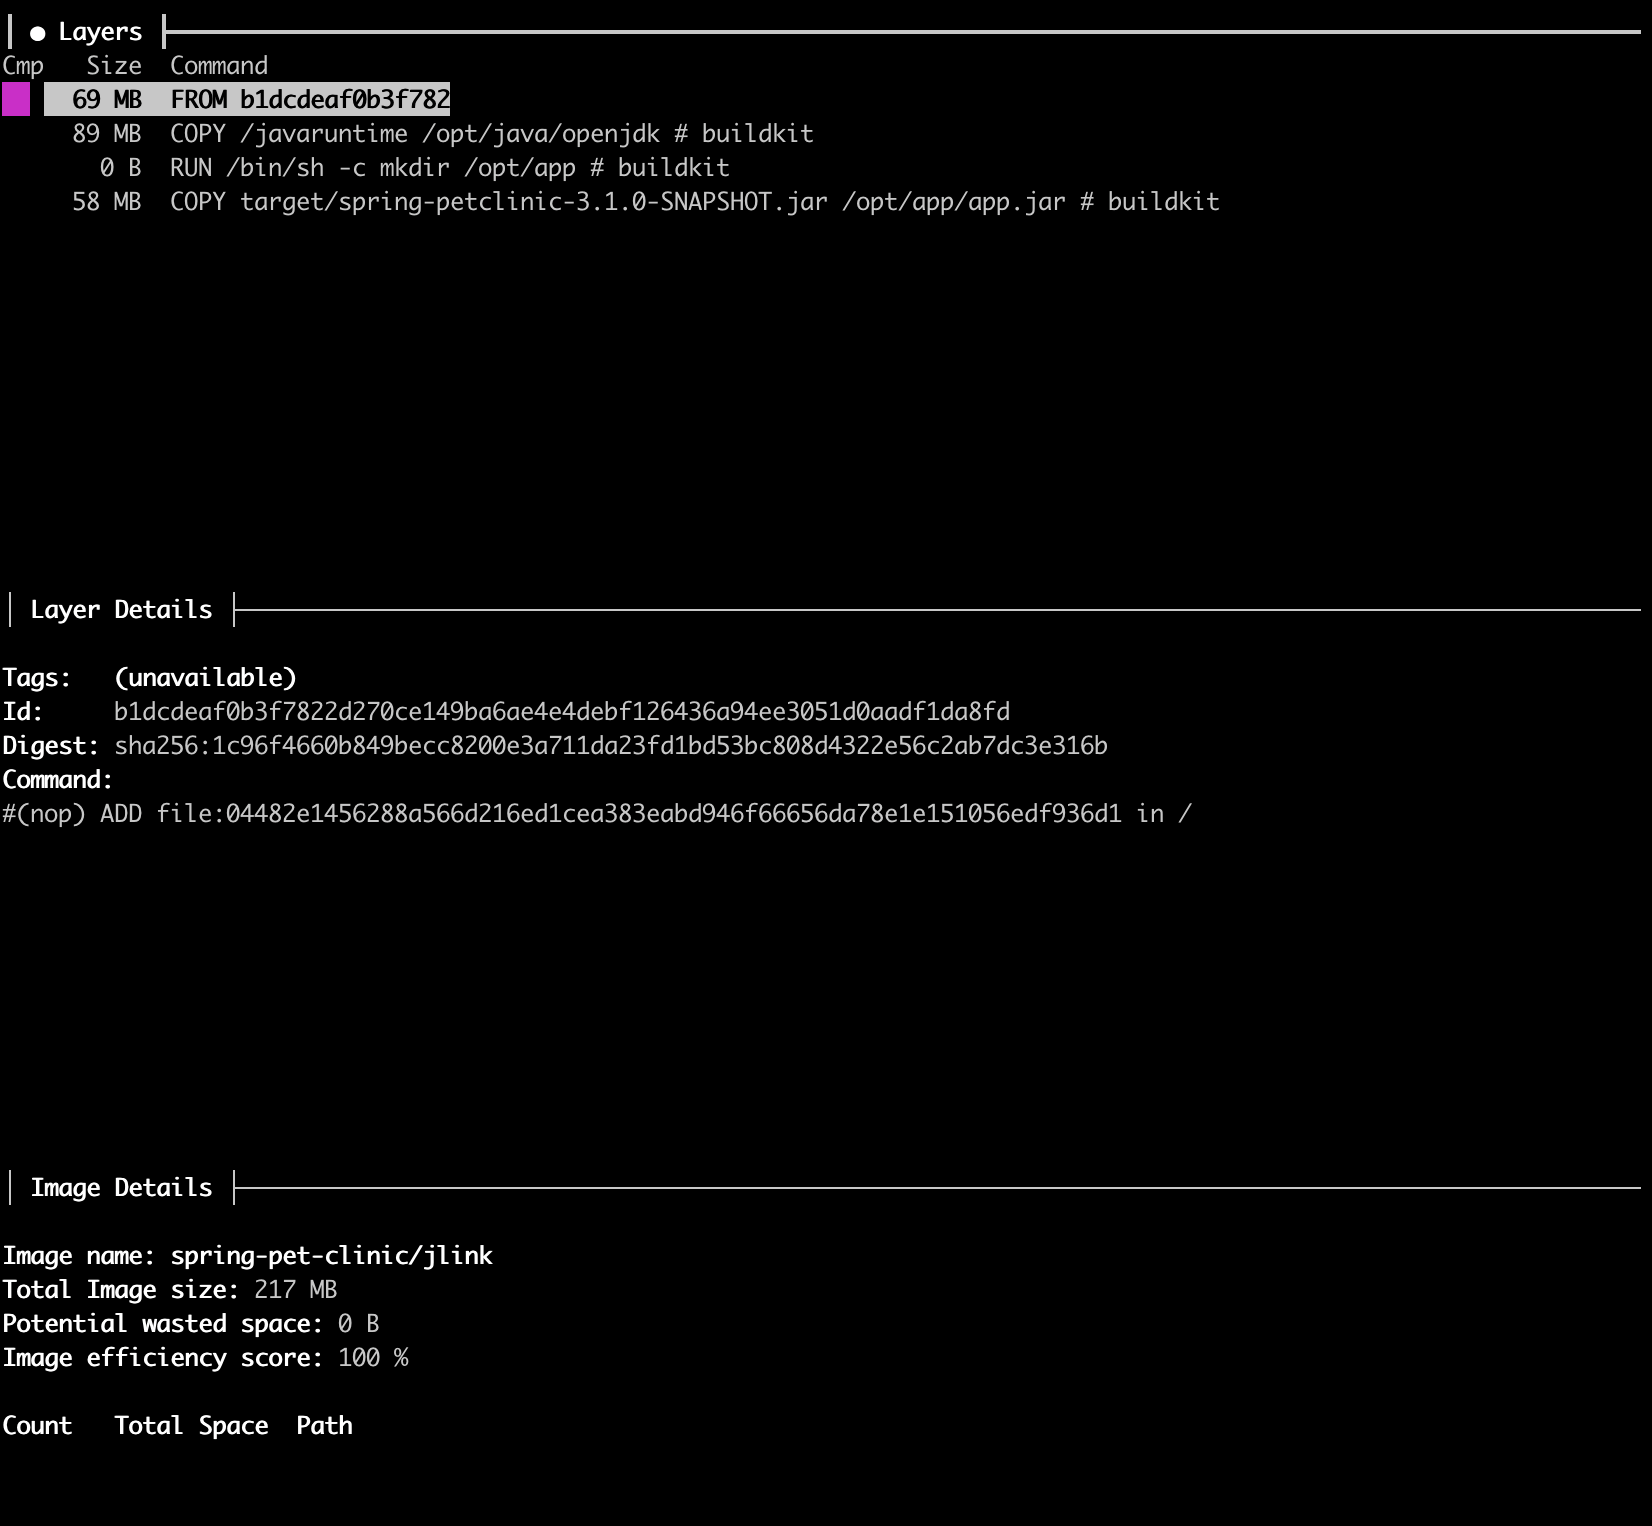
Dockerfile_jlink
Here, we went even further and passed only used Java modules to our JRE, making the built JRE even smaller, thus reducing the size of the entire final image.
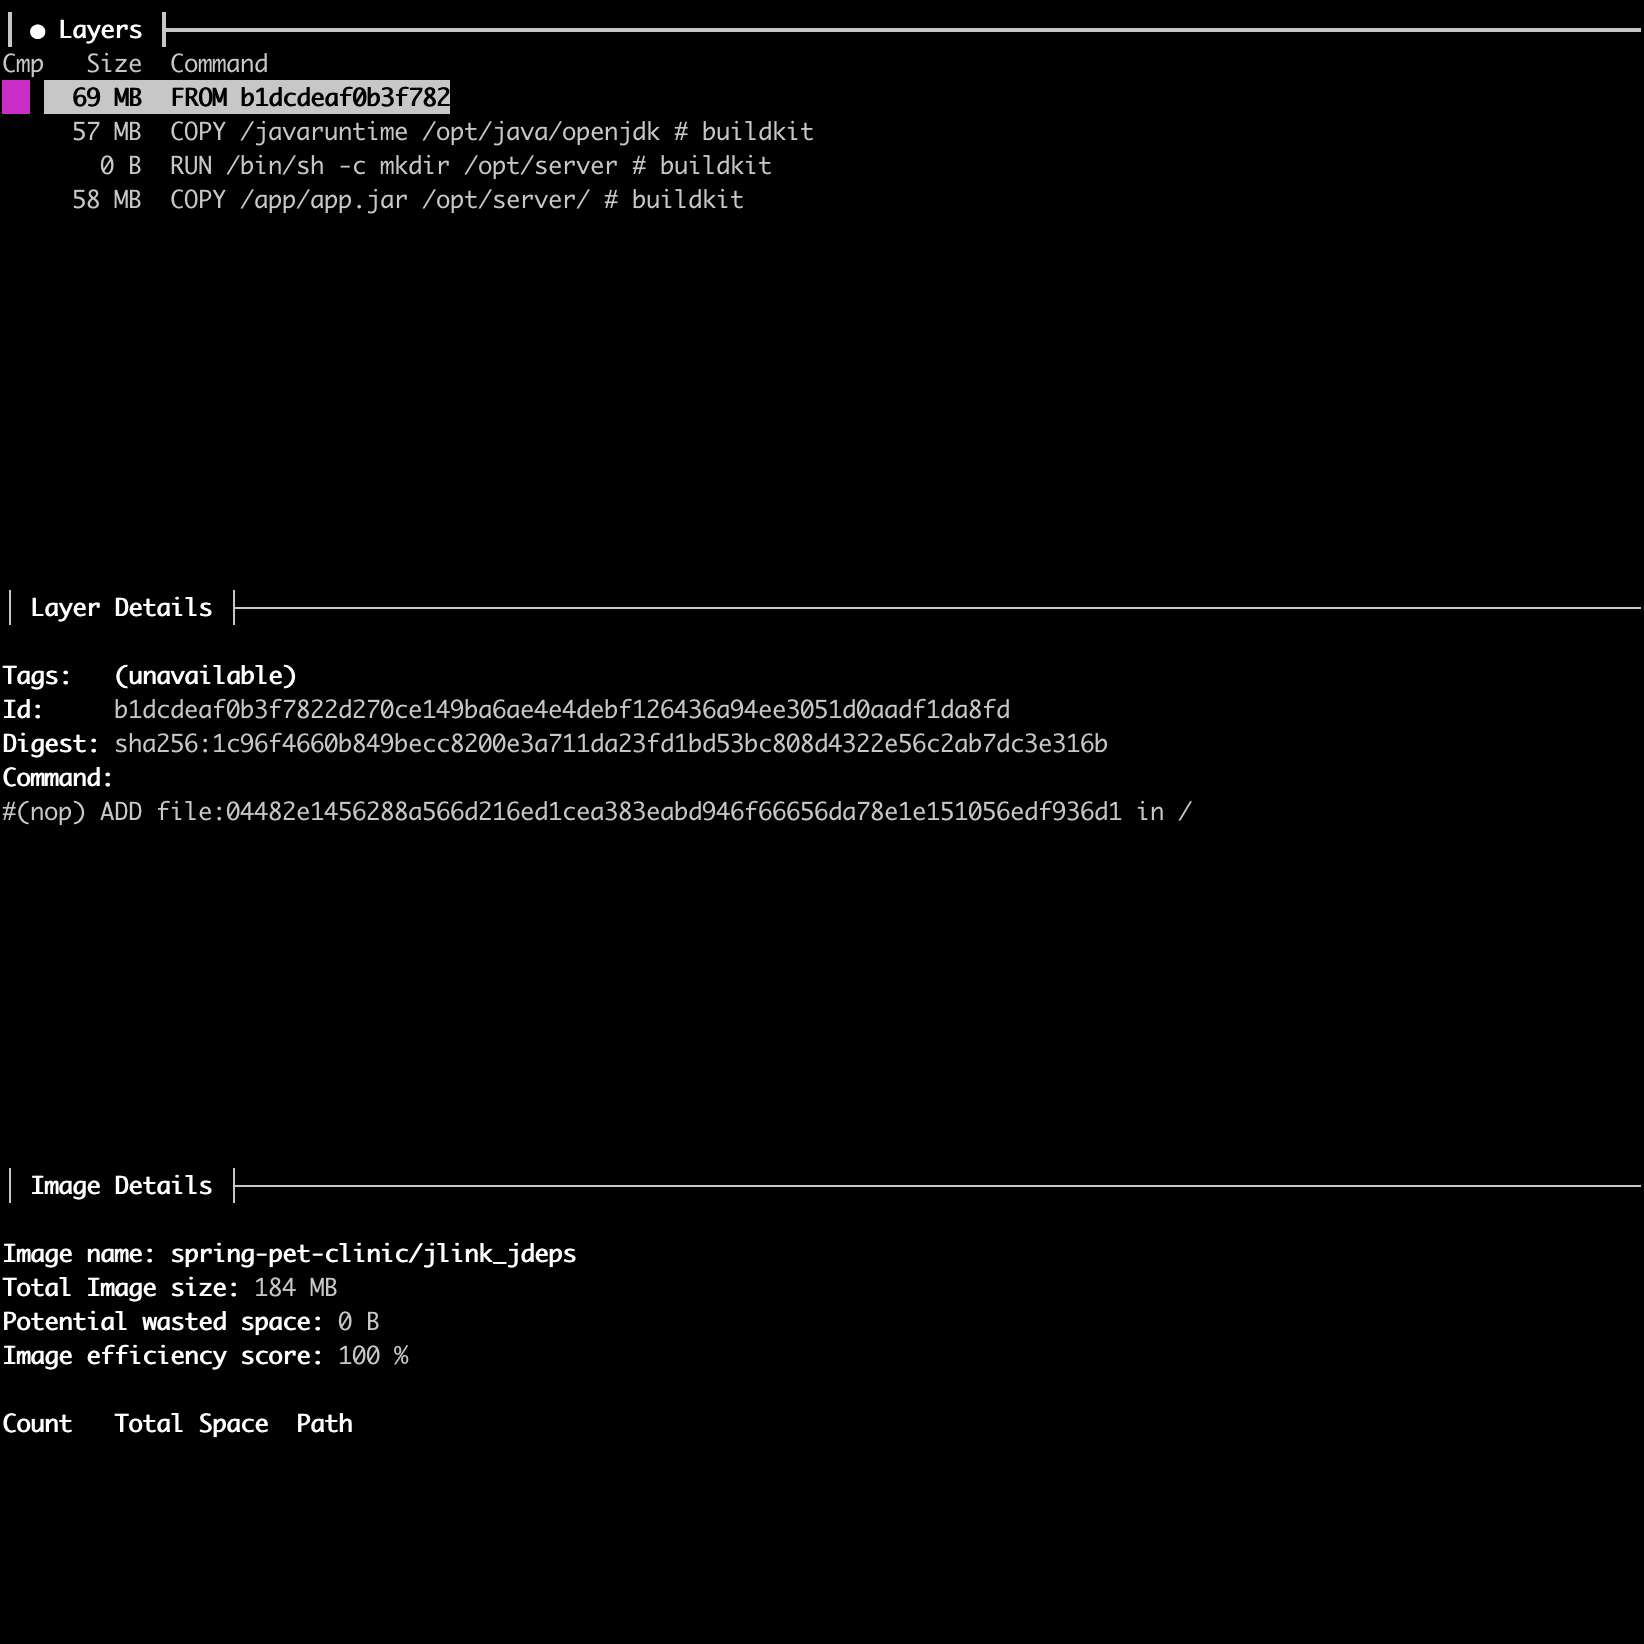
Dockerfile_jdeps
In conclusion, reducing the size of JVM Docker images can significantly optimize resource usage and speed up deployments. Employing techniques like multi-stage builds, jlink, jdeps, and experimenting with base images can make a substantial difference. While the size reduction might seem minimal in some cases, the cumulative effect can be significant, especially in environments where multiple containers are running. Thus, optimizing Docker images should be a key consideration in any application development and deployment process.
We Provide consulting, implementation, and management services on DevOps, DevSecOps, DataOps, Cloud, Automated Ops, Microservices, Infrastructure, and Security
Services offered by us: https://www.zippyops.com/services
Our Products: https://www.zippyops.com/products
Our Solutions: https://www.zippyops.com/solutions
For Demo, videos check out YouTube Playlist: https://www.youtube.com/watch?v=4FYvPooN_Tg&list=PLCJ3JpanNyCfXlHahZhYgJH9-rV6ouPro
If this seems interesting, please email us at [email protected] for a call.
Recent Comments
No comments
Leave a Comment
We will be happy to hear what you think about this post