Kubernetes Services Explained
A rundown of NodePorts, LoadBalancers, Ingresses, and more in Kubernetes!
Kubernetes networking principles are really confusing, especially if you’re a beginner.
Regardless of how well I followed the official documentation, I honestly didn’t understand a single damn thing!
After watching some tutorials on YouTube, I was able to write and duplicate the tutorials, but a core understanding of Kubernetes networking concepts was still missing.
This blog post is my take on explaining Kubernetes networking concepts in depth and answering the following questions, which always confused me:
- How does a Kubernetes networking resource solve the Service Discovery problem in Kubernetes?
- Does a LoadBalancer service really provision a load balancer automatically? What will happen if I create this service locally?
- How does a production-ready Kubernetes cluster expose its applications?
- What is the difference between an Ingress and an Ingress controller?
- and more…
Let’s Get Started
Throughout the entire blog post, we will assume the following.
- You have familiarity with the structure of Kubernetes YAML resource definition.
- You have deployed an imaginary Kubernetes cluster on the cloud across three VMs. The VMs/nodes have the following Public IP addresses
- Node A (192.168.0.1)
- Node B (192.168.0.2)
- Node C (192.168.0.3)
- A microservices application having four services is deployed on that K8s cluster. The application is deployed in such a way that each VM has at least one replica of that service running
- Products
- Reviews
- Details
- Ratings
- Notations
-
$Reviews_A$
denotes that the
Reviewsservice is running on node A - K8s denotes Kubernetes
- LBs denotes Load Balancers

Example Pod IP
K8s pods are short-lived/ephemeral.
So if a pod dies for any reason, K8s will automatically restart the pod, but the IP address assigned to that pod also changes. This in turn will lead to communication failure between the $Products_A$ and $Reviews_A$ microservice, as the IP address of $Reviews_A$ service is hardcoded in the configuration file of $Products_A$ service. This is problematic!
Wouldn’t it be great if somehow a static IP address or a DNS name was assigned to the Pod? This will solve our problem.
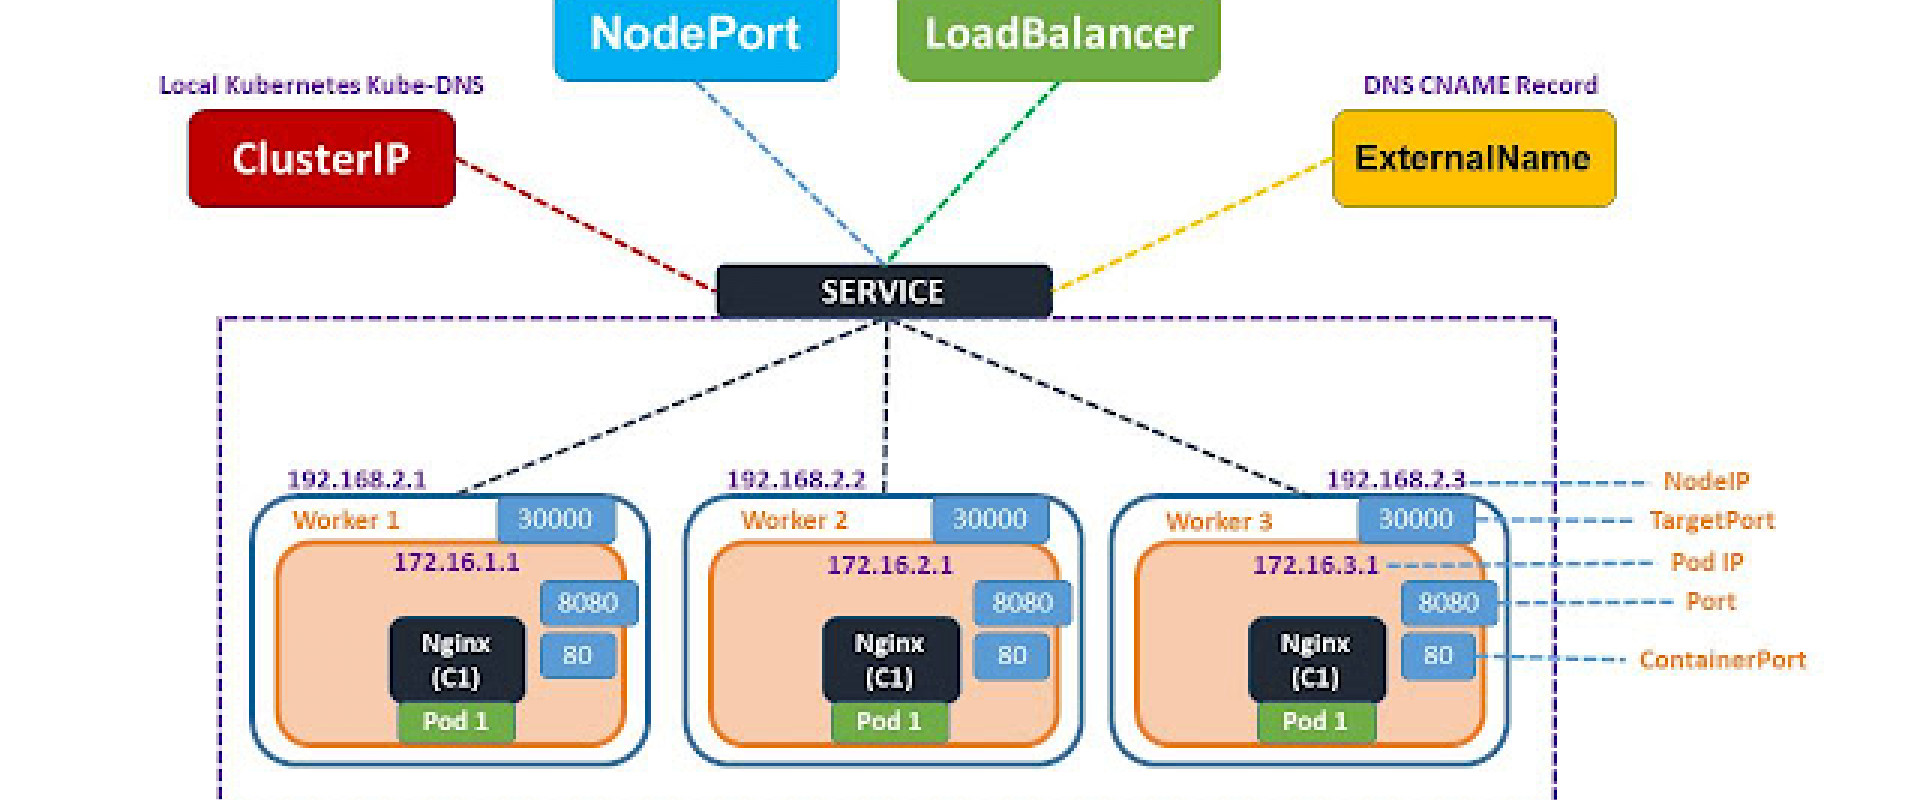
That’s where the Service resource of K8s comes to the rescue. I know the name Service sounds deceiving. A Service resource doesn’t run our containers. It merely provides and maintains a network identity for our Pod resource.
This Service network identity provides both a static IP address and a DNS name. We just need to specify the ports on which the incoming request will be received and the port of the pod on which the request has to be sent.
Services listen on a static address that doesn’t change and forwards the request to the unreliable container address. It internally keeps a map that always contains the latest IP address of the Pod. So, whenever a Pod restarts, it updates that map automatically so you get a seamless connection.
Another benefit of using services is load balancing between replicas of the same application. With our imaginary application, because there are three instances of each microservice running on separate VMs, a service will load balance the request between the replicas of $Products_A$ $Proudcts_B$ $Products_C$.
<!--[if mso & !supportInlineShapes & supportFields]>
Load Balancing between Pods in K8s using Service Resource
Until now, we have understood what are services and why are they needed. Let’s check out the different services that K8s offers and their use cases.
How Do I make $Products_A$ Service Talk to $Reviews_A$ service?
ClusterIP Service to the Rescue
The following YAML defines a service of type ClusterIP
The important fields in this YAML are
-
targetPort: denotes the container port on which the request has to be forwarded -
port: denotes the port on which the service accepts incoming requests -
selector: used for associating/attaching a K8s Service resource to a K8s Pod resource. This is done by matching labels (key-value pairs) of the pod with selectors labels specified in the selector section.
Selector labels must match to attach a service to a pod.
The command below shows you the static IP address of the service which can be used by other Pods:

You can use the above IP address for communication between the $Products_A$ and $Reviews_A$ microservices.
There are two way to communicate using DNS.
- Pods residing in the same K8s Namespace can use the name of the service for DNS resolution
-
Example
→
http://reviews:5000 -
Pods
residing in other namespaces can use the following DNS notation →
. .svc.cluster.local -
Let’s
say $Products$ Pod resides in the products namespace and the $Reviews$ pod
resides in reviews
namespace. For the $Products$ pod to communicate with the
$Reviews$ pod, you would use the following DNS →
http://reviews.reviews.svc.cluster.local:5000
Now you can pass these addresses to your microservice for communication.
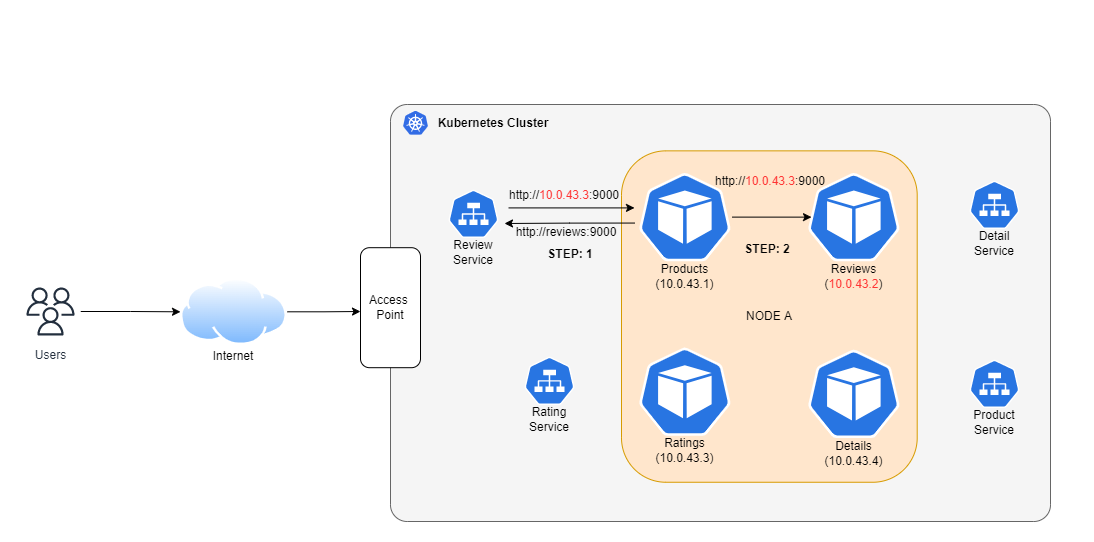
Internal Communication Using Cluster IP Service
Until now, we've understood how applications inside the K8s cluster talk to each other, but you made your application to be consumed by users on the internet. Let’s check out how it is done.
How Do I Expose $Products_A$ Service Over the Internet?
Every application that is deployed in K8s by default cannot be accessed over the network/internet. They need to be exposed Via a Service. K8s provides two Services to do just that:
NodePort Service
The following YAML can be used to create a NodePort service:
The above YAML definition is very similar to the ClusterIP
Service definition. The only field that has changed is the type field
from ClusterIP to NodePort. When you create a NodePort
service, K8s will randomly select any available port on the node/VM
between 30000 - 32767 and listen on it for incoming
requests.
You can specify the NodePort field yourself in the service definition, but you have to deal with the hassle of checking if the port is available on every node.
After creating the service, to get the port on which this NodePort service is listening for requests, use the command:
Shell
kubectl get service

In our imaginary K8s cluster, this will happen on all the nodes:
- Node A (192.168.0.1:30519)
- Node B (192.168.0.2:30519)
- Node C (192.168.0.3:30519)
You can access your application using the address nodeIP:30519. For Node A, it would be 192.168.0.1:30519.
<!--[if mso & !supportInlineShapes & supportFields]>
Exposing Application Using Nodeport Service
But this is not practical. Users of your application won’t
remember your IP address and port for accessing your app. They need a domain
name like myapp.com to
access your app. We solve this by putting an external load balancer in front of
our VMs. The load balancer's public IP is mapped to myapp.com, so when you type
myapp.com in a browser, it resolves to load balancer's IP. Then, the load
balancer forwards these requests to any of our three nodes according to an
algorithm configured in the load balancer.
K8s provides another service to expose your application called the LoadBalancer service.
LoadBalancer
The following YAML can be used a create a LoadBalancer service:
The above YAML definition is very similar to the ClusterIP
Service definition. The only field that has changed is the type field
from ClusterIP to LoadBalancer.
The LoadBalancer service is an abstraction over the NodePort service. What’s special about this service is that, if you are using a managed Kubernetes service like EKS(AWS), GKS(GCP), AKS(Azure), or any other cloud provider, it provisions a load balancer by itself so that you don’t have the hassle setting up a load balancer yourself.
After creating the service, to get the public IP address of the load balancer provisioned by this service, use the command:
Shell
1
kubectl get service

But what happens if you create a LoadBalancer service on your local K8s cluster or configured your own K8s from scratch in the cloud?
The answer is: It won’t do anything. You will see a
One thing to note here: The LoadBalancer service doesn’t expose any ports by itself like the NodePort service.
LoadBalancer is a superset of NodePort, which is a superset of the clusterIP service, which means that, when you create a service of type NodePort, a ClusterIP service also gets created implicitly. So if you create a NodePort service for a $Products$ microservice, then this same service can be used for both internal communications by other pods and accessing the $Products$ service on the internet.
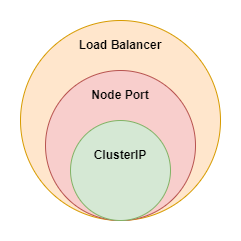
Service Superset
What Should We Use NodePort or LoadBalancer Service?
If you read carefully, you will observe there is not much difference between the NodePort and LoadBalancer service, except for some automation being done in the latter one.
Using a LoadBalancer service takes away the trivial task of configuring and provisioning LBs. Meanwhile, using a NodePort gives you the freedom to set up your own load-balancing solution, such that configuring environments that are not fully supported by Kubernetes, or even exposing one or more nodes’ IPs directly.
So it depends upon the situation you are in, but the general rule of thumb is to try to use the LoadBalancer service first, but if it doesn’t work for your environment, go for the NodePort service
That is it, these two services are used to expose your application outside of the cluster. But there is a slight problem.
If you want to expose more than one application, you end up creating multiple NodePort / LoadBalancer Services. This gets the job done but you have to face some consequences because with each NodePort service you need to deal with the hassle of manually managing the IPs and ports. And with each LoadBalancer service, you go on increasing your cloud bill.
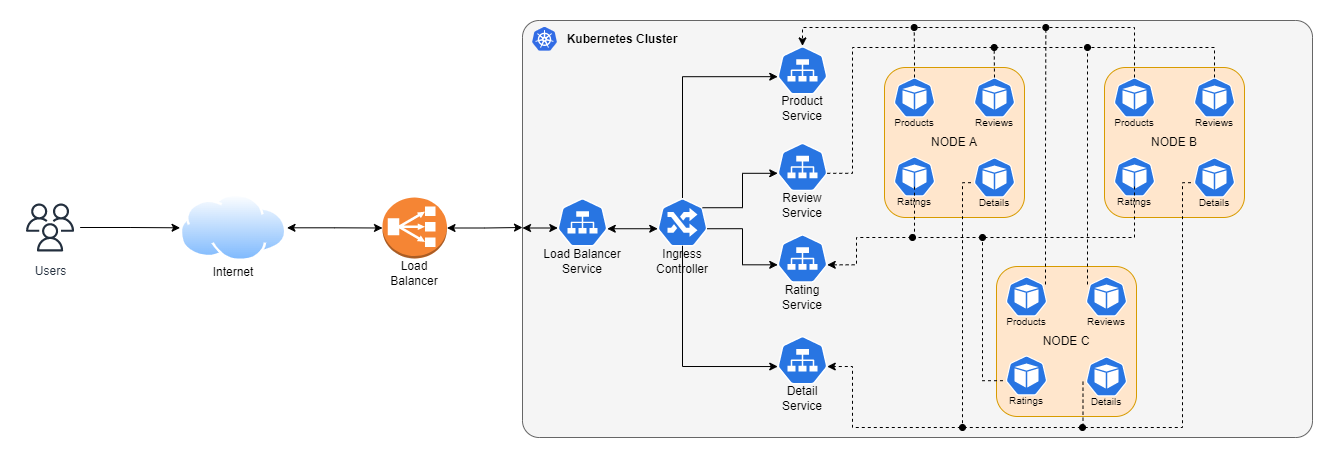
No worries, K8s has addressed this issue with the use of Ingress and Ingress controllers.
How to Expose Multiple Applications Without Creating Multiple Services
Ingress and Ingress Controller
Ingress and Ingress controllers are two different things.
An Ingress controller is just another K8s deployment resource (an app running in a container), but what is special about this deployment is that it provides a single point of control for all incoming traffic into the Kubernetes cluster.
Think of the Ingress controller as a smart proxy running in K8s and Ingress as a K8s resource that configures the routing logic of the Ingress controller. For people who have worked with Nginx, the Nginx webserver would be your Ingress controller, and the nginx.conf file would be your Ingress resource.
With these, you can specify what request needs to be routed to which service in your K8s cluster on the basis of any request parameter, like host, URL path, subdomain, etc.
The following YAML can be used to create an Ingress resource:
With the above YAML, we have exposed two services. If a request
comes from products.myapp.com and
the request path starts with /proudcts, we send it
to our products-app K8s Service, which in
turn forwards the request to our container.
Similarly, if a request comes from ratings.bar.com it is
forwarded to ratings-app
Ingress YAML Explanation
The important fields in these YAML are:
-
ingressClassName: Usually, there is only one ingress controller in the cluster, but no one is stopping you from creating many. This field is used for the selection of ingress controller, similar to the selector field of services -
service: denotes the name of the service on which the request has to be forwarded
An ingress resource should be created in the same namespace
where the corresponding K8s Service resides,
but an ingress controller can be placed in any namespace. It will automatically
detect Ingresess defined in other namespaces on the basis of ingressClassName.
An important thing to remember is that an Ingress by itself doesn’t expose any port. In the end, it’s just a K8s deployment resource. You need a service(NodePort/LoadBalancer) in front of it to expose it.
Exposing Application Using Load Balancer Service
Conclusion
Congratulations on sticking around until the end. Let’s summarize what we have learned so far. Kubernetes gives us three types of Service Resource Object
- Cluster IP Service→
- Used for internal communication among workloads and handles Service Discovery.
- NodePort Service→
- Used for exposing applications over the internet, mostly used in development environments
- LoadBalancer Service→
- Used for exposing applications over the internet
- Provision actual load balancer on the cloud, on supported cloud platforms
- Ingress Resource→
- Used for controlling incoming traffic in the Kubernetes cluster
- Various implementations are available each with its pros and cons
That’s it for this blog post.
We Provide consulting, implementation, and management services on DevOps, DevSecOps, Cloud, Automated Ops, Microservices, Infrastructure, and Security
Services offered by us: https://www.zippyops.com/services
Our Products: https://www.zippyops.com/products
Our Solutions: https://www.zippyops.com/solutions
For Demo, videos check out YouTube Playlist: https://www.youtube.com/watch?v=4FYvPooN_Tg&list=PLCJ3JpanNyCfXlHahZhYgJH9-rV6ouPro
If this seems interesting, please email us at [email protected] for a call.
Relevant Blogs:
The Top Elastic Beanstalk Alternatives for Startups in 2022
Architectural Patterns for Microservices With Kubernetes
Searchable Pod Logs on Kubernetes in Minutes
O11y Guide: Keeping Your Cloud-Native Observability Options Open
Recent Comments
No comments
Leave a Comment
We will be happy to hear what you think about this post