Understanding Multi-Arch Containers, Benefits, and CI/CD Integration

We'll cover multi-architecture container images, how to create and promote them and share an example code for building one in a CI/CD pipeline.
Have you ever seen the “exec /docker-entrypoint.sh: exec format error” error
message on your server while running any docker image or Kubernetes pods? This
is most probably because you are running some other CPU architecture container
image on your server, or did you ever use --platform
linux/x86_64 option on your Apple silicon M1, M2 MacBook? If yes, then
you are not
getting the native performance of Apple silicon, and it may
be draining your MacBook battery. To avoid this kind of error and performance
issue, we need to run the correct multi-arch container image, or we may need to
build our own image because all container public image does not have the multi-arch
image available.
In this blog post, we will learn what are multi-arch container images. How does it work? How to build and promote them? and we will write a sample code for building a multi-arch image in the CI/CD pipeline.
What Is a Multi-Arch Container Image?
A multi-arch Docker image is a list of images that has references to binaries and libraries compiled for multiple CPU architectures. This type of image is useful when we need to run the same application on different CPU architectures (ARM, x86, RISC-V, etc) without creating separate images for each architecture.
Multi-Arch Container Use Cases
- Performance and Cost Optimization: Container multi-arch is used to optimize performance on different CPU architectures. By building and deploying images that are optimized for a specific architecture, we can achieve better performance and reduce resource usage. Using Karpenter, we can easily deploy our workload to arm64 and get the benefit of AWS Graviton’s performance and cost savings.
- Cross-Platform Development: If you are developing an application that needs to run on multiple platforms, such as ARM and x86, you can use buildx to build multi-arch Docker images and test the application on different architectures.
- IoT Devices: Many IoT/Edge devices use ARM processors, which require different binaries and libraries than x86 processors. With multi-arch images, you can create an image that can run on ARM, x86, and RISCV devices, making it easier to deploy your application to a wide range of IoT devices.
Benefits of Using Multi-Arch Container Image
Several advantages of using multi-arch container images are:
- Ability to run Docker images on multiple CPU architectures.
- Enables us to choose eco-friendly CPU architecture.
- Seamless migration from one architecture to another.
- Better performance and cost saving using arm64.
- Ability to support more cores per CPU using arm64.
How To Build Multi-Arch Container Image?
There are multiple ways to build a multi-arch container, but we will be focusing on widely used and easy methods.
- Traditional Docker build command.
- Using Docker buildx
Using Traditional Docker Build Command
In this tutorial, we will manually build both images on different CPU architecture machines and push them to the container registry (e.g., Dockerhub) and then create the manifest file, which has both image references. A manifest file is a simple JSON file containing the index of container images and their metadata like the size of the image, sha256 digest, OS, etc. We will see more about the manifest file later in this blog.
For example, this is our basic Dockerfile.
HTML
FROM nginx
RUN echo “Hello multiarch” > /usr/share/nginx/html/index.html
HTML
########## on amd64 machine ##########
docker build -t username/custom-nginx:v1-amd64 .
docker push username/custom-nginx:v1-amd64
########## on arm64 machine ##########
docker build -t username/custom-nginx:v1-arm64 .
docker push username/custom-nginx:v1-arm64
########## Create a manifest index file ##########
docker manifest create \
username/custom-nginx:v1 \
username/custom-nginx:v1-amd64 \
username/custom-nginx:v1-arm64
########## Push manifest index file ##########
docker manifest push username/custom-nginx:v1
Using Docker Buildx
With buildx, we just need to run one single command with parameterized architecture.
HTML
docker buildx build \
--push \
--platform linux/arm64,linux/amd64 \
-t username/custom-nginx:v1 .
In the background, the Docker
buildx command uses buildkit, so when we run the above command, it creates one
container with moby/buildkitd image,
which has QEMU
binary for multiple CPU
architectures, which are responsible for the emulating CPU instruction sets. We
can view these QEMU binaries by running ls
/usr/bin/buildkit-qemu-* inside the
running buildkit container.
In the above command, we
passed --platform linux/arm64,linux/amd64 so it uses the /usr/bin/buildkit-qemu-aarch64 QEMU binary for building linux/arm64 image and linux/amd64
are natively built on the host machine. Once both images are built, then it
uses the --push option to create the manifest file and pushes both images
to the registry server with the manifest file.
By inspecting the manifest file,
we can see “Ref” contains the actual image link, which
will be fetched when platform[0].architecture matches the host system architecture.
HTML
$ docker manifest inspect -v nginx
[
{
"Ref": "docker.io/library/nginx:latest@sha256:bfb112db4075460ec042ce13e0b9c3ebd982f93ae0be155496d050bb70006750",
"Descriptor": {
"mediaType": "application/vnd.docker.distribution.manifest.v2+json",
"digest": "sha256:bfb112db4075460ec042ce13e0b9c3ebd982f93ae0be155496d050bb70006750",
"size": 1570,
"platform": {
"architecture": "amd64",
"os": "linux"
}
},
"SchemaV2Manifest": {
"schemaVersion": 2,
"mediaType": "application/vnd.docker.distribution.manifest.v2+json",
"config": {
"mediaType": "application/vnd.docker.container.image.v1+json",
"size": 7916,
"digest": "sha256:080ed0ed8312deca92e9a769b518cdfa20f5278359bd156f3469dd8fa532db6b"
},
….
{
"Ref": "docker.io/library/nginx:latest@sha256:3be40d1de9db30fdd9004193c2b3af9d31e4a09f43b88f52f1f67860f7db4cb2",
"Descriptor": {
"mediaType": "application/vnd.docker.distribution.manifest.v2+json",
"digest": "sha256:3be40d1de9db30fdd9004193c2b3af9d31e4a09f43b88f52f1f67860f7db4cb2",
"size": 1570,
"platform": {
"architecture": "arm64",
"os": "linux",
"variant": "v8"
}
},
"SchemaV2Manifest": {
"schemaVersion": 2,
"mediaType": "application/vnd.docker.distribution.manifest.v2+json",
"config": {
"mediaType": "application/vnd.docker.container.image.v1+json",
"size": 7932,
"digest": "sha256:f71a4866129b6332cfd0dddb38f2fec26a5a125ebb0adde99fbaa4cb87149ead"
}
We can also use buildx imagetools command to view the same output in a more human-readable format.
HTML
$ docker buildx imagetools inspect sonarqube:10.0.0-community
Name: docker.io/library/sonarqube:10.0.0-community
MediaType: application/vnd.docker.distribution.manifest.list.v2+json
Digest: sha256:51588fac6153b949af07660decfe20b5754da9fd12c82db5d95a0900b6024196
Manifests:
Name: docker.io/library/sonarqube:10.0.0-community@sha256:8b536568cd64faf15e1e5be916cf21506df70e2177061edfedfd22f255a7b1a0
MediaType: application/vnd.docker.distribution.manifest.v2+json
Platform: linux/amd64
Name: docker.io/library/sonarqube:10.0.0-community@sha256:2163e9563bbba2eba30abef8c25e68da4eb20e6e0bb3e6ecc902a150321fae6b
MediaType: application/vnd.docker.distribution.manifest.v2+json
Platform: linux/arm64/v8
If you are having any issues building multi-arch images, you can run the following command to reset the /proc/sys/fs/binfmt_misc entries.
HTML
docker run --rm --privileged multiarch/qemu-user-static --reset -p yes
We can also build multi-arch container images using Buildah as well.
How Do Multi-Arch Container Images Work?
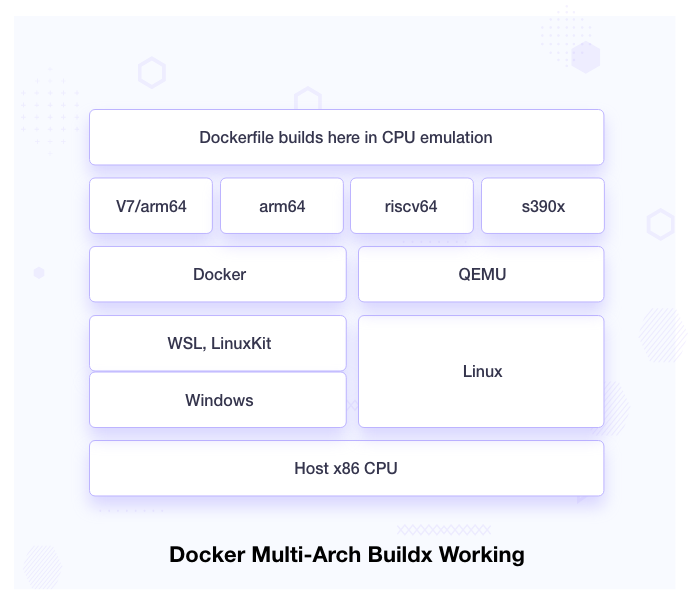
As we can see in the diagram, the host machine has x86/amd64 CPU architecture, and on top of that, we install operating systems which can be Windows or Linux. Windows requires WSL or LinuxKit to run Docker. It uses QEMU to emulate multiple CPU architectures, and Dockerfile builds run inside this emulation.

When we run the docker pull or build command, it fetches the requested manifest file from the registry server. These manifest files are JSON file that can have one Docker image reference or contains more than one image list. It fetches the correct image depending on the host machine’s CPU architecture.
How To Integrate Multi-Arch Container Build With CI/CD?
If your workload runs on multiple machines with different CPU architectures, it is always better to build multi-arch Docker images for your application. Integrating multi-arch build into CI/CD streamlines the image build and scan process easier, adds only one Docker tag, and saves time. Below we have written Jenkins and GitHub CI sample code for building multi-arch images.
Jenkins Multi-Arch CI
Currently, the Jenkins Docker plugin does not support multi-arch building, so we can use buildx to build multi-arch images.
HTML
pipeline
{
agent {
label 'worker1'
}
options{
timestamps()
timeout(time: 30, unit: 'MINUTES')
buildDiscarder(logRotator(numToKeepStr: '10'))
}
environment {
DOCKER_REGISTRY_PATH = "https://registry.example.com"
DOCKER_TAG = "v1"
}
stages
{
stage('build-and-push')
{
steps{
script{
docker.withRegistry(DOCKER_REGISTRY_PATH, ecrcred_dev){
sh '''
####### check multiarch env ###########
export DOCKER_BUILDKIT=1
if [[ $(docker buildx inspect --bootstrap | head -n 2 | grep Name | awk -F" " '{print $NF}') != "multiarch" ]]
then
docker buildx rm multiarch | exit 0
docker buildx create --name multiarch --use
docker buildx inspect --bootstrap
fi
####### Push multiarch ###########
docker buildx build --push --platform linux/arm64,linux/amd64 -t "$DOCKER_REGISTRY_PATH"/username/custom-nginx:"$DOCKER_TAG" .
'''
}
}
}
}
}
}
Otherwise, we can use the traditional Docker build command as shown above in Jenkins stages with different sets of Jenkins worker nodes.
GitHub CI Pipeline for Building Multi-Arch Container Images
GitHub Actions also supports multi-arch container images. It also uses QEMU CPU emulation in the background.
HTML
name: docker-multi-arch-push
on:
push:
branches:
- 'main'
jobs:
docker-build-push:
runs-on: ubuntu-20.04
steps:
- name: Checkout Code
uses: actions/checkout@v3
- name: Set up QEMU
uses: docker/setup-qemu-action@v2
- name: Set up Docker Buildx
uses: docker/setup-buildx-action@v2
- name: Login to docker.io container registry
uses: docker/login-action@v2
with:
username: $
password: $
- name: Build and push
id: docker_build
uses: docker/build-push-action@v3
with:
context: .
file: ./Dockerfile
platforms: linux/amd64,linux/arm64
push: true
tags: username/custom-nginx:latest
How To Promote Your Multi-Arch Image to Higher Environments?
Promoting Docker multi-arch
requires a few extra steps, as the docker pull command only pulls a single image based on the host machine’s
CPU architecture. To promote multi-arch Docker images, we need to pull all CPU
architecture images one by one by using –plarform=linux/$ARCH and then create a manifest file and push them to the new
registry server. To avoid these complex steps, we can leverage the following
tools.
Skopeo or Crane can be used to promote our multi-arch image from one account to another using just a single command. In the background, what these tools do is use Docker API to fetch all multi-arch images and then create a manifest and push all images and manifest.
HTML
$ skopeo login --username $USER docker.io
$ skopeo copy -a docker://dev-account/custom-nginx:v1 docker://prod-account/custom-nginx:v1
What if you want to use only the Docker command to promote this image to a higher environment (Production)?
HTML
####### Pull DEV images ###########
docker pull --platform=amd64 "$DOCKER_IMAGE_NAME_DEV":"$DOCKER_TAG"
docker pull --platform=arm64 "$DOCKER_IMAGE_NAME_DEV":"$DOCKER_TAG"
####### Tag DEV image with STAGE ###########
docker tag "$DOCKER_IMAGE_NAME_DEV":"$DOCKER_TAG" "$DOCKER_IMAGE_NAME_STAGE":"$DOCKER_TAG"-amd64
docker tag "$DOCKER_IMAGE_NAME_DEV":"$DOCKER_TAG" "$DOCKER_IMAGE_NAME_STAGE":"$DOCKER_TAG"-arm64
####### Push amd64 and arm64 image to STAGE ###########
docker push "$DOCKER_IMAGE_NAME_STAGE":"$DOCKER_TAG"-amd64
docker push "$DOCKER_IMAGE_NAME_STAGE":"$DOCKER_TAG"-arm64
####### Create mainfest and push to STAGE ###########
docker manifest create \ "$DOCKER_IMAGE_NAME_STAGE":"$DOCKER_TAG" \ --amend "$DOCKER_IMAGE_NAME_STAGE":"$DOCKER_TAG"-amd64 \ --amend "$DOCKER_IMAGE_NAME_STAGE":"$DOCKER_TAG"-arm64
docker manifest push "$DOCKER_IMAGE_NAME_STAGE":"$DOCKER_TAG"
How To Scan Multi-Arch Images for Vulnerabilities?
We can use any tool like Trivy, Gryp, or Docker
scan for image scanning, but we
have to pull multi-arch images one by one and then scan them because, by
default, the Docker pull command will only fetch the one image that matches
with the Host CPU. We can leverage the Docker pull command with --platform={amd64,
arm64} to pull different CPU arch
images. Here is how we can do that:
HTML
####### Pull amd64 image and scan ###########
docker pull --platform=amd64 nginx:latest trivy image nginx:latest
####### Pull arm64 image and scan ###########
docker pull --platform=arm64 nginx:latest trivy image nginx:latest
Some Caveats of Using Multi-Arch Container
There are prominent benefits of using multi-arch containers, but there are some caveats that you should certainly be aware of before taking the leap.
- It takes extra storage for storing other arch images.
- Takes time to build the multi-arch container image also, while building the arm64 on QEMU emulation consumes lots of time and resources.
- Performance is significantly slower with emulation to run binaries on different CPUs compared to running the binaries natively.
- There are still some issues with buildx building arm64 images, like the base image not being available in arm64 and also performing sudo level access or building cross-compile statically linked binary requires an extra step.
- Need container scanning for all images one by one.
- Buildx multi-arch builds are only supported on amd64 CPU architecture.
Conclusion
In this blog, we saw what are multi-arch containers and their use cases. We integrated a multi-arch build with Jenkins and Github CI with sample code and provides you the several ways to promote and scan multi-arch container images, and finally, we learned the caveats of using multi-arch containers.
Using multi-arch images gives us the ability to build once and run everywhere. We can seamlessly migrate from one CPU arch to another CPU with ease. Also, by deploying images that are optimized for specific architectures, we can achieve better performance and reduce resource costs.
We Provide consulting, implementation, and management services on DevOps, DevSecOps, DataOps, Cloud, Automated Ops, Microservices, Infrastructure, and Security
Services offered by us: https://www.zippyops.com/services
Our Products: https://www.zippyops.com/products
Our Solutions: https://www.zippyops.com/solutions
For Demo, videos check out YouTube Playlist: https://www.youtube.com/watch?v=4FYvPooN_Tg&list=PLCJ3JpanNyCfXlHahZhYgJH9-rV6ouPro
If this seems interesting, please email us at [email protected] for a call.
Relevant Blogs:
Recent Comments
No comments
Leave a Comment
We will be happy to hear what you think about this post